Heavenly Popovers: Light & Airy Delights in Just 50 Minutes!
The Magic of Popovers: An Easy Delight in 50 Minutes
Have you ever stumbled upon a recipe that totally changed your breakfast game? well, that was me and my discovery of popovers.
I remember the first time i pulled out a tray of puffy, airy popovers from the oven. the way they just seemed to defy gravity; i mean, honestly, i couldn't believe i’d made something so impressive.
It was one of those “wow, i actually did that” moments. if you’re like me, looking to impress your family or just treat yourself, then you’re in for a treat.
Today, we’re diving into how to bake popovers: light & airy treats in 50 min .
What’s the Deal with Popovers?
Let’s rewind for a second. popovers have a bit of a history to them and are rooted in american cooking with a flirtation with french pastry science.
Yep, they’re originally inspired by the classic pâte à choux used in things like éclairs. nowadays, they’re a popular staple, even showing up at brunches across the country.
Now, if you’re worried about time, popovers are your best friend. you can whip these up in no time. we're talking about a prep time of 10 minutes and just 30 minutes in the oven .
Total? 40 minutes. easy peasy! plus, they yield about 12 fluffy popovers perfect for sharing, or you know, not sharing.
Your call.
Why Bake Popovers?
You might ask, why should i spend my precious time baking these airy delights? well, let me hit you with a few key benefits.
First off, these bad boys are light recipes packed with the kind of flavors that fit any occasion. want savory popovers ? throw in some cheese or herbs.
Craving something sweet? a hint of vanilla and sugar will have you set!
And lets not overlook the health factor here. while they’re not a full-on health food, they are certainly lighter than most breakfast treats out there.
And they’re customizable! got some leftover bits of this and that in your fridge? throw it in! think cheese popovers or even flavored popovers with your favorite spices.
Popovers shine brightest at brunch, but i’ve also served them alongside soups or simply with a dab of whipped cream and fresh berries for an afternoon snack.
Seriously, try it; they’ll take your tea time up a notch!
A Treat for Everyone
Let’s talk versatility. they aren't just for the savory lovers or sweet tooths ; popovers can easily cater to everyone! plus, they can be a great hit during special occasions like holiday brunches.
You know, when your relatives come over and you want to serve something that screams effort without being an all-day commitment.
Got kids at home? these are totally kid-friendly recipes , and honestly, they’ll have a blast making their own. plus, your kitchen will smell like a heavenly bakery, and you might get a few accolades for your “baking skills” even if it’s a simple popover recipe.
So, what do you say? ready to make some homemade delights? you don’t need any fancy tools just a basic mixing bowl and a muffin tin will do.
Trust me, once you nail this baking technique, you’ll find yourself experimenting with your own variations!
Now that we’ve got the exciting intro sorted, let’s jump into the ingredients you’ll need to bake popovers: light & airy treats in 50 min .
Grab your aprons; it’s about to get real!
The Ultimate Essential Ingredients Guide
Hey there, foodies! today, we’re diving deep into the essential ingredients guide that will set you up for success whether you're whipping up a classic popover recipe or crafting your next favorite light recipes .
Let’s break it down so you can shine in your kitchen!
Premium Core Components
First things first, we need to talk about the premium core components . The building blocks of any great dish!
Measurements: for our american crew, you’ll want to keep it simple: 1 cup of flour, 1 cup of milk, etc.
If you’re measuring in metric, that’s about 120g of flour and 240ml of milk. just grab a measuring cup and get to work!
Quality indicators: look for fresh ingredients, like eggs that are a few days old but not expired. if you're checking milk, see if it smells okay and doesn't have any funky colors.
Trust your nose!
Storage guidelines and shelf life: keep your flour in a cool, dry spot to keep it fresh. milk? well, it should be in the fridge, of course! and eggs? stick those bad boys in the carton and back in the fridge for maximum freshness.
Freshness Tips: To pick the best produce, go seasonal! Local farmer's markets are goldmines for fresh goodies.
Signature Seasoning Blend
Now, let's jazz things up with signature seasoning blends!
Essential Spice Combinations: For savory popovers , think about adding a pinch of garlic powder or paprika. They’ll amp up that flavor for sure.
Herb Selections: Fresh herbs like thyme or rosemary can be game changers. You can toss those in your batter as a fun twist!
Flavor Enhancers: If you love to experiment, add a splash of soy sauce or a drizzle of honey and see what happens.
Regional Variations: Depending on where you're cooking, you might wanna try using local spices or herbs to give your popovers a little flair.
Smart Substitutions
Ever found yourself missing an ingredient? No sweat. Here’s where smart substitutions come into play!
Common Alternatives: No whole milk? Use 2% or even almond milk; just ensure it's unsweetened.
Dietary Modifications: Going gluten-free? Swap out the all-purpose flour for a gluten-free blend, and you’ll be golden.
Emergency replacements: ran out of eggs? a flaxseed meal mixed with water can be a nifty hack. just mix 1 tablespoon of ground flaxseed with 2.
5 tablespoons of water and let it sit.
Seasonal Options: Think about seasonal fruits and veggies for your popovers! Apples in fall or fresh herbs in summer are always a treat.
Kitchen Equipment Essentials
Let’s talk gear! Kitchen equipment essentials can make or break your experience.
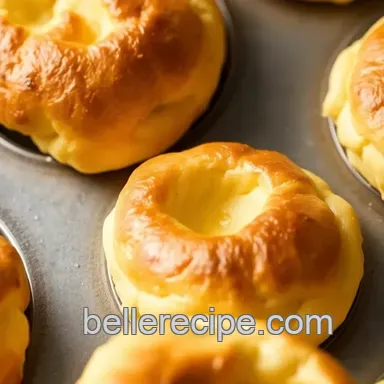
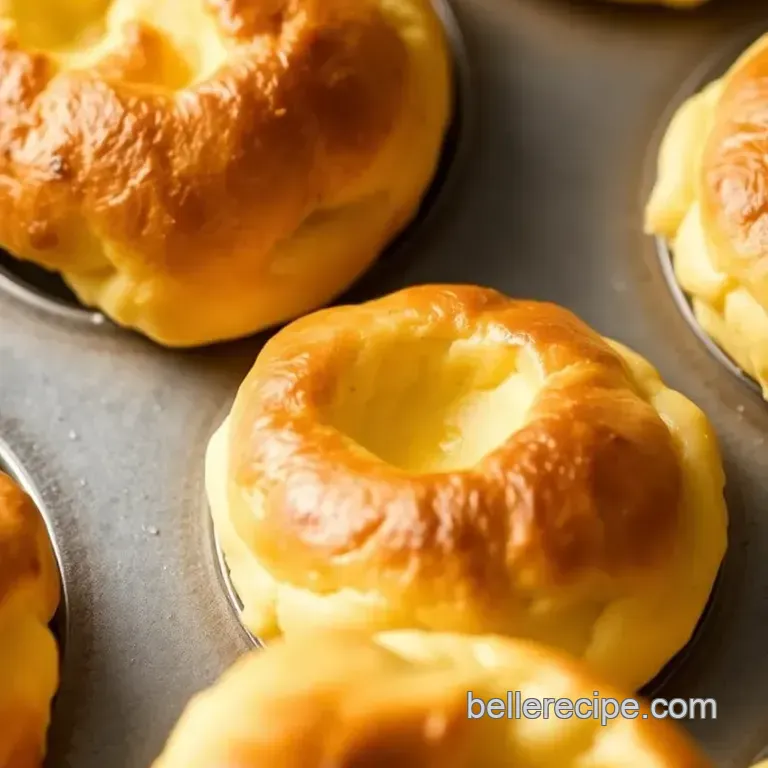
Must Have Tools: You’ll really want a 12-cup popover or muffin tin . It’s crucial for achieving those fluffy popovers . Seriously, they're the star of the show!
Alternative Equipment: If you don’t have a popover pan, no worries! Muffin tins will do the trick. Just be aware your popovers might not be as tall.
Preparation Tips: When you’re all set to bake, grease your tin with melted butter well. Trust me; it’ll help your popovers slide right out!
Storage Solutions: To save room, stack your mixing bowls when not in use. Pro tip: use those nested bowls for everything from making batter to holding all your tasty toppings!
So there you have it! the essentials that will help you create delicious oven baked snacks like heavenly popovers: light & airy treats in 50 minutes .
In a moment, we’ll jump into the easy step-by-step instructions. get ready to impress your friends and family with those delicious brunch ideas !
Get Ready to Bake Popovers: Light & Airy Treats in 50 Min
Alright, friends, today we're diving into the wonderful world of popovers those fluffy little delights that can take any meal from meh to magical! if you’ve never tried them, you’re in for a treat.
They're like a french pastry adopted by americans that will make your brunch table shine. picture this: crisp on the outside, soft on the inside, and oh-so-versatile.
You can go savory with cheese popovers or sweet with a drizzle of honey. let’s get you started!
Essential Preparation Steps
Before we jump into the fun, let’s chat about getting our ducks in a row. first up, mise en place a fancy french term for having everything ready to go.
Trust me; this will save you time and stress. grab all your ingredients: 1 cup of flour , 3 eggs , 1 cup of milk , melted butter , and salt.
Time management is key here. preheat your oven to 450° f ( 232° c) while you prep. getting that temperature right ensures a good puff! also, have your muffin tin greased and ready with melted butter.
Organizing your space is super important! i like to clean as i go, so keep a towel nearby for spills.
And don’t forget safety! make sure you wear oven mitts when you’re handling that hot tin. you don’t want to be fumbling around with burnt fingers, am i right?
Step-by-step Process
Now, let’s get to the fun part! Here’s how to bake those amazing popovers:
Preheat your oven: Go ahead, crank it up to 450° F ( 232° C) .
Prep the tin: Generously grease your popover or muffin tin with melted butter. This helps them not stick and creates a lovely crust.
Mix it up: in a big bowl, whisk together your flour and salt . in another bowl, combine your eggs and milk.
Make sure they’re at room temperature this helps them mix better. then, slowly mix that egg mixture into the dry ingredients until just combined.
You want to avoid overmixing; we’re getting airy popovers here!
Add melted butter: Stir in the 2 tablespoons of melted butter .
Fill the tins: Pour the batter into greased cups, filling them halfway.
Bake: pop those beauties in the oven. bake for 20 minutes at 450° f ( 232° c) , then lower the heat to 350° f ( 176° c) and bake for an additional 10- 15 minutes until golden brown.
Check for doneness: Tap them gently; they should sound hollow when done.
Cool: Let them cool for just a minute before digging in.
Expert Techniques
So, here’s the deal getting the perfect popover is all about those professional techniques ! Here are a few critical steps to ensure quality every time:
- Egg temperature matters: Trust me; cold eggs will mess with your rise.
- Do not open the oven door during those first 20 minutes ! That’s the moment for puff magic.
- Test with a toothpick if unsure if it comes out clean, you're golden.
Success Strategies
Now, don’t sweat it if things go sideways. We’ve all had kitchen fails (just last week, I confused baking powder with baking soda oops!). A couple of common mistakes to avoid?
- Don’t overmix your batter.
- Ensure your oven is fully preheated.
- Serve them immediately; they’re best when fresh.
For those who want to prepare ahead, bake popovers can be made in advance, frozen, and then reheated at a low temperature for about 10 minutes .
That way, you’re set for an easy snack.
Additional Information
Now that you’re armed with all the tools to bake popovers perfectly, why not experiment with flavors? try experimenting with flavored popovers like adding cheese or herbs to the batter.
They’re super versatile and can match any meal. you can enjoy them as delightful breakfast treats, airy snacks, or even as a side at dinner!
So, what are you waiting for? get into that kitchen, turn on some music, and whip up these delightful treats that will make everyone wonder if you're secretly french.
Who knew baking could be this easy and rewarding?! trust me, once you perfect the art of baking those fluffy popovers , your brunch game will never be the same!
Additional Recipe Information for Heavenly Popovers: Light & Airy Delights in Just 50 Minutes!
Alright, friends! if you’re ready to elevate your baking game, let’s dive into some pro tips and presentation secrets that’ll make your homemade popovers shine like the glorious stars they are.
Seriously, the thrill of pulling these flaky, airy treats out of the oven is a game changer. grab your ingredients, and let's get into it!
Pro Tips & Secrets
First things first, let’s talk popovers tips ! to achieve those wonderfully fluffy popovers, make sure your eggs and milk are at room temperature.
This is key, you know? cold ingredients hit that oven and flop we want them to rise to glory.
If you want to save some time, whip up the batter before meal prep. you can even mix it up the night before.
Just pop it in the fridge and take it out to get to room temp while preheating the oven. it’s a total time saver and means you can be munching on those easy snacks in no time!
For flavor enhancement, consider tossing in some cheese or fresh herbs. i’m talking cheddar and chive popovers here, people! this little addition turns a simple popover recipe into a flavor explosion.
You can thank me later.
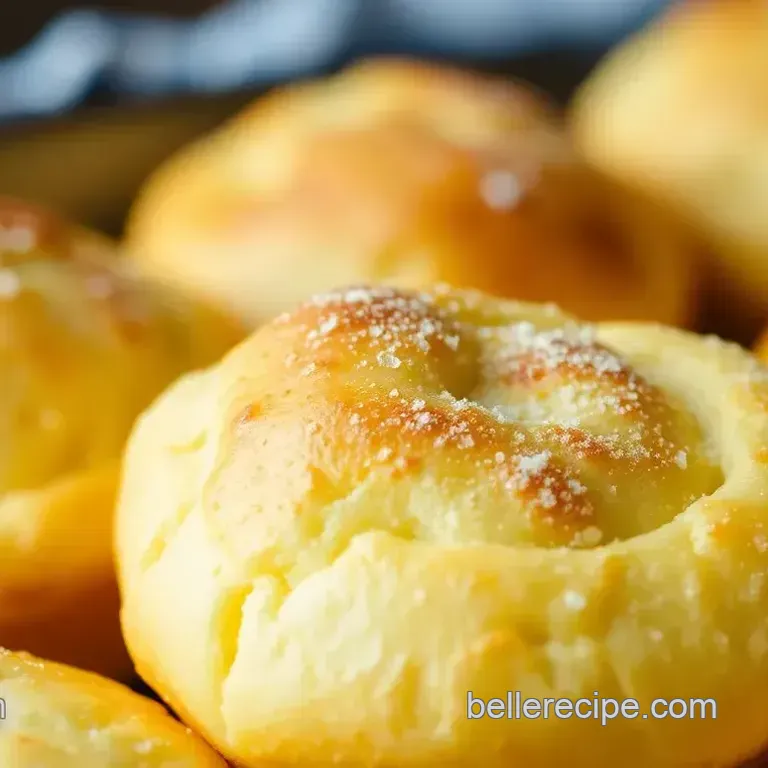
And hey, when it comes to presentation, a sprinkle of fresh herbs on top or a delectable dollop of whipped cream and berries takes your popovers from meh to magnificent ! trust me, your brunch guests will think you’re a gourmet chef.
Perfect Presentation
Now that we have the baking basics down, let’s make those popover desserts eye-catching! Use a nice muffin tin if you want that pretty shape no one likes a flat popover! When they're ready, this is where the fun starts !
Plating is important. stack a couple of your fluffy popovers on a nice plate with a luscious berry coulis drizzled around.
A pop of red against the golden brown? yes, please! don’t forget the garnish; finely chop some chives for a fresh green touch or dust with powdered sugar for sweet popovers.
It’s all about the contrast and making your dish pop !
Storage & make-ahead Tips
You might be wondering, “What if I can’t eat all these delicious delights in one sitting?” No worries! Your popovers are best served fresh, but here’s how to play it smart:
Store your popovers in an airtight container at room temperature. honestly, they will start losing their fluff after about a day.
But if you wrap them in foil and toss them in the fridge, they’ll be good for a couple more days.
Just reheat them in a 350° f ( 176° c) oven for about 10 minutes to revive their airy texture.
If you're thinking ahead, you can prepare the batter earlier in the day. just make sure to keep it covered in the fridge.
When you’re ready for some amazing oven baked snacks , pour that batter into the hot, buttered tin, and watch ‘em rise!
Creative Variations
Now, let’s get a little wild with these popovers. you can customize them for any season and any mood. feeling fruity? try making sweet vanilla popovers with a hint of nutmeg yum! or if you’re in the mood for something savory, how about spinach and feta popovers ?
Seriously, there are so many variations of popovers you can experiment with.
And if you need to cater to different dietary needs, no problem! go for gluten-free baking alternatives and create equally delicious treats everyone can enjoy.
Just swap that all-purpose flour for a gluten-free mix. even the most discerning taste buds won’t know the difference.
Complete Nutrition Guide
The best part of learning how to make popovers? they can fit into various diets! each popover has about 112 calories , but you can adjust that with different ingredients.
Add some flavored popovers for a slight indulgence while still keeping it light.
Whether you’re enjoying these for breakfast, at brunch, or as a fancy midday snack , just keep portion sizes in mind.
You’ll find popovers work great as part of a balanced meal with plenty of fresh ingredients, so go wild with how you pair them.
Wrap-Up
So there you have it, my baking buddies! with these tips and tons of ideas, you’ll be well on your way to mastering the art of how to bake popovers: light & airy treats in 50 min.
Now get those ovens roaring, and remember, it’s all about having fun in the kitchen. let those popovers rise and conquer your breakfast table, brunch spread, or cozy dinner! you’ve got this!
Frequently Asked Questions
How do I ensure my popovers rise perfectly when I Bake Popovers: Light & Airy Treats in 50 Min?
To achieve the perfect rise, ensure that both your eggs and milk are at room temperature before mixing them into the batter. Additionally, preheat your oven thoroughly to 450°F (232°C) and avoid opening the oven door during the first 20 minutes of baking, as this can cause them to deflate.
Can I make adjustments for dietary restrictions when I Bake Popovers: Light & Airy Treats in 50 Min?
Yes! You can easily adjust the recipe for dietary needs. For gluten-free popovers, substitute all-purpose flour with a gluten-free flour blend. For a dairy-free option, use unsweetened non-dairy milk and coconut oil instead of butter.
How should I store leftover popovers, and how long do they last?
Leftover popovers can be stored in an airtight container at room temperature for up to 2 days. However, for the best texture, it’s recommended to enjoy them fresh. If you need to store them longer, consider freezing them and reheating in the oven before serving.
What can I serve with my popovers for a complete meal?
They pair wonderfully with a variety of dishes! Serve them with savory soups or stews, allowing the hollow centers to soak up delicious flavors. Alternatively, for breakfast, serve popovers with whipped cream and fresh berries for a sweet treat.
Can I customize the flavor of my popovers while still following the Bake Popovers: Light & Airy Treats in 50 Min recipe?
Absolutely! You can easily customize the flavor by adding ingredients like shredded cheese, herbs, or spices directly to the batter. For a sweet variation, try incorporating vanilla extract or sugar for a delightful dessert popover.
What is the nutritional breakdown of a popover?
Each popover contains approximately 112 calories, with 3.5g of protein, 5g of fat, and 12g of carbohydrates. They are light and airy, making them a treat you can enjoy in moderation as part of your meal.
Bake Popovers Light Airy Treats In 50 Min