Hello Dolly Bars: Classic 7 Layer Magic Cookie Bars
- Time:10 minutes active + 30 minutes cooking + 2 hours chilling = 2 hours 40 minutes total
- Flavor/Texture Hook: Toasted coconut crunch meets a velvety, melt in-your mouth butterscotch center
- Perfect for: Holiday cookie platters, backyard potlucks, or a nostalgic weekend baking project
- Creating the Ultimate Hello Dolly Bars Recipe with Iconic Layers
- The One Thing That Changes Everything
- Understanding the Essential Recipe Specs for Baking Success
- Selecting the Best Ingredients for Rich and Fudgy Bars
- The Basic Kitchen Tools for Every Hello Dolly Batch
- Step by Step Instructions from Preparation to Golden Finish
- Professional Advice for Avoiding Common Messy Kitchen Disasters
- Exploring Creative Flavor Variations and Smart Dietary Swaps
- Clever Preservation Methods for Keeping Every Bite Fresh
- Simple Presentation Techniques to Make Your Dessert Shine
- Recipe FAQs
- 📝 Recipe Card
Creating the Ultimate Hello Dolly Bars Recipe with Iconic Layers
The very second you pull these from the oven, your kitchen fills with the most intoxicating scent of toasted coconut and warm butterscotch. It is a heavy, sweet aroma that reminds me of my grandmother’s kitchen during the holidays, where the air was always thick with the smell of browning butter and sugar.
I remember the first time I tried to make these; I was so impatient that I tried to slice them while they were still warm. The result was a gooey, albeit tasty, heap of melted chocolate that refused to hold its shape.
Since then, I’ve learned that the secret isn't just in the layering, but in the quiet patience of the cooling process.
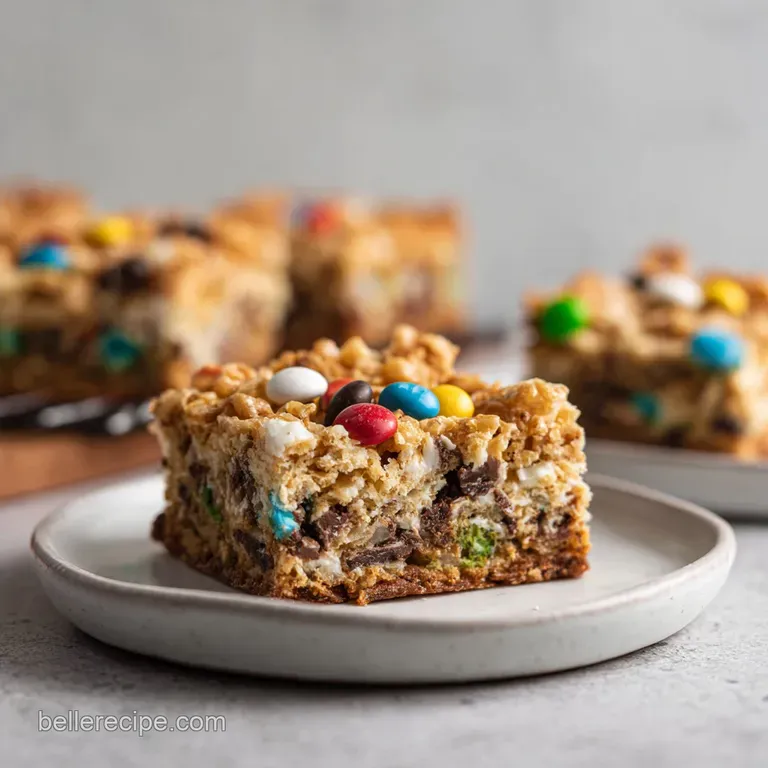
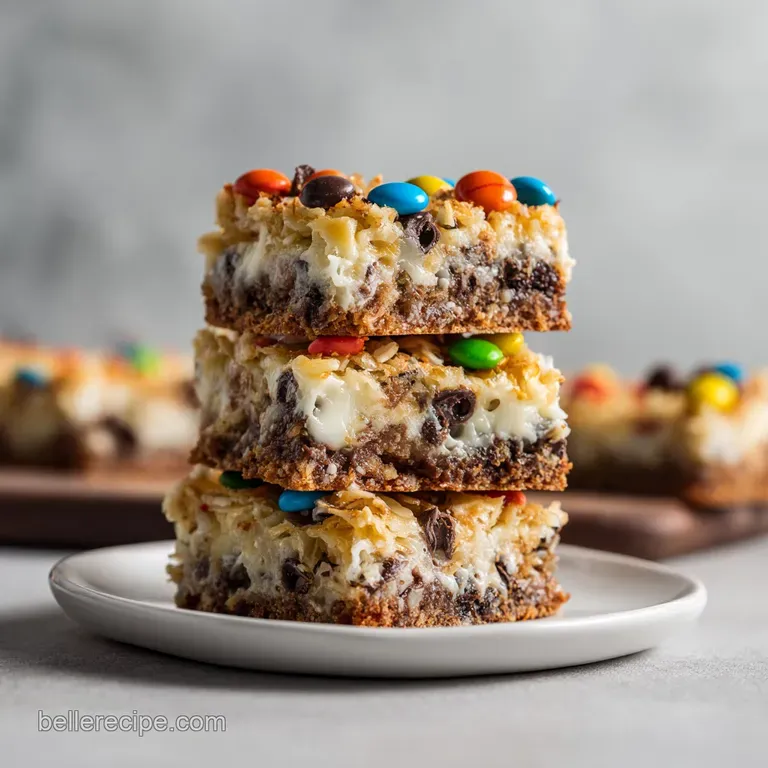
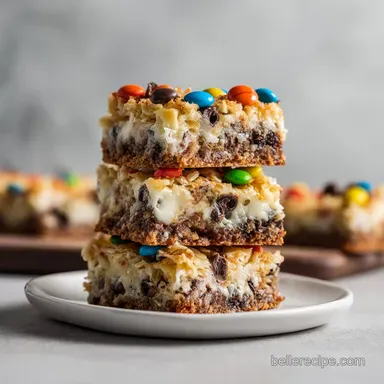
The name of Hello Dolly bars is as charming as their flavor, and supposedly the connection to the late 1969 Broadway musical helped propel this specific combination into the American dessert hall of fame. Whether you call them 7 layer bars, magic bars, or Hello Dollies, the soul of the dish remains the same. It is about that specific, "shatter crisp" graham cracker base supporting a dense, fudgy middle. We aren't just making a dessert here; we are building a structural marvel of fats and sugars that somehow stays perfectly balanced.
Every time I bring a tray of these to a friend's house, someone inevitably asks for the secret. Honestly, it’s about the order of operations. We want the coconut on top so it can catch the direct heat and turn that beautiful mahogany brown, while the chocolate and butterscotch chips sit nestled below, protected by a blanket of nuts and milk.
It’s a mindless, comforting bake that yields a result far more impressive than the effort required. Trust me, once you see that condensed milk bubbling at the edges, you'll know exactly why this remains a classic.
The One Thing That Changes Everything
While many people think this is just a "dump and bake" situation, there is actually some fascinating logic behind why these layers stay so distinct and why the texture is so specific.
- Structural Binding: The sweetened condensed milk acts as a liquid protein and sugar matrix that seeps through the layers, filling the gaps between the chips and nuts to create a solid, fudge like bond upon cooling.
- Capillary Action: As the butter in the crust melts, it creates a steam barrier that prevents the condensed milk from soaking too deeply into the graham crackers, keeping the base snappy rather than soggy.
- The Toasting Effect: Placing the coconut as the final layer allows the moisture to evaporate quickly, leading to a crisp, toasted exterior that contrasts with the jammy interior.
- Fat Saturation: The combination of fats from the butter, pecans, and milk creates a rich mouthfeel that slows down the release of sugar on your palate, making the bars taste complex rather than just sweet.
| Feature | Fresh Homebaked | Grocery Store Shortcut |
|---|---|---|
| Crust Texture | Snappy and buttery | Often soft or sandy |
| Nut Profile | Toasty and aromatic | Can taste slightly stale |
| Coconut Finish | Deeply burnished and crisp | Usually pale and chewy |
Choosing the right ingredients can make a massive difference in the final flavor profile, especially when you are looking to balance the sweetness of the chips. If you find yourself craving a similar nutty and sweet profile but with a different texture, you might also enjoy my Peanut Butter Scotcheroos.
Understanding the Essential Recipe Specs for Baking Success
To get that perfect "clean slice" look you see in professional bakeries, we need to focus on the temperature and the weight of our ingredients. Using a scale for the graham crumbs ensures your base isn't too dry (which leads to crumbling) or too greasy.
| Component | Science Role | Pro Secret |
|---|---|---|
| Condensed Milk | Emulsified binder | Pour in a zigzag pattern to ensure every corner is "glued" |
| Unsalted Butter | Moisture and flavor | Melt it until it just turns liquid, but don't let it boil |
| Pecans | Structural integrity | Toast them for 5 minutes before adding to the layers for deeper flavor |
| Coconut | Moisture regulator | Use "sweetened shredded" for the best chewy to crisp ratio |
The interaction between the fats in the butterscotch chips and the proteins in the milk is what creates that iconic "pull" when you take a bite. It’s a delicate dance of sugars caramelizing at 175°C while the center stays relatively protected.
Selecting the Best Ingredients for Rich and Fudgy Bars
For this hello dolly bars recipe, quality is your best friend. Since there is no flour or eggs to hide behind, every single element needs to be top notch.
- 1.5 cups (150g) graham cracker crumbs: Why this? Provides a sturdy, honey sweetened foundation that absorbs the butter perfectly.
- Substitute: Digestive biscuits (same weight) for a less sweet, more wheaty base.
- 0.5 cup (115g) unsalted butter, melted: Why this? It acts as the "cement" for the crumbs without adding excess saltiness.
- Substitute: Salted butter (omit the extra sea salt in the recipe).
- 1 cup (170g) semi sweet chocolate chips: Why this? Balances the sugar with a hint of cocoa bitterness.
- Substitute: Dark chocolate chunks (60% cacao) for a more mature flavor.
- 1 cup (170g) butterscotch chips: Why this? Provides that nostalgic, buttery toffee flavor characteristic of Dollies.
- Substitute: Peanut butter chips for a salty sweet twist.
- 1.5 cups (130g) sweetened shredded coconut: Why this? It toasts beautifully and adds a tropical, chewy dimension.
- Substitute: Unsweetened flaked coconut (adds more crunch, less chew).
- 1 cup (100g) chopped pecans: Why this? Adds a necessary earthy crunch to break up the soft layers.
- Substitute: Walnuts or toasted almonds.
- 1 can (14 oz / 396g) sweetened condensed milk: Why this? The essential "magic" ingredient that binds everything together.
- Substitute: Coconut condensed milk (for a slight flavor shift).
- 1 tbsp (12g) granulated sugar & 0.25 tsp sea salt: Why this? These season the crust so it doesn't taste flat.
The Basic Kitchen Tools for Every Hello Dolly Batch
You don't need a professional pastry kitchen to pull this off, but a few specific items will make the "clean up" phase much less of a headache. Trust me, condensed milk is basically superglue once it hits a hot pan.
- 9x13 inch Rectangular Baking Pan: Metal is preferred here for sharper corners and better heat conduction than glass.
- Parchment Paper: Absolutely non negotiable. It allows you to lift the entire block out of the pan once chilled.
- Heavy Bottomed Measuring Cup: Perfect for pressing the crust into a flat, compressed layer.
- Mixing Bowl: Just one medium sized bowl for the crust is all you'll need.
- Offset Spatula: Great for spreading the chips and coconut evenly without getting your hands sticky.
If you enjoy these types of sturdy, portable desserts, you should also look into making Homemade Granola Bars for your next outdoor adventure.
step-by-step Instructions from Preparation to Golden Finish
- Preheat your oven to 350°F (175°C). Line your 9x13 inch pan with parchment paper, ensuring it hangs over the edges like a sling.
- In your medium bowl, mix 150g graham crumbs, 115g melted butter, 12g sugar, and 0.25 tsp salt. Stir until it looks like wet, dark sand.
- Dump the crumbs into the pan. Press firmly with the bottom of a cup until the layer is tight and even. Note: A loose crust will crumble when sliced.
- Scatter 170g semi sweet chocolate chips evenly over the base. Listen for the soft "clink" of chips hitting the crust.
- Add 170g butterscotch chips as the second layer. Avoid clustering them in the center.
- Sprinkle 100g chopped pecans over the chips. This provides a "shelf" for the next layers.
- Cover everything with 130g sweetened shredded coconut. Ensure the coconut is light and fluffy, not clumped together.
- Slowly pour the entire 396g can of condensed milk over the top. Watch the milk disappear into the crevices between the chips.
- Bake for 25 to 30 minutes until the edges are bubbling and the coconut is a deep, burnished gold.
- Remove and cool completely in the pan on a wire rack. Chill in the fridge for 2 hours before lifting the parchment sling.
Professional Advice for Avoiding Common Messy Kitchen Disasters
The most frequent heartbreak with this recipe is a crust that stays in the pan while the toppings come out in your hand. This usually happens because the butter wasn't fully incorporated or the pressing wasn't firm enough.
Resolving the Greasy Bottom Problem
If you find a pool of yellow oil at the bottom of your pan, your oven temperature might be too low, or you used a margarine with high water content. The butter should emulsify with the crumbs, not separate from them.
Fixing Persistent Sticky Edge Issues
Condensed milk loves to weld itself to the sides of a pan. If you don't use parchment, you must grease the sides of the pan excessively with butter. Even then, run a thin knife around the perimeter while the bars are still slightly warm to break the seal.
| Problem | Root Cause | Solution |
|---|---|---|
| Crumbly Base | Insufficient pressing or dry crumbs | Use the flat bottom of a glass to pack the base tightly |
| Soggy Center | Underbaked milk layer | Bake until the edges are dark brown and bubbling vigorously |
| Burned Coconut | Oven rack too high | Bake on the center rack and tent with foil if browning too fast |
Common Mistakes Checklist
- ✓ Always use the parchment paper "sling" to avoid prying bars out of a deep pan.
- ✓ Never skip the 2 hour fridge rest; the sugars need time to crystallize and set.
- ✓ Use semi sweet chips instead of milk chocolate to prevent an overly cloying taste.
- ✓ Don't over process your pecans; you want distinct chunks, not a fine meal.
Exploring Creative Flavor Variations and Smart Dietary Swaps
While the "classic 7 layers" are iconic, you can easily adapt this hello dolly bars recipe to fit different palates or pantry limitations.
- Tropical Hello Dolly Bars: Use macadamia nuts instead of pecans and add half a cup of dried pineapple bits under the coconut layer.
- The "Dark & Salty" Swap: Use 70% dark chocolate chips and sprinkle a generous pinch of flaky Maldon salt over the condensed milk before baking.
- Go Nut Free: Swap the pecans for toasted sunflower seeds or simply double up on the graham cracker crumbs for a thicker base.
| If you want... | Do this... | Result |
|---|---|---|
| Less Sweetness | Use unsweetened coconut and dark chocolate | A more sophisticated, bitter sweet balance |
| Chewier Texture | Add 1/2 cup of rolled oats to the crust | A heartier, oatmeal cookie like base |
| Party Size | Double the recipe and use a half sheet pan | Feeds 48 people with a thinner, crispier profile |
Clever Preservation Methods for Keeping Every Bite Fresh
Because of the high sugar and fat content, these bars are incredibly resilient. They actually taste even better on the second day once the flavors have had a chance to fully migrate into the crust.
- Room Temperature
- Store in an airtight container for up to 5 days. Keep them in a cool, dry place to prevent the chocolate from blooming.
- Fridge
- They will stay fresh for up to 2 weeks. I actually prefer eating them cold straight from the fridge as it makes the texture more like a dense fudge.
- Freezer
- These freeze beautifully for up to 3 months. Wrap individual squares in plastic wrap, then place them in a freezer bag. Thaw at room temperature for 20 minutes before eating.
Zero Waste Tip: If you have leftover graham crumbs that didn't make it into the pan, don't toss them! Toast them in a dry skillet for 2 minutes and use them as a crunchy topping for morning yogurt or vanilla ice cream.
The same goes for any stray coconut flakes they make a great addition to a bowl of oatmeal.
Simple Presentation Techniques to Make Your Dessert Shine
To get those perfect, sharp edged squares, use a long chef's knife and wipe it clean with a damp cloth between every single cut. If the knife is sticky, it will drag the coconut into the chocolate layers, blurring those beautiful strata we worked so hard to build.
For a holiday spread, I like to cut these into small triangles rather than squares. It makes them look a bit more elegant and "bite sized" on a crowded platter. You can also drizzle a tiny bit of extra melted chocolate over the top in a cross hatch pattern once they are cool to give them a finished, "bakery style" look.
Whether you’re serving these with a cold glass of milk or a hot cup of coffee, the contrast of the cold, creamy center and the crunchy, toasted top is what will keep everyone coming back for seconds. Enjoy every gooey, buttery bite!

Recipe FAQs
What is in a Hello Dolly bar?
These bars consist of six primary layers. You will need graham cracker crumbs, melted unsalted butter, granulated sugar, fine sea salt, semi sweet chocolate chips, butterscotch chips, chopped pecans, sweetened shredded coconut, and a can of sweetened condensed milk.
How long do Hello Dolly Bars need to be refrigerated?
They must chill for at least 2 hours. This mandatory cooling period allows the sweetened condensed milk and sugar to stabilize so the bars hold their shape when sliced.
Are magic cookie bars the same as Hello Dollies?
Yes, they are the same recipe under different names. Both refer to this classic layered dessert, and if you enjoyed mastering the texture control required for these bars, you can apply similar logic to achieve the perfect consistency in other no-bake desserts.
What is the best pan size for Hello Dolly squares?
Use a 9x13 inch rectangular pan. This specific size ensures the ingredients create the ideal thickness for easy slicing and uniform baking.
Is it true I can bake these at a higher temperature for speed?
No, this is a common misconception. You must maintain the oven at 350°F (175°C) to ensure the coconut toasts evenly without burning the bottom layer or leaving the center raw.
How to ensure the crust does not crumble during slicing?
Press the crumbs firmly using the bottom of a heavy measuring cup. Compacting the mixture until it reaches the consistency of wet sand is essential for creating a stable foundation that holds together.
How to remove the bars from the pan without breaking them?
Line the pan with parchment paper using an overhang on the long sides. This creates a sling that allows you to lift the entire block out of the pan once it has fully set in the refrigerator.
Classic Hello Dolly Bars
Ingredients:
Instructions:
Nutrition Facts:
| Calories | 241 kcal |
|---|---|
| Protein | 2.6 g |
| Fat | 15.0 g |
| Carbs | 26.3 g |
| Fiber | 1.4 g |
| Sugar | 20.7 g |
| Sodium | 116 mg |
