Popovers Recipe: Airy Towers
- Time: Active 10 minutes, Passive 35 minutes, Total 45 minutes
- Flavor/Texture Hook: Shatteringly crisp crust with a silky, hollow center
- Perfect for: Holiday brunches, cozy Sunday mornings, or beginner bakers
- Shells with Steamy Hollow Centers
- The Physics of the Steam Rise
- Component Analysis for High Rises
- Timing and Temperature Precision Guide
- Simple Staples for Better Batter
- Minimal Tools for Towering Results
- Steps for the Flakiest Rise
- Solutions for Sinking Popovers
- Adjusting the Yield
- Preserving the Shatteringly Crisp Texture
- Popular Kitchen Misconceptions
- Pairings for Every Comforting Occasion
- Recipe FAQs
- 📝 Recipe Card
The sound of a popover being torn open is something I never get tired of hearing. It’s that distinct crack of the golden, buttery crust giving way to a cloud of steam and a velvety, hollow interior.
I remember the first time I tried making them in my tiny first apartment; I didn't know the "room temperature egg rule" and ended up with six heavy, sad little hockey pucks. It was a disaster, but it taught me that baking isn't just about mixing ingredients, it's about managing air and heat.
Since that flop, I've spent years obsessing over the exact physics of the rise. There’s something so mindful about whisking a simple batter and watching it transform into these majestic, towering shapes. We don't need fancy additives or complex techniques here.
It’s just about being patient with your ingredients and trusting your oven to do the heavy lifting.
Right then, let's get into what actually makes this popovers recipe work every single time. We are going to bypass the typical pitfalls and focus on the tiny details that ensure your batter climbs high out of the tin.
Trust me on this, once you see that first batch "pop" through the oven glass, you'll be hooked on the magic just like I am.
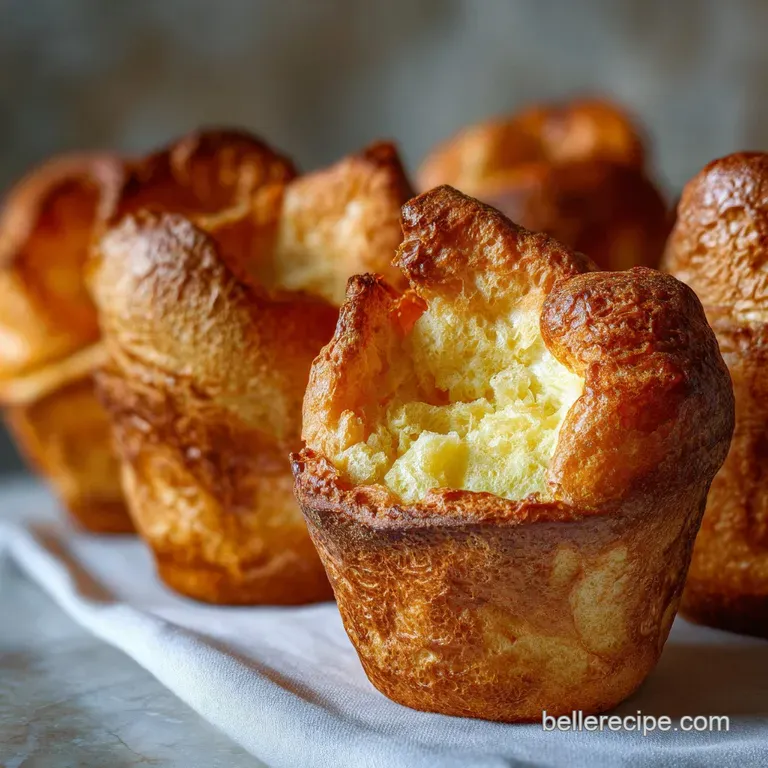
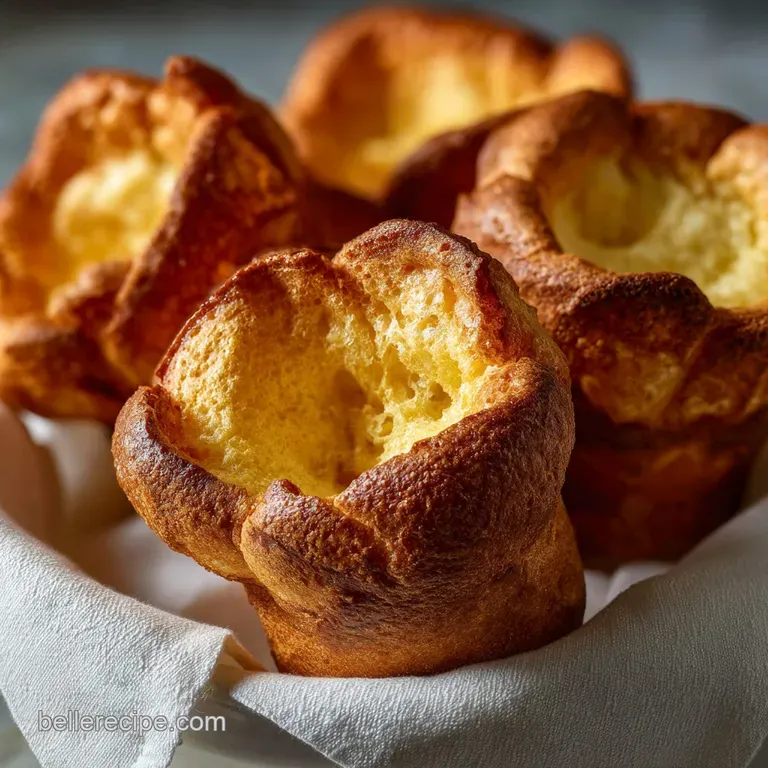
Shells with Steamy Hollow Centers
What we are aiming for here isn't a muffin or a roll. A great popover is a structural marvel. It’s nearly hollow, with a thin, eggy wall that should be dry and crisp on the outside but soft enough to swipe through a bit of jam or gravy.
Because the ingredients are so simple just flour, eggs, milk, and salt the quality of your technique is what provides the flavor.
The aroma in your kitchen while these bake is incredible. It’s the scent of toasted butter and caramelizing proteins. Unlike sourdough or yeast breads that take all day, these offer that same comforting, bakery fresh experience in under an hour.
It’s a brilliant way to add a bit of "wow" to a simple weeknight meal without needing a culinary degree.
If you love things that rise beautifully in the oven, you'll find this mindful approach similar to the logic behind my Dinner Rolls Recipe. Both rely on the relationship between moisture and heat, though popovers are much faster since we aren't waiting for yeast to bloom.
The Physics of the Steam Rise
- Steam Expansion: The high water content in milk and eggs turns to steam instantly in a hot oven, forcing the batter to expand rapidly before the crust sets.
- Protein Structure: Eggs provide the elastic framework that stretches as the steam builds, eventually setting into a firm wall that holds the hollow shape.
- Thermal Shock: Placing room temperature batter into a preheated, greased tin causes the edges to sear and climb the sides of the cup.
- Starch Gelatinization: The flour absorbs the liquid and, under high heat, creates a stable lattice that prevents the popover from collapsing once removed from the heat.
| Method | Time | Texture | Best For |
|---|---|---|---|
| Fast Method | 45 minutes | Dense, slightly chewy | Busy weeknights |
| Classic Method | 1 hour 15 mins | Extra airy, very tall | Special occasions |
| Blender Method | 40 minutes | Smooth, uniform | Beginners |
Giving your batter a short rest (even 15 minutes) allows the flour to fully hydrate. This simple shortcut preserves the quality of the rise without requiring the long overnight rests some older books suggest. It's the sweet spot for a busy home cook who still wants a professional looking result.
Component Analysis for High Rises
| Ingredient | Science Role | Pro Secret |
|---|---|---|
| Large Eggs (3) | Structural Binder | Use eggs at 70°F to ensure maximum air volume during whisking. |
| Whole Milk (1.5 cups) | Steam Source | Full fat milk creates a richer, more velvety interior crumb. |
| All purpose Flour (1.5 cups) | Framework | Sift your flour to avoid clumps that weigh down the rising batter. |
The creamy steam trapped inside these shells reminds me of the richness found in The Homemade Chicken recipe. While one is a meal and the other a side, they both celebrate the comforting nature of simple, well cooked proteins and dairy.
Timing and Temperature Precision Guide
To get that "never fail" result, we need to be specific. Baking is a game of numbers. If your oven is off by even twenty degrees, the steam won't have enough pressure to lift the weight of the flour. Use an oven thermometer if you have one; it’s a tiny tool that makes a massive difference.
- 35 minutes: The exact baking window required to set the exterior without burning the bottoms.
- 450°F Start: The initial blast of heat that triggers the "pop" by turning liquid into gas.
- 70°F Ingredients: Ensuring eggs and milk aren't cold prevents the oven from having to work twice as hard to heat the batter.
Simple Staples for Better Batter
- 3 large eggs, room temperature Why this? Cold eggs inhibit the steam expansion needed for a high rise.
- 1.5 cups whole milk, room temperature Why this? Fat in whole milk provides a tender, silky interior texture.
- 1.5 cups all purpose flourWhy this? Provides the moderate protein needed for structure without being too tough.
- 0.75 teaspoon fine sea saltWhy this? Enhances the nutty flavor of the toasted flour and butter.
- 3 tablespoons unsalted butter, melted and slightly cooled Why this? Adds richness to the batter and helps the crust brown.
- 2 tablespoons unsalted butter, divided for the tins
| Original Ingredient | Substitute | Why It Works |
|---|---|---|
| Whole Milk | 2% Milk | Slightly less rich but still provides the necessary steam. |
| All purpose Flour | Bread Flour | Higher protein leads to a chewier, taller popover. Note: Crumb will be tougher. |
| Unsalted Butter | Salted Butter | Same fat content. Note: Reduce the added sea salt to 0.5 teaspoon. |
If you find yourself with extra milk or eggs after this, don't let them go to waste. You can use similar pantry staples to whisk up a batch of something sweet. For example, a Silky Smooth Homemade recipe on a toasted popover is a flavor combination that feels incredibly indulgent.
Minimal Tools for Towering Results
You don't actually need a specialized popover pan to make this popovers recipe, though it certainly helps with the height. A standard muffin tin works just fine if you follow my spacing trick. The key is to use tools that conduct heat quickly.
Two Indispensable Kitchen Tools
- Whisk or Blender: You want to incorporate air and eliminate every single flour lump. A simple balloon whisk is perfect, but a blender is even faster for busy mornings.
- Heavy Duty Tin: Whether it's a dedicated popover pan or a 12 cup muffin tin, choose one that feels substantial. Thin, flimsy tins can result in uneven browning.
Chef's Tip: Place your empty pan in the oven for 5 minutes while it preheats. Pouring cold batter into a sizzling hot, buttered tin creates an immediate "lift" that cold pans just can't replicate.
Steps for the Flakiest Rise
- Preheat oven. Set your rack to the lower middle position and heat to 450°F. Note: This ensures the heat hits the bottom of the tin first.
- Whisk eggs. Beat the 3 large eggs until frothy and pale yellow.
- Add liquids. Slowly whisk in the 1.5 cups of room temperature milk and 3 tablespoons of melted butter.
- Incorporate solids. Add the 1.5 cups of flour and 0.75 teaspoon of salt. Whisk until the batter is smooth like heavy cream. Note: A few tiny lumps are okay, but avoid large clumps.
- Rest batter. Let the mixture sit for 15 minutes at room temperature. Note: This allows the gluten to relax for a more tender bite.
- Prep tin. Place about 1 teaspoon of the remaining 2 tablespoons of butter into each of the 6 popover cups (or 12 muffin cups).
- Heat pan. Place the buttered pan in the oven for 2 minutes until the butter is bubbling and slightly browned.
- Fill cups. Carefully pour batter into the hot cups, filling them about halfway to two thirds full.
- First bake. Bake at 450°F for 15 minutes. Do not open the oven door or they will collapse.
- Second bake. Reduce heat to 350°F and bake for another 20 minutes until deep golden brown and firm to the touch.
- Vent steam. Remove from the oven and immediately pierce the side of each popover with a small knife. Listen for the hiss of escaping steam.
Solutions for Sinking Popovers
The biggest heartbreak in the kitchen is watching your beautiful towers deflate the second they hit the counter. This usually happens because the interior hasn't dried out enough to support the weight of the crust. It’s a common hurdle, but it is easily fixed with a little patience and a sharp knife.
Common Causes for Flatness
If your popovers look more like puddings than towers, the issue is almost always temperature related. If the oven isn't hot enough, the steam won't have the "explosive" force needed to push the batter up. Conversely, if you open the door to peek, that rush of cool air is like popping a balloon.
| Problem | Root Cause | Solution |
|---|---|---|
| Popovers collapse | Trapped steam softens the walls | Pierce the side with a knife immediately after baking to vent steam. |
| Too dense/rubbery | Over mixing the flour | Whisk until just combined; do not beat the batter like a cake. |
| Sticking to pan | Pan wasn't hot enough | Preheat the buttered tin until it sizzles before adding batter. |
Preventive Success Checklist
- ✓ Use room temperature eggs and milk (it’s the most important rule!)
- ✓ Never open the oven door during the first 20 minutes of baking
- ✓ Ensure your oven is fully preheated to 450°F before the pan goes in
- ✓ Pierce the finished popovers to let internal steam escape
- ✓ Don't over fill the cups; they need room to "pop" upward
Adjusting the Yield
If you are cooking for a crowd or just for yourself, scaling this popovers recipe is straightforward. However, because baking relies on ratios, you have to be careful with the volume of the pan.
If you double the recipe, I highly recommend baking in batches rather than trying to cram two pans into one oven, as this can drop the temperature too significantly.
- To Scale Down (3 Popovers): Use 2 eggs (beat one and use half), 3/4 cup milk, 3/4 cup flour, and a pinch of salt. Use a smaller pan and keep the baking times the same.
- To Scale Up (12 Popovers): Double all ingredients exactly. Bake on two separate racks but switch them halfway through the second baking phase (after the heat reduction) to ensure even browning.
- Muffin Tin Adaptation: If using a 12 cup muffin tin, fill every other cup to allow more airflow around each popover. This helps them rise taller and crisp more evenly.
Preserving the Shatteringly Crisp Texture
Popovers are best served within minutes of leaving the oven. That's when the contrast between the hot, crisp exterior and the soft interior is at its peak. If you have leftovers, don't worry they can be revived, but you should never use a microwave unless you want a rubbery mess.
- Fridge
- Store in an airtight container for up to 2 days. To reheat, place in a 350°F oven for 5 minutes until the exterior is crisp again.
- Freezer
- These freeze surprisingly well! Wrap them individually in foil and store in a freezer bag for up to 2 months. Reheat directly from frozen at 350°F for 8-10 minutes.
- Zero Waste
- If you have popovers that have gone completely stale, tear them into chunks and use them as "croutons" for a creamy soup or as the base for a savory bread pudding. They soak up liquids beautifully.
Popular Kitchen Misconceptions
One common myth is that you must have a specialized popover pan to get a good rise. While the deep, narrow wells of a popover pan encourage vertical growth, a standard muffin tin is perfectly capable of producing airy results.
The secret isn't the shape of the pan, but the heat of the metal and the temperature of the batter.
Another misconception is that the batter needs to be ice cold. Some people think the cold batter hot pan combo creates more steam. In reality, cold batter takes longer to heat up, meaning the outside might set before the inside has fully expanded.
Using room temperature ingredients allows the entire mass to hit the "steam point" much faster, leading to a more dramatic "pop."
Pairings for Every Comforting Occasion
Popovers are incredibly versatile. In my house, we often serve them for breakfast with a big smear of salted butter and honey. The way the honey pools in the hollow center is just heaven. But they are equally at home next to a roast beef dinner, where they can be used to mop up every last drop of juice.
For a fresh, lighter pairing, I love serving these alongside a crisp Greek Salad Recipe. The salty feta and acidic dressing provide a wonderful contrast to the rich, eggy popovers. If you’re feeling adventurous, you can even turn them into a dessert by dusting them with powdered sugar and filling the centers with a little lemon curd or chocolate ganache.
Whatever you choose to serve them with, remember that the joy of a popover is in its simplicity. We aren't looking for perfection here; we’re looking for those wild, irregular shapes that prove they were made by hand in a warm kitchen. Happy baking!

Recipe FAQs
What is the single most crucial step for guaranteeing a high popover rise?
Use room temperature eggs and milk. Cold ingredients cool the hot tin too fast, which delays the steam expansion needed for the initial dramatic "pop" upwards.
How do I prevent my popovers from collapsing after they come out of the oven?
Pierce the side of each finished popover immediately after baking. This allows the pressurized steam trapped inside to escape slowly, letting the structure set without collapsing in on itself.
Should I open the oven door while the popovers are baking?
No, avoid opening the door for the first 20 minutes. A sudden drop in temperature from cool air hitting the oven interior will cause the rapidly expanding steam to lose its pressure and deflate the batter instantly.
How long should I let the batter rest before putting it into the hot pan?
Rest the batter for 15 minutes at room temperature. This short rest allows the flour to fully hydrate, which results in a more tender crumb structure that supports the rise better than an un-rested batter.
Can I use a standard muffin tin instead of a specialized popover pan?
Yes, a standard muffin tin works well if spaced correctly. Fill every other cup in a 12-cup tin to allow maximum airflow around each popover, encouraging them to rise vertically rather than spreading sideways.
Is it necessary to grease the pan before adding the room temperature batter?
Yes, you must preheat the buttered pan until it sizzles. Placing cold batter into scorching hot, buttered cups creates immediate searing on the edges, which gives the batter the anchor it needs to climb the tin walls.
If I want a richer, more savory popover, what should I serve it with?
Serve them alongside rich, savory dishes to soak up the juices. They function wonderfully as a sponge for pan drippings, similar to how you might use good bread with our Leftover Brisket Recipe.
Easy Popovers Recipe

Ingredients:
Instructions:
Nutrition Facts:
| Calories | 273 calories |
|---|---|
| Protein | 8.4 g |
| Fat | 14.3 g |
| Carbs | 27.2 g |
| Fiber | 0.8 g |
| Sugar | 2.9 g |
| Sodium | 295 mg |
