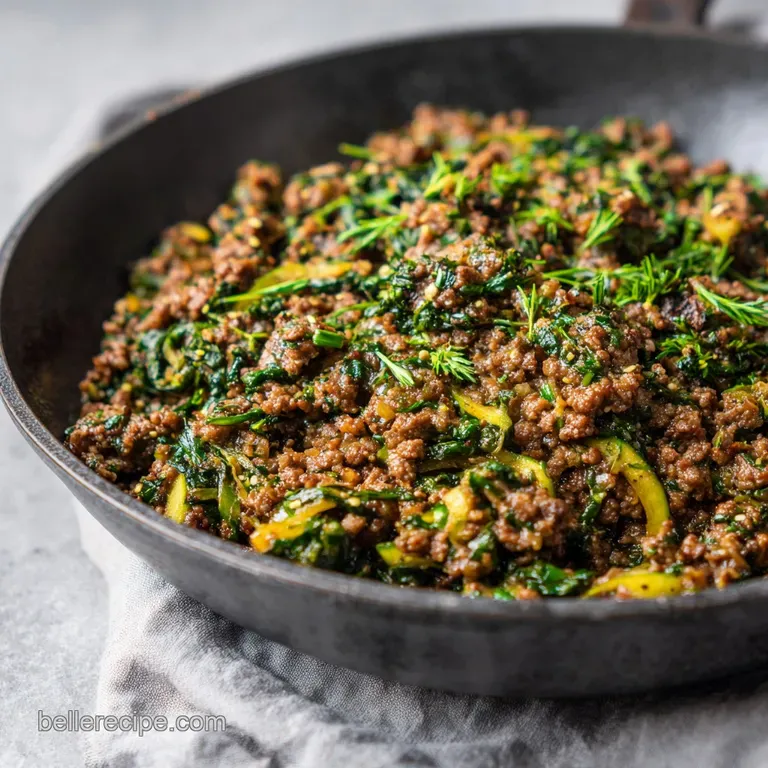
Keto Ground Beef Recipe with Garlic: Crispy and Savory

- Time: Active 5 minutes, Passive 15 minutes, Total 20 minutes
- Flavor/Texture Hook: Crispy seared edges with a velvety garlic butter finish
- Perfect for: Busy weeknights when you want a high protein, comforting meal
- Why Most Skillet Beef Lacks Flavor
- Ingredients for Fragrant Keto Meals
- Essential Tools for Professional Searing
- Steps for the Perfect Golden Sear
- Fixing Common Searing and Flavor Problems
- Creative Ways to Adapt Your Beef
- Adjusting for Families or Solo Meals
- Why Searing Does Not Seal Juices
- Safe Storage and Reheating Guidelines
- Simple Plating for Beautiful Dinners
- Recipe FAQs
- 📝 Recipe Card
Why Most Skillet Beef Lacks Flavor
If you have ever ended up with a pan full of grey, watery meat, you are not alone. Most of us were taught to dump the beef in and immediately start breaking it up into tiny bits. When you do that, the meat releases all its moisture at once, and instead of frying, it ends up steaming in its own juices.
This prevents those wonderful crispy bits from forming. By keeping the meat in larger chunks initially, we allow the surface area to make direct contact with the hot metal, which is where all that deep, nostalgic flavor lives.
The fat content also plays a massive role in the final texture. Using an 80/20 blend ensures there is enough rendered fat to help the garlic "bloom." This is a fancy way of saying the fat carries the garlic flavor into every nook and cranny of the beef. If you use meat that is too lean, the herbs just sit on top and can sometimes taste dusty or dry. This Salisbury Steak dish uses a similar logic for flavor depth, showing how the right fat ratio makes the difference between a bland meal and a comforting classic.
- Heat Retention
- Heavy pans like cast iron hold onto heat, ensuring the temperature does not drop when the cold meat is added.
- Fat Soluble Aromatics
- Garlic and herbs release their best scents and flavors when they sit in warm fat rather than just water.
- Surface Browning
- Leaving the meat undisturbed for several minutes allows the natural sugars and proteins to toast into a savory crust.
- Acid Balance
- The final squeeze of lemon juice cuts through the richness of the butter, making the whole dish feel light and sunny.
| Cooking Method | Total Time | Resulting Texture | Best Used For |
|---|---|---|---|
| Cast Iron Skillet | 20 minutes | Crispy, deeply browned edges | Maximum flavor and speed |
| Stainless Steel | 22 minutes | Golden brown with some sticking | Good fond for pan sauces |
| Non Stick Pan | 20 minutes | Soft and evenly cooked | Easy cleanup, less crust |
Choosing the right pan is half the battle when you want to achieve that perfect contrast between the tender interior and the crisp exterior. A heavy skillet acts like a battery for heat, pushing energy into the beef consistently.
This is why we wait for that tiny wisp of smoke before we even think about adding the meat. It is a mindful moment of patience that pays off the second you take your first bite.
Ingredients for Fragrant Keto Meals
When we look at our components, it is all about the balance of rich, earthy, and bright notes. We start with the 1.5 lb ground beef, which provides the protein and the essential fats. Then we bring in the "big three" of the herb world: rosemary, thyme, and parsley.
Each one brings a different layer of comfort to the pan. Rosemary is woody and deep, thyme is slightly floral and earthy, and parsley adds that fresh, green finish that makes the whole plate look alive.
| Component | Role in Dish | Pro Tip |
|---|---|---|
| Ground Beef (80/20) | Main Texture and Fat | Use room temperature meat to prevent the pan from cooling down too fast. |
| Fresh Garlic | Aromatic Heart | Mince it by hand for little bits that toast and turn golden without burning. |
| Grass Fed Butter | Flavor Carrier | Add it toward the end so the milk solids toast but do not turn bitter. |
| Lemon Juice | Flavor Brightener | Always use fresh; the bottled stuff lacks the essential oils that make the dish pop. |
The butter is another place where quality really shines. Using a grass fed butter often gives you a deeper yellow color and a richer, more velvety mouthfeel. It mingles with the rendered beef fat to create a sort of "natural sauce" that coats every piece of garlic and every leaf of thyme.
It is a simple luxury that makes a weeknight meal feel like something special you’ve prepared for a slow Sunday afternoon.
Pantry Staples and Substitutes
- 1.5 lb ground beef (80/20 blend): Why this? The fat provides flavor and prevents the meat from drying out. (Substitute: Ground lamb for a gamier, richer profile)
- 1 tsp coarse sea salt: Why this? Provides a nice crunch and even seasoning. (Substitute: Kosher salt)
- 0.5 tsp freshly cracked black pepper: Why this? Better floral heat than pre ground pepper. (Substitute: White pepper for a milder bite)
- 6 cloves fresh garlic, minced: Why this? Fresh garlic has the oils needed for that sunny aroma. (Substitute: 1 tbsp garlic paste)
- 2 tbsp grass fed butter: Why this? Adds a creamy, nutty finish to the beef. (Substitute: Ghee for a higher smoke point)
- 1 tbsp fresh rosemary, finely chopped: Why this? Essential for that deep, woody scent. (Substitute: 1 tsp dried rosemary, crushed)
- 1 tbsp fresh thyme leaves: Why this? Adds a subtle, earthy sweetness. (Substitute: 0.5 tsp dried thyme)
- 0.5 tsp red pepper flakes: Why this? Provides a tiny back of-the throat warmth. (Substitute: Pinch of cayenne)
- 1 tbsp fresh lemon juice: Why this? The acid balances the heavy fats perfectly. (Substitute: Apple cider vinegar)
- 2 tbsp fresh parsley, chopped: Why this? For color and a clean, grassy finish. (Substitute: Fresh cilantro for a different vibe)
| Fresh Ingredient | Shortcut Alternative | Impact on Final Dish |
|---|---|---|
| Fresh Garlic Cloves | Jarred Minced Garlic | Less pungent, slightly sweeter, but saves 5 minutes of prep. |
| Fresh Herbs (Thyme/Rosemary) | Dried Herb Blend | More concentrated flavor; use 1/3 the amount to avoid bitterness. |
| Fresh Lemon Juice | Bottled Lemon Juice | Loses the bright citrus oils; the dish may taste slightly flatter. |
Using fresh ingredients is always my first choice because of the sensory experience, but I know life gets busy. If you go the shortcut route, just be mindful of the salt. Jarred garlic often sits in a preservative liquid that can change the seasoning of the dish.
I always recommend a quick taste before you add that final sprinkle of sea salt at the end.
Essential Tools for Professional Searing
To get the results we are looking for, the equipment matters almost as much as the beef itself. A 12 inch cast iron skillet is the gold standard here. Its ability to hold heat is what creates that "shatter crisp" texture on the beef.
If you use a thin pan, the temperature will drop the moment the meat hits the surface, and you will end up with the dreaded steaming effect. A heavy stainless steel pan also works well, but you might need a tiny bit more fat to prevent sticking.
You will also want a sturdy metal spatula. When you are ready to break up those large chunks of beef after they have seared, you need something with a bit of "heft" to get under that crust. A flimsy plastic spatula just won't cut it.
It’s about being deliberate with your movements, feeling the resistance of the crust, and then flipping it over to reveal that beautiful mahogany color.
- 12 inch Cast Iron Skillet: The heavy bottom is non negotiable for a proper sear.
- Metal Fish Spatula or Sturdy Turner: To scrape up the flavorful "fond" from the bottom.
- Sharp Chef’s Knife: For mincing that garlic into fine, even pieces.
- Microplane or Small Juicer: To get every drop of that bright lemon juice.
Steps for the Perfect Golden Sear
- Heat your 12 inch cast iron skillet over medium high heat until you see a very light wisp of smoke rising from the surface. Note: This ensures the meat sears immediately instead of sticking.
- Add the 1.5 lb of ground beef to the pan in large, flat chunks, almost like you are making thick rustic burgers.
- Let the beef sit completely undisturbed for 4 to 5 minutes until a deep, dark brown crust forms on the bottom.
- Flip the chunks over and let the other side sear for another 2 to 3 minutes until the meat is about 80% cooked through.
- Use your sturdy spatula to break the beef into smaller, bite sized pieces now that the crust has been established.
- Drop in the 2 tbsp of butter and the 6 cloves of minced garlic, letting them foam and sizzle around the meat.
- Add the chopped rosemary, thyme, and red pepper flakes, tossing everything together for 2 to 3 minutes until the garlic is golden and fragrant.
- Turn off the heat entirely to prevent the herbs from burning or turning bitter.
- Pour in the 1 tbsp of fresh lemon juice and stir in the 2 tbsp of chopped parsley.
- Give the pan one final toss to ensure the butter and lemon have emulsified into a light, silky coating over the beef.
Fixing Common Searing and Flavor Problems
Sometimes things don't go exactly to plan, and that's okay. The most common issue is the meat releasing too much liquid. If you see a pool of grey water in your pan, don't panic. You can carefully tilt the pan and spoon out the excess liquid, then turn the heat up slightly to evaporate the rest.
The goal is to get back to "frying" as quickly as possible so you can still get some of that texture.
Another frequent hiccup is the garlic. Garlic is delicate, and if the pan is screaming hot when you add it, it can turn from sweet and toasted to bitter and black in seconds. This is why we add the butter at the same time. The butter helps regulate the temperature and provides a little buffer for the garlic.
If it does burn, honestly, it’s best to wipe the pan and start the garlic/herb step over, as burnt garlic can ruin the whole mindful experience of the dish.
Stop the Grey Meat Steam
This happens when the pan isn't hot enough or the meat is too crowded. If you only have a small pan, work in two batches. It takes a few extra minutes, but the difference in flavor is massive. You want the meat to sizzle, not simmer.
Avoid Bitter Burnt Garlic
Always add your aromatics toward the end of the cooking process. Garlic only needs a couple of minutes to release its oils. If you put it in at the start with the raw beef, it will definitely burn before the meat is finished browning.
| Problem | Root Cause | Solution |
|---|---|---|
| Meat is tough/chewy | Overcooking after breaking it up | Break the meat up only when it is 80% done and finish quickly. |
| Dish tastes flat | Not enough acid or salt | Add an extra squeeze of lemon or a pinch of sea salt at the end. |
| Herbs are black | Added to a pan that was too hot | Remove pan from heat before adding the most delicate herbs. |
- ✓ Pat the ground beef dry with paper towels before adding to the pan.
- ✓ Ensure the skillet is large enough to leave space between the beef chunks.
- ✓ Don't move the meat for the first 4 minutes; patience is your best ingredient.
- ✓ Use fresh herbs whenever possible for the most "sunny" flavor profile.
- ✓ Add the lemon juice only after the heat is turned off to keep the flavor bright.
Creative Ways to Adapt Your Beef
While the garlic and herb combination is a classic for a reason, this recipe is a fantastic canvas for other flavors. If you are looking for something a bit more comforting for a cold evening, you can lean into different spices. For example, adding a bit of smoked paprika and cumin can take this in a completely different direction. This Hungarian Goulash recipe is a great example of how beef can transform with different aromatic bases.
If you want to keep it keto but add some bulk, tossing in some sliced mushrooms with the butter and garlic is a fantastic move. The mushrooms will soak up all that herb infused fat and become little umami bombs. Just make sure to give the mushrooms their own space in the pan for a minute so they can brown properly too.
The Mediterranean Twist
Swap the rosemary and thyme for dried oregano and a handful of halved cherry tomatoes. Finish with some crumbled feta cheese and a few kalamata olives for a bright, salty meal that feels like a vacation.
The Spicy Garden Swap
Use fresh basil instead of parsley and add a diced jalapeño along with the garlic. This version is incredible served over a bed of sautéed zucchini noodles or "zoodles."
Adjusting for Families or Solo Meals
Scaling this recipe is quite simple because ground beef is so forgiving. If you are cooking for one, you can easily use just a third of the ingredients. However, I usually recommend making the full batch because the leftovers are so versatile.
You can toss the cold beef into a salad the next day or fold it into an omelet for a high protein breakfast that keeps you full until lunch.
When doubling the recipe for a larger gathering, the most important thing is the pan size. Do not try to cram 3 lbs of beef into one 12 inch skillet. It will steam, and you will lose all that beautiful texture. Instead, use two pans or cook the meat in two separate batches.
When scaling, remember that spices don't always need to be exactly doubled start with 1.5 times the amount and taste as you go.
Why Searing Does Not Seal Juices
One of the oldest stories in the kitchen is that searing meat "seals in the juices" by creating a waterproof barrier. In reality, that crust is actually porous. Moisture is lost throughout the cooking process regardless of how hard you sear the exterior.
The reason we sear isn't for moisture retention; it's for the development of hundreds of new flavor compounds that only occur at high heat. It is about the taste and the texture, not the "seal."
Another myth is that you should never use butter with ground beef because it has enough fat. While beef fat is great, butter brings a different kind of richness and a creamy finish that beef fat alone cannot replicate.
The milk solids in butter caramelize, adding a nutty sweetness that balances the sharp garlic and the earthy herbs. It is about layering flavors to create something more complex than the sum of its parts.
Safe Storage and Reheating Guidelines
This beef keeps beautifully in the fridge for up to 4 days. I find that the flavors actually meld together even more overnight, making the garlic a bit more mellow and the herbs more integrated. Store it in an airtight glass container to keep it as fresh as possible.
- Fridge: Up to 4 days in a sealed container.
- Freezer: Up to 3 months. Let it cool completely before freezing in a freezer safe bag.
- Zero Waste Tip: Don't throw away those parsley and thyme stems! Toss them into a bag in your freezer to use the next time you make a batch of bone broth or vegetable stock. Even the lemon rinds can be used to freshen up your garbage disposal after you have squeezed out the juice.
When reheating, the microwave can sometimes make the beef a bit rubbery. The best way to bring it back to life is in a small skillet over medium heat with a tiny splash of water or a half teaspoon of butter.
This helps redistribute the fats and prevents the meat from drying out, keeping those crispy edges as close to their original glory as possible.
Simple Plating for Beautiful Dinners
Eating is a sensory experience that starts with your eyes. To make this simple skillet meal feel a bit more elevated, think about the colors on the plate. The deep brown of the beef and the bright green of the fresh parsley already look great, but a few small touches can make it feel like a restaurant dish.
I love serving this in wide, shallow bowls. It makes the portion feel generous and comforting. Sprinkle a few extra red pepper flakes over the top for a pop of color, and maybe a final tiny grate of lemon zest to reinforce that sunny aroma.
If you have a few whole sprigs of thyme or rosemary left over, tucking one into the side of the bowl adds a lovely rustic touch. It’s a mindful way to honor the work you put into the meal and makes the act of sharing it with others feel even more special.

Recipe FAQs
Is it true I should stir the beef immediately after adding it to the pan?
No, this is a common misconception. You must place the beef in large chunks and let it sear undisturbed for 4 5 minutes to develop a deep, mahogany colored crust.
How to achieve the perfect golden crust on the beef?
Heat your 12 inch cast iron skillet over medium high heat until you see a light wisp of smoke. This high initial temperature is critical for creating a flavorful Maillard reaction, much like the precision searing technique used in our ultimate classic meatloaf.
Can I use pre-minced garlic instead of fresh cloves?
No, stick with fresh cloves for the best flavor. Freshly minced garlic toasts properly in the rendered fat and butter, whereas pre-minced varieties often contain additives that prevent proper browning.
How to know when the garlic is finished toasting?
Look for a light golden brown color. Since you are toasting the garlic for 2 3 minutes in the beef fat and butter, watch it closely so it remains fragrant and does not turn dark or bitter.
Is it necessary to remove the pan from the heat before adding lemon juice?
Yes, this preserves the bright flavor of the juice. Adding the lemon juice and parsley after pulling the pan from the burner ensures the acidity remains vibrant and does not cook off.
What is the best way to ensure the ground beef stays juicy?
Use an 80/20 blend of ground beef. The higher fat content prevents the meat from drying out during the high heat searing process required for this recipe.
How to break up the beef without losing the crust?
Wait until the beef is roughly 80% browned before using a sturdy metal spatula to gently break the meat into smaller bite sized pieces. This technique ensures you retain the texture of the crust you worked to develop.
Keto Garlic Ground Beef
Ingredients:
Instructions:
Nutrition Facts:
| Calories | 402 kcal |
|---|---|
| Protein | 28.6 g |
| Fat | 31.2 g |
| Carbs | 1.8 g |
| Fiber | 0.4 g |
| Sugar | 0.3 g |
| Sodium | 615 mg |
