Rachael Ray Yellow Cake Recipe: 5 Easy Tips for Delicious Success
- Rachael Ray-Inspired Yellow Cake: A Culinary Journey
- Your New Favorite Rachael Ray-Inspired Yellow Cake
- Health and Nutrition Highlights
- Recipe at a Glance
- Master Ingredient List
- Kitchen Equipment Essentials
- Pro Ingredient Tips
- Foolproof Cooking Steps for Rachael Ray-Inspired Yellow Cake
- Game-Changing Tips
- Perfect Presentation
- Storage and Make-Ahead
- Creative Variations
- Complete Nutrition Guide
- Expert FAQ Solutions
- 📝 Recipe Card
Have you ever wondered why yellow cake has held its spot as a universal favorite carving its place in birthday celebrations and casual get-togethers alike? what is it about this buttery, soft delight that elevates it from mere dessert to a staple of joy?
Honestly, between the nostalgia of childhood birthdays and the comforting aroma that fills your kitchen as it bakes, there’s just something magical about it.
This rachael ray-inspired yellow cake is special not just because it’s an easy cake recipe that comes together in just about 50 minutes, but also because it embodies simplicity and tradition.
With a difficulty level that sits comfortably at "easy," it’s perfect for novice bakers and seasoned pros who just want to whip something up without the fuss.
So, roll up your sleeves it’s time to embark on this deliciously satisfying journey!
Did you know that yellow cake traces its roots all the way back to the 19th century? this classic dessert, often simply called "yellow cake," was born out of the rise of chemical leaveners like baking powder, which revolutionized baking.
Its gleaming golden hue comes from the rich egg yolks mixed into the batter an ingredient choice that also adds to its flavor and texture.
What sets this cake apart from others is its versatility and the nostalgia it offers each slice carries with it a piece of history.
The airy, fluffy crumb melds beautifully with a luscious buttercream frosting or a simple dusting of powdered sugar. oh, and let’s not forget its ability to pair with countless add-ins, flavors, and even frosting ideas!
Rachael Ray-Inspired Yellow Cake: A Culinary Journey
The rich culinary heritage of yellow cake is filled with fascinating stories and cultural significance. known for its straightforward ingredients, it’s a testament to days gone by when baking was seen as a collaborative effort in the home.
Just think of the countless sweet fragrances wafting through family kitchens, bringing folks together over a slice or two! modern day popularity of this cake hasn’t waned at all.
Instagram and food blogs are brimming with spins on the classic, from hefty chocolate chip versions to decorated birthday cakes that would make anyone envious.
Your New Favorite Rachael Ray-Inspired Yellow Cake
This yellow cake embraces unique flavor combinations with a base that's easy to customize. whether you're adding lemon zest for a tangy twist or mixing in chocolate chips for a little indulgence, the options are endless!
Plus, the techniques are foolproof can we get an amen for butter and sugar creaming together like they were meant to be? this method has been expert tested and is almost fail proof.
As for time saving tips, remember that having your ingredients at room temperature makes mixing a breeze, often saving you a few heart felt moments of frustration!
Health and Nutrition Highlights
Alright, before you feel guilty for indulging in a slice or three let’s take a moment for some nutrition highlights. each serving is surprisingly balanced with about 250 calories, and while it’s not winning any nutrition awards, think of it as an easy dessert that can have a place in moderation.
You can also cater to dietary considerations; if you’re gluten-free or dairy-free, i’ve got tips in the variations section to make it work.
Recipe at a Glance
- Total Preparation Time : 20 minutes
- Cooking Time : 30 minutes
- Total Time : 50 minutes
- Serving Size : 12 servings
To give you a clearer view, here’s a quick rundown: with basic ingredients like flour, eggs, and milk, you'll find this recipe to be both cost efficient and a simple dessert recipe that everyone loves.
Now, let’s get into what really makes your cake sing the ingredients! whether you’re sticking with a classic yellow cake or toying with different cake variations, it’s all about getting those room temperature ingredients and using parchment paper to ease the post bake cleanup.
So, armed with all this tasty knowledge, you're all set to view the ingredients section , where the real magic starts!
Master Ingredient List
So, hey! let me tell you about my kitchen adventures while making my rachael ray-inspired yellow cake . it’s one of those desserts that just brings a smile to your face, am i right?
Let’s break down the ingredients you’ll need, starting with those premium core ingredients that are basically the backbone of your cake.
Premium Core Ingredients
First off, for the best yellow cake ever, you need 2 cups of all-purpose flour . make sure to spoon and level it for accuracy! you don’t want a flat cake; we’re aiming for a soft and fluffy masterpiece.
Look for flour that’s finely milled with a bright white color cheap stuff can make your cake dense.
Then there's 1 ½ cups of granulated sugar . get the good sugar, people. i like to give it a little taste before i use it.
You can tell it’s of high quality if it dissolves smoothly in your batter. next, grab the ½ cup of unsalted butter , softened one stick is all you need.
This is where your cake gets its rich flavor, so splurge a little here.
Don’t forget 1 cup of milk at room temperature! this step's key, trust me. cold milk can mess with your batter’s texture.
For those who are looking to jazz things up with a dairy-free cake, swap the milk for almond or oat milk.
You’ll still rock that flavor!
Now, for the 3 ½ teaspoons of baking powder . if your baking powder is older than the first harry potter book, toss it out! fresh baking powder is essential for the rising magic, turning your batter into a fluffy dream.
You’ll also need 1 teaspoon of vanilla extract don’t skimp on this one! get the real stuff; imitation vanilla just doesn’t cut it.
Last but not least, toss in ½ teaspoon of salt . i know, i know, we usually think of salt as the enemy, but it really enhances the sweetness of your cake.
Finally, you’ll need 3 large eggs at room temperature to bind it all together.
Signature Seasoning Blend
Now, while we’re diving into the deliciousness, let’s talk about adding that signature twist. i’m a huge fan of flavor enhancers.
A sprinkle of zest from an orange or lemon in the batter brings a whole new vibe. it’s like your cake is wearing a fancy hat totally classy!
And hey, if you want to take it up a notch with spice, consider a dash of nutmeg or cinnamon, just to keep things interesting.
Trust me; the aroma from the oven will be heavenly!
Smart Substitutions
Now, we could all use a little help when the pantry runs low. if you find yourself without baking powder, a quick baking powder substitute is to mix 1 teaspoon of baking soda with 2 teaspoons of cream of tartar.
Just a little hack that can save the day!
Not to mention, if you’re trying to go the gluten-free route, grab a good gluten-free flour blend. i’ve found that they work just as well with a best yellow cake recipe like this.
Kitchen Equipment Essentials
Okay, let’s talk tools. You don’t need all the crazy gadgets you see on TV. I mean, who has room for a cake decorating turntable anyway? Here’s what you really need.
Must Have Tools
- Two 9 inch round cake pans : These are your MVPs for this recipe.
- Mixing bowls : Get a couple, so you can mix without the hassle.
- Electric mixer : I can’t tell you how life changing it is to have this. Your hands will thank you!
Recommended Appliances
An oven thermometer is also a great addition because oven temps can be wacky sometimes. You don't want your cake to be overbaked, trust me on that one!
Helpful Gadgets
And while we’re at it, a microplane for zesting and a good offset spatula for frosting are definitely worthy investments.
And parchment paper? you bet! line those pans to avoid cake drama when you’re trying to flip them out.
Pro Ingredient Tips
Here’s the scoop on how to pick the best ingredients and save a few bucks along the way. always check the expiration date on baking supplies it’s a total bummer when you realize your baking powder is expired.
Also, pro tip : buy sugar in bulk! it’s usually cheaper, plus you won’t run out when you’re ready to make another batch of easy desserts.
Store it in an airtight container, and you’re golden.
Before we get to the fun part the actual baking keep an eye out for those room temperature ingredients. it just makes a world of difference! now, i’m ready to dive into the step-by-step instructions that will have you serving up cake like a pro.
So, grab that apron and your favorite playlist. Let’s get to baking this delightful yellow cake your family and friends will think you’ve been slaving away in the kitchen all day!
Foolproof Cooking Steps for Rachael Ray-Inspired Yellow Cake
Ah, the joy of baking! if there’s one thing that takes me back to my childhood, it’s the smell of a warm yellow cake straight out of the oven.
Like, honestly, it’s like a hug made with sugar and butter. today, i’m gonna walk you through a super straightforward version of rachael ray’s famous yellow cake perfect for birthdays, celebrations, or just because you want to indulge in something sweet.
So let’s dive right in!
Essential Preparation Steps
Before you even think about mixing flour and sugar, there’s a little thing called mise en place that fancy french term for having everything in its place.
Gather all your ingredients and tools. you want your 2 cups of all-purpose flour , 1½ cups granulated sugar , and, of course, your ½ cup of softened unsalted butter at the ready.
I usually find that measuring everything out makes the whole process smoother. don’t you hate it when you're halfway through a recipe and realize you’ve run out of sugar?
Time management is key! You should have a humble 20 minutes set aside for prep, and while your cakes are baking, you can clean up yay for multitasking!
And hey, I gotta say, using parchment paper to line your cake pans is a game changer. It prevents the cakes from sticking like that one friend who overstays their welcome!
Professional Cooking Method
Alright, let’s get this party started! preheat your oven to 350°f (175°c) . grease those two 9 inch round cake pans, or better yet, line ‘em with parchment paper.
It makes life easier, trust me!
Mix Dry Ingredients : Whisk together the flour , baking powder (3½ teaspoons, if you’re counting), and salt (½ teaspoon) in a medium bowl. Set that aside for now.
Cream butter and sugar : grab your electric mixer and beat that softened butter and sugar together. you’re aiming for light and fluffy, which usually takes about 3-5 minutes.
Your kitchen will smell heavenly, by the way!
Add eggs and vanilla : now, toss in your 3 large eggs , mixing them in one at a time.
Add 1 teaspoon of vanilla extract , and let the mixer do its thing until it’s all combined.
Combine Ingredients : Gradually add the dry mix, alternating with 1 cup of milk at room temperature. Start and end with the flour! Be careful here no overmixing folks!
Pour into pans and bake : divide the batter evenly into your prepared pans and pop them in the oven for 25-30 minutes .
The cakes are ready when a toothpick inserted comes out clean.
Cool the Cakes : Let them hang out in their pans for about 10 minutes , then invert them onto a wire rack to cool completely.
Frosting Time : Once the cakes are cool, it’s time to unleash your inner pastry chef! You can go wild with frosting ideas how about a classic buttercream recipe or something chocolatey?
Expert Techniques
For those of you looking to elevate your cake game, here are some pro tips to ensure you nail it:
Temperature Control : Room temperature ingredients make a world of difference. Your eggs and milk should be ready to mingle, or your cake might turn out a bit dense.
Precision points : pay attention to the baking time! the sweet spot for this yellow cake is typically 25-30 minutes , but ovens can be funny check it at 25 minutes to be safe.
Quality Checks : If your cake springs back when touched, or if the toothpick test is clear, you've hit the jackpot!
Success Strategies
What if things don’t go as planned? don’t sweat it; we all have our off days. if your cake sinks, it could be a case of overmixing or not enough baking powder.
My #1 tip? always double check your ingredients. if you can’t find baking powder, you can use a substitute by mixing cream of tartar with baking soda.
You’ll totally want to pull this yellow cake out for gatherings and celebrations. It’s the kind of recipe that begs for a twist think chocolate chip cake or even a fruit compote dessert to take it up a notch!
And convincing the fam to give a gluten-free cake a whirl can be a fun challenge.
So what do you say? ready to channel your inner rachael ray and whip up some magic in the kitchen? grab your apron, and stay tuned for additional information on making the perfect cake! we’ll dive into flavor ideas and more in the next section.
Trust me, you don't want to miss it!
Game Changing Tips
Oh, my friend, if there's one thing i've learned in my culinary adventures, it’s that a few pro tips can take your baking to the next level.
Let’s dive into some expert techniques that will make your homemade yellow cake a nod to that fantastic rachael ray yellow cake recipe absolutely irresistible.
First off, do yourself a favor and embrace room temperature ingredients. trust me, it makes a world of difference! when your butter, eggs, and milk are at room temperature, they blend together like smooth jazz, creating that soft and fluffy cake we all dream of.
And if you’re ever caught without baking powder, a quick baking powder substitute is combining vinegar and baking soda. magic, i tell you!
Now, here’s a little kitchen wisdom: when you're creaming your butter and sugar, take your time. you want it light and fluffy, like a cloud! seriously, keep mixing for a good three to five minutes.
It's the secret to a tender crumb, i promise. and once you add that flour, keep it gentle; overmixing is your enemy.
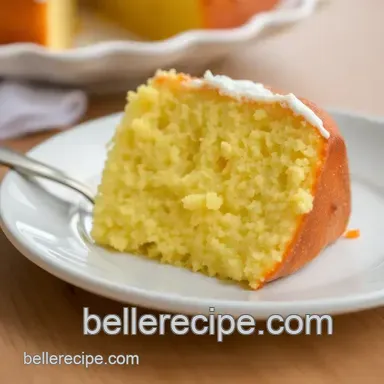
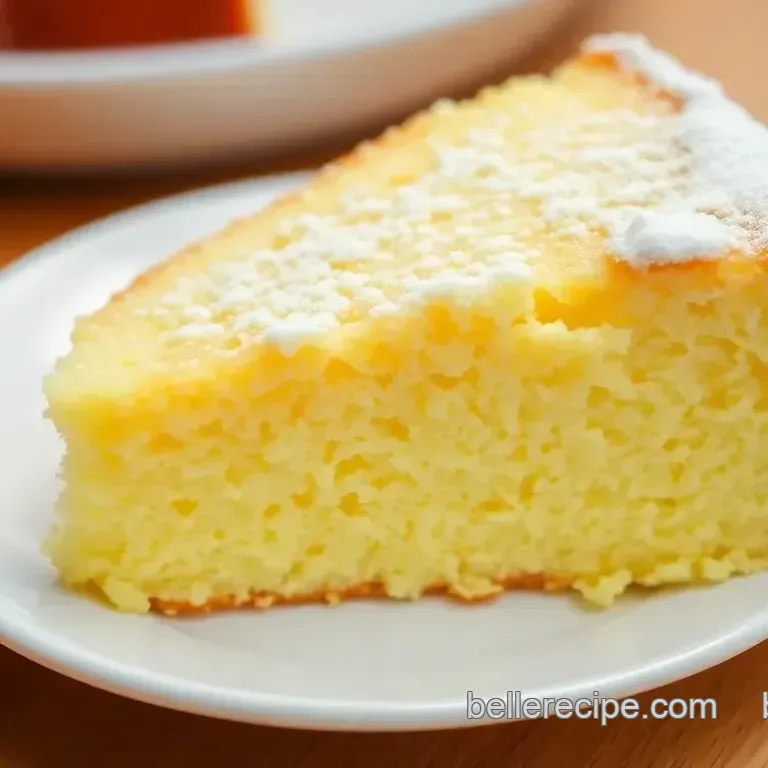
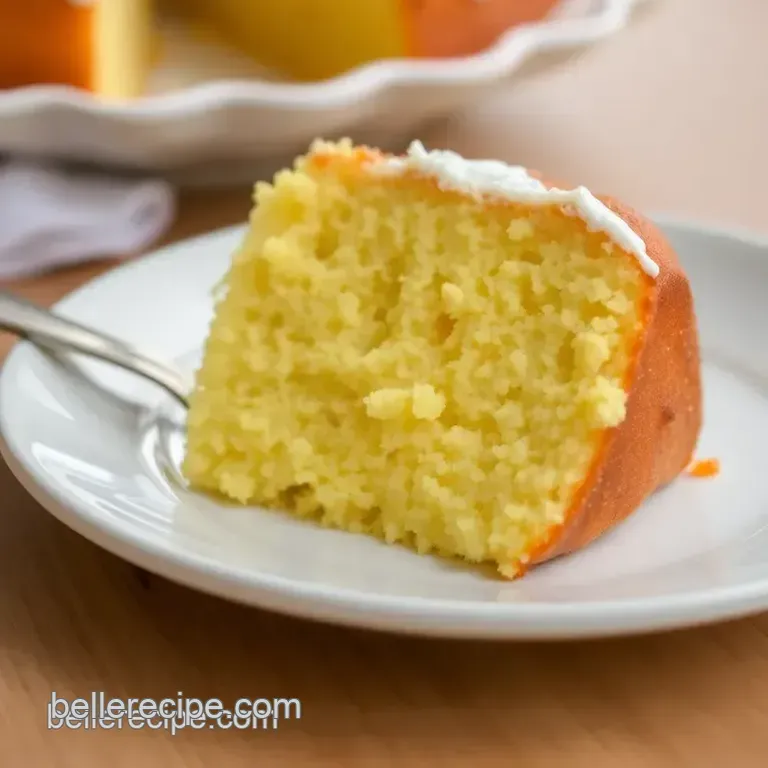
Perfect Presentation
Now, let’s talk about presentation. because honestly, what’s a great cake if it doesn’t look divine? plating techniques are essential! i always recommend leveling the tops of your cakes with a serrated knife the perfect, flat surface makes frosting easier and prettier.
And about that frosting oh, the possibilities! for a classic touch, a rich buttercream recipe will never disappoint. but why not have a little fun with garnishes? fresh berries or edible flowers can add a gorgeous pop of color.
Serve your cake on a beautiful platter, and it instantly elevates any gathering, even casual ones.
And here’s a pro tip: if you're using a layer cake, add a stripe of frosting between the layers for that perfect reveal when you cut into it.
It’s those little details that make people say, “wow!”
Storage and make-ahead
If you’re like me, you might bake a cake and panic about leftovers. but no worries! let’s talk storage. first, make sure your cake is completely cooled before wrapping it up.
I usually just use plastic wrap, but if you want to be fancy, you could store it in an airtight container.
You can even freeze slices for those unexpected guests! wrap each slice well, and it’ll last for about three months in the freezer.
When it's time to enjoy, just let it thaw out on the counter for a couple of hours.
And let’s be real here: who doesn’t love cake on a whim? if you’re preparing for a gathering, you could make your cake a day ahead.
Just pop it into the fridge until party time, and frost it right before serving!
Creative Variations
Get ready to unleash your inner baker! this yellow cake is a blank canvas. want to swap flavor ideas for cake? how about turning it into a chocolate chip cake by folding in some chocolate chips? or, craving something zesty? incorporate citrus zest into the batter.
For those mindful of dietary restrictions, no problem! you can make a gluten-free cake by swapping in a gluten-free baking blend or whip up a dairy-free cake using almond milk and coconut oil.
Seriously, the options are endless!
Seasonal twists are fun too! I love adding pumpkin puree in the fall or fresh berries during summer months for a delicious cake variation. It keeps things fresh and exciting!
Complete Nutrition Guide
Let’s take a minute to look at the nutritional information because you deserve to know what you're enjoying! each serving of our classic yellow cake is about 250 calories.
Not too shabby, huh? with approximately 8g of total fat and 22g of sugar, it’s a treat a delightful indulgence!
And hey, this cake isn't just about calories. it brings joy, and in my book, that’s a significant health benefit! enjoying a slice with friends or family can brighten even the dullest of days.
Just keep an eye on your portion guidance if you’re watching your intake!
Expert FAQ Solutions
Before i wrap this up, let’s tackle a few common questions i’ve heard over the years. one frequent concern is how to ensure your cake doesn’t sink in the middle.
Ensure your baking powder is fresh, and remember don’t open the oven door until the timer is almost up!
Another common dilemma is what to do if your cake is too dry. if that happens, just brush it with some simple syrup or cover it with a luscious frosting.
And if anything goes sideways, just remember: laughter is the best remedy! your cake may not be perfect, but it’s still a homemade effort that deserves a pat on the back.
So, there you have it, a complete guide to whipping up a divine yellow cake that would make rachael ray proud! trust me, with these tips and ideas, your cake will not only taste incredible but look like a showstopper, ready to impress at any gathering.
Enjoy your baking adventures, and may your cakes always rise to the occasion!
Rachael Ray Yellow Cake Recipe 5 Easy Tips For D