Kings Hawaiian Rolls: Fluffy and Sweet

- Time: Active 30 minutes, Passive 160 minutes, Total 190 minutes
- Flavor/Texture Hook: Cloud like crumb with a honey glazed mahogany crust
- Perfect for: Holiday dinners, backyard sliders, or a nostalgic weekend project
- The Ultimate Kings Hawaiian Rolls Recipe
- Why These Sweet Rolls Work
- Essential Kitchen Benchmarks for Success
- Selecting the Right Ingredients
- Tools for Perfect Bread Making
- Step by Step Baking Process
- Solving Your Dough Dilemmas
- Tasty Variations and Substitutions
- Storing and Reheating Your Rolls
- Best Ways to Serve Rolls
- Recipe FAQs
- 📝 Recipe Card
The Ultimate Kings Hawaiian Rolls Recipe
The scent of a warm pineapple juice reduction hitting yeast is something that stays with you. I remember the first time I tried to recreate that iconic orange bag magic in my own kitchen, the air in my small apartment turned into a sweet, buttery cloud.
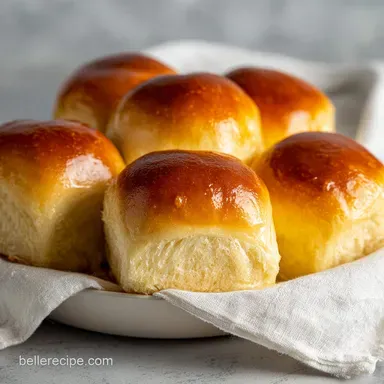
There is a specific kind of sunny, warm joy that comes from pulling a tray of these mahogany topped buns out of the oven, watching the steam rise as you brush on that final honey butter glaze.
This isn't just about making bread, it's about capturing a specific memory of slider nights and holiday hams. We aren't just looking for a "tasty" roll here. We are chasing that specific, almost ethereal fluffiness that makes these rolls famous.
It starts with the pineapple juice, our hero ingredient, which provides both the sweetness and a subtle acidity that makes the crumb incredibly tender.
You’re going to love how the kitchen smells while these are in the oven. It is a mix of floral honey, tropical fruit, and that deep, comforting aroma of toasted sugar. We are going to take it slow, letting the yeast do the heavy lifting, so you end up with rolls that don't just look the part but actually shatter slightly on the crust before revealing a velvety, soft interior.
Why These Sweet Rolls Work
The magic of this dough isn't accidental, it's a careful layering of fats and sugars that protects the air bubbles we work so hard to create.
- Enzyme Tenderization: Pineapple juice contains bromelain, but when we warm it to 110°F, we manage the enzyme activity so it softens the gluten just enough without turning the dough into a puddle.
- Protein Structure: By using bread flour instead of all purpose, we provide a strong enough "net" to hold up all that heavy butter and sugar, keeping the rolls from collapsing.
- Enriched Hydration: The combination of whole milk and eggs creates an "enriched" dough, which results in a tighter, finer crumb that feels like silk on the tongue.
- Double Sweetening: Using both granulated sugar in the dough and honey in the glaze ensures the sweetness is layered through every bite, not just sitting on top.
| Method | Time | Texture | Best For |
|---|---|---|---|
| Homemade Fresh | 190 minutes | Ultra flaky crust, airy center | Special occasions, ultimate sliders |
| store-bought | 0 minutes | Soft but often slightly gummy | Last minute convenience |
| Refrigerated Dough | 45 minutes | Denser, more biscuit like | Quick weeknight side dish |
Whether you are making these for a crowd or just for a quiet Sunday breakfast, the technique matters more than the tools. If you have ever tried my Dinner Rolls recipe, you know I've got a soft spot for bread, but this Hawaiian version is in a league of its own because of that tropical acidity.
Essential Kitchen Benchmarks for Success
When we talk about bread, precision is our best friend. I have learned the hard way that "eyeballing" the temperature of your liquids is the quickest way to end up with a flat, sad tray of dough. If the juice is too cold, the yeast stays asleep. If it’s too hot, you’ve basically sent the yeast to its doom.
Component Deep Dive
| Ingredient | Science Role | Pro Secret |
|---|---|---|
| Pineapple Juice | Acidic Tenderizer | Use 100% pure juice, not "cocktail" blends for the best lift. |
| Bread Flour | Gluten Scaffold | The higher protein content (12-13%) prevents the rolls from being "cakey." |
| Active Dry Yeast | Leavening Agent | Always bloom it in the juice/milk mix to ensure it's alive before adding flour. |
| Unsalted Butter | Fat Enrichment | Soften it to room temp (65°F) so it incorporates without breaking the gluten. |
While we are focusing on these specific ingredients, it's worth noting that the temperature of your kitchen also acts as an ingredient. A drafty room will double your rising time. I like to keep my dough in a turned off oven with the light on. It creates a tiny, warm greenhouse that the yeast absolutely loves.
The hydration level here is intentionally high. This makes the dough a bit tacky to the touch during the mixing phase. Don't be tempted to dump in an extra cup of flour just because it feels "sticky." If you do, you'll lose that signature light as-air texture and end up with something closer to a bagel.
Selecting the Right Ingredients
For this recipe, we are using a specific set of ingredients that work together to create that iconic flavor profile. I've found that swapping high-quality sea salt for generic table salt actually makes the sweetness of the pineapple pop much more effectively.
- 1/2 cup pineapple juice, warmed to 110°F
- Substitute: Orange juice (Same acidity, but citrusy instead of tropical)
- Why this? Provides the signature flavor and tenderizes the gluten proteins.
- 1/4 cup whole milk, warmed to 110°F
- Substitute: Unsweetened soy milk (Similar protein content for structure)
- Why this? Adds fat and lactose, which helps the crust brown beautifully.
- 2.25 tsp active dry yeast
- Substitute: 1.75 tsp Instant yeast (Skip the bloom, mix with dry ingredients)
- Why this? The standard leavener for a slow, flavor developing rise.
- 1 tbsp honey (for the dough)
- Substitute: Maple syrup (Adds a woodsy sweetness)
- Why this? Feeds the yeast quickly and adds floral notes.
- 3.5 to 4 cups bread flour
- Substitute: All purpose flour (The rolls will be softer but less tall)
- Why this? High protein ensures the rolls don't collapse under the weight of the butter.
- 1/3 cup granulated sugar
- Substitute: Coconut sugar (Adds a caramel like depth)
- Why this? Essential for the traditional "sweet" Hawaiian bread profile.
- 1/2 cup unsalted butter, softened
- Substitute: Vegan butter sticks (Choose a high fat brand for richness)
- Why this? Creates a velvety mouthfeel and rich flavor.
- 2 large eggs, room temperature
- Substitute: 1/2 cup unsweetened applesauce (Makes a denser roll)
- Why this? Provides structure and a beautiful golden interior color.
- 1 tsp vanilla extract
- Substitute: Almond extract (Use only 1/4 tsp; it’s very strong)
- Why this? Rounds out the sweetness and mimics the "bakery" scent.
- 1 tsp fine sea salt
- Substitute: Kosher salt (Increase to 1.5 tsp)
- Why this? Balances the sugar and strengthens the gluten network.
- 1/4 tsp ground ginger
- Substitute: 1/2 tsp fresh grated ginger (More pungent flavor)
- Why this? A secret ingredient that enhances the pineapple flavor without tasting like ginger.
- 2 tbsp unsalted butter, melted (for glaze)
- 1 tsp honey (for glaze)
Many people ask if they can use canned pineapple juice versus fresh. Honestly, stay away from fresh pineapple juice for this. Fresh pineapple contains an active enzyme called bromelain that is so strong it can actually dissolve the proteins in your dough, leaving you with a sticky mess that won't rise.
Canned or bottled juice has been pasteurized (heated), which deactivates that enzyme, making it perfect for baking.
Tools for Perfect Bread Making

You don't need a professional bakery to make world class rolls, but a few specific tools will make your life significantly easier. I've made these by hand in a bowl, and while it's a great workout, a stand mixer is your best friend when dealing with enriched, tacky doughs like this one.
- Stand Mixer: Using a dough hook (like on a KitchenAid) allows for consistent gluten development without adding too much extra flour from your hands.
- Digital Thermometer: This is the only way to ensure your juice and milk are exactly 110°F. Even 10 degrees too high can kill your yeast.
- Kitchen Scale: To get 15 perfectly even rolls, weighing each dough ball (60-65g) is much more accurate than "eyeballing" it.
- 9x13 inch Baking Pan: A metal pan is preferred for a better "mahogany" crust on the bottom, though glass or ceramic works fine too.
- Pastry Brush: Essential for getting that honey butter glaze into all the nooks and crannies while the rolls are still sizzling.
Chef's Tip: If you don't have a warm spot for proofing, turn your oven on for exactly 60 seconds, then turn it off. The residual heat is perfect for helping the dough double in size.
step-by-step Baking Process
This is where the magic happens. We are going to build the flavor in stages, starting with the yeast bloom and ending with a glossy, sweet finish. Follow these steps closely, and pay attention to the sensory cues how the dough looks, feels, and smells is just as important as the timer.
- Bloom the yeast. Combine the warmed 1/2 cup pineapple juice, 1/4 cup milk, 1 tbsp honey, and yeast in the mixer bowl. Let it sit for 5–10 minutes until it is frothy and smells like a brewery. Note: This confirms your yeast is active and ready to work.
- Add the wet ingredients. Whisk in the eggs, sugar, softened butter, vanilla, salt, and ginger. Mix on low until the butter looks like tiny pebbles in the liquid.
- Incorporate the flour. Gradually add the bread flour, starting with 3.5 cups. Use the dough hook to knead for 5–7 minutes. The dough should pull away from the sides but still feel slightly tacky. If it's too wet, add the remaining 1/2 cup flour one tablespoon at a time.
- The first rise. Place the dough in a greased bowl and cover with a damp cloth. Let it rest in a warm spot for 1.5 to 2 hours. Wait until it has clearly doubled in size and doesn't spring back when poked.
- Shape the rolls. Punch the air out of the dough and divide it into 15 pieces (about 60-65g each). Roll into tight, smooth spheres and arrange them in three rows of five in your greased 9x13 pan.
- The second rise. Cover and let them rise for another 45–60 minutes. They are ready when they are puffy and touching each other.
- Bake to perfection. Preheat the oven to 350°F (175°C). Bake for 18–22 minutes. Look for a deep mahogany brown color on the tops.
- The final glaze. While the rolls are sizzling hot, whisk together the melted butter and honey. Brush it generously over the tops so it soaks into the warm crust.
One mistake I once made was taking them out too early because I was afraid of the dark color. Don't do that! The sugar in the dough means these will naturally get quite dark that's where all the flavor lives. If they are pale, they will taste like plain white bread. That mahogany crust is the goal.
Solving Your Dough Dilemmas
Bread making can be temperamental. If things aren't going exactly as planned, don't panic. Most dough issues are related to temperature or hydration, and they are usually very fixable if you catch them early.
Why Your Rolls are Dense
If your rolls feel like hockey pucks rather than clouds, you likely over floured the dough or didn't let them rise long enough. Enriched doughs are heavy, so they need every bit of those 170 minutes of prep time to properly expand.
If the room is cold, that rise might even take 3 hours. Patience is the most important ingredient here.
| Problem | Root Cause | Solution |
|---|---|---|
| Dough won't rise | Yeast was killed by heat | Re start with 110°F liquid and fresh yeast. |
| Rolls are dry/crumbly | Too much flour added | Measure by weight next time; don't add flour during kneading. |
| Tops are too dark/burnt | Oven rack was too high | Tent with foil halfway through baking if browning too fast. |
Common Mistakes Checklist
- ✓ Never use fresh pineapple juice; the enzymes will destroy the gluten.
- ✓ Ensure eggs are at room temperature so they don't chill the dough.
- ✓ Don't skip the second rise; this is what creates the "pull apart" texture.
- ✓ Avoid over kneading; 7 minutes in a mixer is plenty for this soft dough.
- ✓ Use a kitchen scale for the rolls to ensure they all cook at the same rate.
If the dough is so sticky you can't even handle it, your kitchen might be too humid. Chill the dough in the fridge for 20 minutes before shaping. Cold dough is much easier to manage, and it won't affect the final bake as long as you let the second rise happen in a warm spot.
Tasty Variations and Substitutions
Once you have mastered the classic version, it is fun to play around with the flavor profile. While these are traditionally sweet, you can lean into the "savory Hawaiian rolls recipes" side of things by adding herbs or spices to the dough.
Flavor Variations
- Toasted Coconut: Add 1/4 cup of finely shredded toasted coconut to the dough during the final minute of kneading for a tropical crunch.
- Savory Herb: Skip the vanilla and ginger; add 1 tablespoon of dried chives and 1/2 teaspoon of garlic powder. This makes incredible turkey sliders.
- Spicy Pineapple: Add a pinch of cayenne pepper to the glaze for a sweet heat finish that pairs beautifully with BBQ pulled pork.
Diet Friendly Substitutions
- dairy-free: Replace the whole milk with full fat coconut milk and the butter with a high-quality vegan butter substitute. The coconut milk actually enhances the tropical vibe.
- Honey Free: If you are avoiding honey, agave nectar or maple syrup are perfect 1:1 swaps for both the dough and the glaze.
If you are looking for another soft bread project, you might want to try my Pandesal Filipino Bread rolls. They have a similar soft texture but are rolled in breadcrumbs for a unique, sandy crust that is absolutely addictive with coffee.
Storing and Reheating Your Rolls
These rolls are so soft because of the high fat content, which actually helps them stay fresh longer than standard lean breads. However, they are still best within the first 48 hours. If you have leftovers, keep them in an airtight container at room temperature.
Don't put them in the fridge, as the cold temperature causes the starches to recrystallize and makes the bread go stale faster.
- Freezing: These freeze beautifully. Once they are completely cool, wrap the whole tray (or individual rolls) in plastic wrap, then a layer of foil. They will stay fresh for up to 3 months.
- Reheating from Frozen: Thaw them at room temperature for about 2 hours. To get that "just baked" feel, wrap them in foil and pop them in a 300°F oven for 10 minutes.
- Zero Waste Tip: If you find yourself with rolls that have gone a bit hard, don't toss them! They make the world's best French toast or bread pudding because the pineapple and honey flavors are already built into the crumb.
If you're in the mood for something a bit more savory with your leftovers, they also make the perfect base for cheesy pizza rolls. Just hollow out the center slightly, stuff with cheese and pepperoni, and bake until melty.
Best Ways to Serve Rolls
The beauty of a "kings hawaiian rolls recipe" is its versatility. I love them just as they are, split open and smeared with a little extra salted butter, but they are also the ultimate vessel for creative sandwiches.
- The Classic Slider: Layer thinly sliced ham and Swiss cheese inside the rolls, brush the tops with a mixture of melted butter, Dijon mustard, and poppy seeds, and bake until the cheese is gooey.
- Breakfast Bliss: Use them for egg and bacon sliders. The sweetness of the bun against the salty bacon and runny yolk is a flavor combination that is hard to beat.
- Pulled Pork Pairing: There is no better match for smoky, vinegary BBQ pulled pork than these sweet, airy rolls. The bread acts like a sponge for the sauce without falling apart.
If you want a specific outcome, try these tweaks: For a chewier crust, skip the honey butter glaze and brush with a simple egg wash before baking. For a sweeter roll, replace the granulated sugar with brown sugar for a deeper molasses note.
For extra fluffy rolls, extend the second rise by 15 minutes until the dough looks almost fragile.
Whatever you decide to do with them, remember that bread is a living thing. It reacts to your touch and your environment. Be mindful of the steps, enjoy the process of kneading, and I promise the reward of those mahogany topped, pillowy rolls will be the highlight of your week.
Sharing a tray of these, still warm from the oven, is one of the simplest ways to bring people together. Trust me, they won't last more than ten minutes on the counter!

Recipe FAQs
What is the secret ingredient in Hawaiian rolls?
The primary secret is pineapple juice. This specific liquid provides the signature sweetness and delicate acidity that distinguishes these rolls from standard milk bread.
What can I do with King's Hawaiian rolls?
Use them for sliders or as a sweet savory side. They are perfect for sandwiches, but if you want to explore how to apply this soft, enriched dough technique to other baked goods, see how we use similar principles in our cinnamon rolls recipe.
What's the secret to the King's Hawaiian roll flavor?
The secret lies in the combination of honey, vanilla, and ground ginger. These aromatics create a complex, warm flavor profile that works in harmony with the pineapple yeast base.
What are the ingredients in King's Hawaiian roll?
They consist of bread flour, pineapple juice, milk, active dry yeast, honey, sugar, butter, eggs, vanilla extract, sea salt, and ground ginger. Everything is glazed with a simple mixture of melted butter and honey immediately after baking.
How to fix dough that is too sticky to handle?
Chill the dough in the refrigerator for 20 minutes before shaping. This firms up the butter and makes the dough significantly easier to divide into equal portions without it sticking to your hands.
How to ensure the rolls have that signature "pull apart" texture?
Allow the shaped dough to undergo a full second rise for 45 60 minutes. Waiting until they are puffy and touching inside the pan is essential for achieving that soft, light, and airy interior structure.
How to keep the rolls fresh after baking?
Store them in an airtight container at room temperature for up to 48 hours. Avoid the refrigerator entirely, as the cold environment causes the starches to recrystallize and makes the bread go stale much faster.
Homemade Kings Hawaiian Rolls
Ingredients:
Instructions:
Nutrition Facts:
| Calories | 226 kcal |
|---|---|
| Protein | 4.9g |
| Fat | 8.8g |
| Carbs | 31.6g |
| Fiber | 0.8g |
| Sugar | 7.3g |
| Sodium | 153mg |
