Instant Pot Chicken Pot Pie: Ultimate and Easy
- Time: 5 min active + 30 min cooking = Total 35 minutes
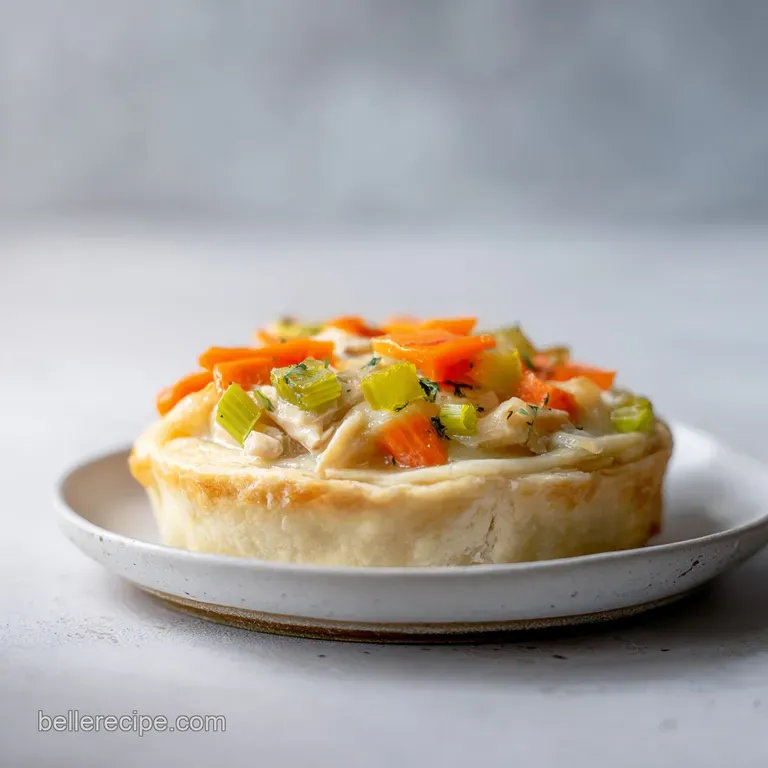
- Flavor/Texture Hook: Velvety, rich filling topped with mahogany gold, buttery biscuits
- Perfect for: Mid week comfort dinners when you're short on time
That first sizzle of butter hitting the hot pot is where the magic starts. I remember trying to make a traditional pot pie for a family dinner years ago, and I was so convinced that the "slow and steady" oven method was the only way to get it right.
I spent two hours on it, only to pull out a pie with a beautiful top but a bottom crust that was basically a wet sponge. It was a total letdown.
I realized that the struggle isn't the ingredients, it's the moisture. You want the filling to be thick and rich, but you don't want that moisture fighting the crust for an hour in the oven. That's why I shifted to this method.
By separating the pressure cooking of the filling from the baking of the topping, you get a velvety interior and a crust that actually shatters when you bite into it.
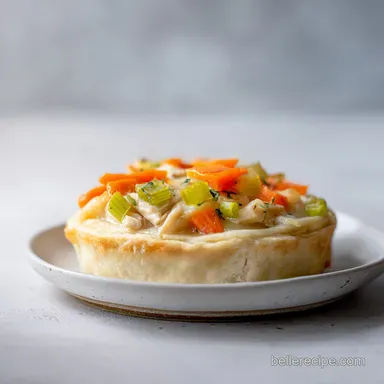
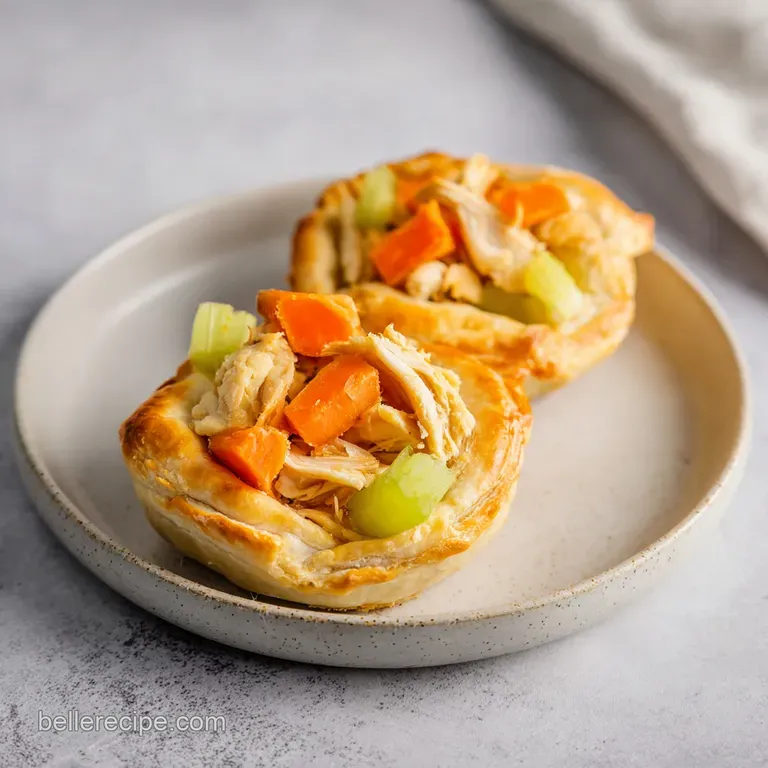
This instant pot chicken pot pie recipe is my go to because it gives you that "Sunday dinner" vibe on a Tuesday night. We're talking about chicken thighs that practically melt and a sauce that hugs the vegetables just right.
It's all about the contrast between the steaming, savory filling and the crisp, buttery biscuit on top.
Instant pot chicken pot pie recipe
Right then, let's get into why this version actually works. Most people think the Instant Pot is just for soups or tough meats, but it's actually a secret weapon for pot pie filling. The high pressure forces the flavors of the thyme and garlic deep into the chicken in a fraction of the time it would take on a stove.
But the real trick is the finishing touch. Instead of putting the dough in the pot which would just result in a doughy mess we move the filling to a dish. This lets the oven heat hit the biscuits directly, creating that deep mahogany color we're after.
It's a simple tweak, but it makes a world of difference in the final texture.
If you're looking for other easy ways to prep chicken, you might like my homemade shake and bake method for a different kind of crunch. But for pure, soul warming comfort, this pie is the winner. It's the kind of meal that makes the whole house smell like a cozy cottage in the countryside.
Why This Works
The secret to a great pot pie isn't just the ingredients, but how they react under pressure and heat.
- Collagen Breakdown: Chicken thighs have more connective tissue than breasts, which turns into gelatin under pressure, making the sauce naturally velvety.
- Starch Activation: Sautéing the flour in butter before adding broth ensures the starch granules swell and thicken the sauce without leaving a grainy texture.
- Moisture Separation: Transferring the filling to a baking dish prevents the steam from the vegetables from soaking into the bottom of the crust.
- Direct Heat: Baking the biscuits at a high temperature allows the butter in the dough to puff and brown rapidly, creating a shatter crisp top.
| Method | Total Time | Crust Texture | Best For |
|---|---|---|---|
| Traditional Oven | 1.5 - 2 hours | Flaky but often soggy bottom | Special occasions |
| Instant Pot Only | 30 minutes | Soft/steamed dough | Quick lunch |
| IP Filling + Oven | 35 minutes | Mahogany gold and crisp | Weeknight dinner |
Component Analysis
Understanding the role of each ingredient helps you tweak the recipe without ruining the texture.
| Ingredient | Science Role | Pro Secret |
|---|---|---|
| Chicken Thighs | Flavor & Gelatin | Cubing them small ensures every bite has protein |
| Unsalted Butter | Fat Emulsion | Use a high fat European style for a richer sauce |
| All Purpose Flour | Thickening Agent | Toast it for 60 seconds to remove the "raw" taste |
| Chicken Broth | Liquid Base | Use low sodium so you can control the salt levels |
What You'll Need
For the filling, keep things simple. The goal is a balance of savory chicken and bright, tender vegetables.
- 1.5 lbs boneless, skinless chicken thighs, cubed Why this? Stay juicy under pressure compared to breasts
- 3 tbsp unsalted butter Why this? Creates a rich, savory base
- 1 cup diced yellow onion Why this? Adds aromatic sweetness
- 3 carrots, sliced into rounds Why this? Earthy contrast to the rich sauce
- 2 stalks celery, diced Why this? Essential savory depth
- 3 cloves garlic, minced Why this? Sharp flavor that mellows when cooked
- 1/3 cup all purpose flour Why this? Thickens the filling into a gravy
- 2 cups low sodium chicken broth Why this? Provides the savory liquid
- 1 tsp dried thyme Why this? The classic pot pie aroma
- 1/2 tsp salt Why this? Enhances all other flavors
- 1/2 tsp black pepper Why this? Adds a subtle warmth
- 1 cup frozen peas Why this? Pop of color and sweetness
- 1 cup frozen corn Why this? Adds a slight crunch
For the topping, you can be a bit more flexible, but the classics work best.
- 1 can (12 oz) refrigerated flaky biscuits Why this? Fast, reliable rise
- 2 tbsp melted butter Why this? For a golden, glossy finish
If you find you have too much broth left over, you can always use it to make a quick pan sauce or store it for another meal. For a fresh side to balance the richness of this instant pot chicken pot pie recipe, a Classic Italian Pasta Salad provides a great acidic contrast.
| Original Ingredient | Substitute | Why It Works |
|---|---|---|
| Chicken Thighs | Chicken Breast | Leaner protein. Note: Can become dry; reduce pressure time by 1 min |
| All Purpose Flour | Cornstarch (3 tbsp) | gluten-free option. Note: Mix with cold water first to avoid lumps |
| Refrigerated Biscuits | Puff Pastry | More buttery and flaky. Note: Requires a slightly longer bake time |
| Frozen Peas/Corn | Fresh Mixed Veggies | Brighter flavor. Note: Add at the very end to avoid overcooking |
How to Make It
Let's crack on. Make sure your chicken is cubed into roughly 1 inch pieces so they cook evenly.
1. The Sauté & Sear
Set the Instant Pot to Sauté mode. Melt the butter over medium heat. Add the chicken and brown for 3-4 minutes until the edges are golden. Note: Don't overcrowd the pot or the chicken will steam instead of searing.
2. Soften the Aromatics
Stir in the onions, carrots, and celery, cooking until the onions become translucent (about 3 minutes). Add garlic and thyme, stirring for 30 seconds until the aroma fills the kitchen.
3. The Thickening Step
Sprinkle the flour over the vegetables and stir constantly for 1 minute. Note: This step is vital to cook out the raw flour taste and prevent a gummy sauce.
4. Deglaze the Pot
Slowly pour in the chicken broth, scraping the bottom of the pot with your spoon to remove any browned bits. Ensure the bottom is clean to prevent the Burn notice.
5. Pressure Infusion
Secure the lid, set the valve to Sealing, and select Manual/Pressure Cook on High for 8 minutes.
6. The Quick Release
Perform a Quick Release of the pressure immediately. Stir in the frozen peas and corn. Note: The residual heat will cook the frozen veg without making them mushy.
7. Assemble for Bake
Pour the filling into a baking dish. Top with the biscuit dough and brush the tops with melted butter.
8. The Final Crisp
Bake at 400°F (200°C) for 12-15 minutes until the crust is deep mahogany gold and the filling is bubbling.
Chef's Tip: If you want an extra layer of flavor, add a pinch of smoked paprika to the melted butter you brush on the biscuits. It gives a subtle, wood fired taste that pairs beautifully with the thyme.
Troubleshooting Guide
Even with a steady hand, things can go sideways. Here's how to handle it.
Filling is too thin?
If the sauce looks more like soup than gravy, it's usually because of too much liquid or not enough flour. You can fix this by simmering the filling on Sauté mode for a few more minutes after the pressure cook, or whisking in a tiny bit of cornstarch slurry.
Encountered the "Burn" Notice?
This happens when bits of food are stuck to the bottom of the pot. The fix is to deglaze more thoroughly in step 4. If it happens mid cycle, Quick Release, stir well, add a splash more broth, and restart.
Soggy Crust Syndrome?
If the biscuits aren't crisp, your oven might not be hot enough, or you put the dough on before the filling had a chance to settle. Always preheat your oven to a full 400°F (200°C) before the filling goes in.
| Problem | Root Cause | Solution |
|---|---|---|
| Lumpy Sauce | Flour added too fast | Whisk vigorously or use a handheld blender |
| Rubbery Chicken | Overcooked breast meat | Use thighs or reduce time to 6 mins |
| Pale Biscuits | Oven temp too low | Increase temp or broil for the last 2 mins |
Common Mistakes Checklist:
- ✓ Deglazed the pot completely after sautéing
- ✓ Used chicken thighs instead of breasts for better texture
- ✓ Preheated oven to 400°F (200°C)
- ✓ Stirred in frozen veggies after pressure cooking
- ✓ Brushed biscuits with butter for that mahogany finish
Adjusting Your Batch
You don't always need a full pot of pie. Here is how to scale this instant pot chicken pot pie recipe.
Cutting it in half: Use a smaller baking dish (like a loaf pan). Reduce the chicken broth by about 15% because less liquid evaporates in smaller batches. The pressure cook time remains 8 minutes, but the baking time for the biscuits may drop to 10-12 minutes.
Doubling the recipe: Don't double the liquids exactly; reduce the total broth by about 10% to keep the sauce thick. Work in two batches for the sautéing phase if you crowd the pot, the chicken won't brown, and you'll lose that deep flavor.
For baking, use two separate dishes rather than one deep one to ensure the biscuits cook through.
Baking Adjustments: If you're doubling the amount of biscuits in one large pan, lower the oven temperature to 375°F (190°C) and extend the bake time by 5-7 minutes. This prevents the edges from burning before the center is done.
Truth About Pot Pies
There are a few things people get wrong about this dish that I want to clear up.
Myth: Searing the chicken seals in the juices. Actually, searing doesn't "seal" anything. Moisture is lost regardless. The reason we sear the chicken in this instant pot chicken pot pie recipe is for the flavor those browned bits (fond) create the savory depth of the gravy.
Myth: Pressure cookers make vegetables mushy. They can, but not if you time it right. By adding the peas and corn after the pressure cycle, they stay bright and slightly crisp, providing a necessary texture break from the velvety sauce.
Myth: You need a homemade crust for it to be "real." Honestly, refrigerated biscuits are often superior for this specific method because they rise higher and create more air pockets, which leads to that shatter crispy top.
Preservation Secrets
Since this is a hearty meal, it actually keeps quite well, provided you store it correctly.
In the Fridge: Store the filling and the baked biscuits separately if possible. If they are already combined, keep them in an airtight container for up to 3 days. The sauce may thicken more in the fridge, so you'll need a splash of water or broth when reheating.
In the Freezer: You can freeze the filling (without the crust) for up to 2 months. Let it cool completely before freezing in a freezer safe bag. When you're ready to eat, thaw it in the fridge overnight, pour it into a dish, and add fresh biscuits on top.
Zero Waste Tips: Don't toss your veggie scraps! Save the onion skins, carrot ends, and celery tops in a freezer bag. Once the bag is full, simmer them in water for two hours to make your own homemade stock for the next time you make this pie.
Perfect Complements
Because this dish is so rich and creamy, you want sides that bring a bit of brightness or acidity to the plate.
A simple arugula salad with a lemon vinaigrette is a great choice. The peppery greens and citrus cut through the butter and cream of the pot pie. If you want something heartier, roasted asparagus or steamed green beans with a squeeze of lime work beautifully.
For those who love a bit of heat, a drizzle of hot sauce on the side can wake up the flavors. While this recipe is classic, adding a bit of spice is a great way to personalize your meal. Trust me, a little zing makes the velvety chicken pop.
High in Sodium
910 mg 910 mg of sodium per serving (40% 40% of daily value)
The American Heart Association recommends a limit of 2,300mg of sodium per day for most adults to maintain heart health.
Tips to Reduce Sodium in Your Chicken Pot Pie
-
Upgrade Your Broth-30%
Replace the low-sodium chicken broth with no-salt added chicken broth or a homemade unsalted stock.
-
Omit Added Salt-25%
Remove the 1/2 tsp of added salt entirely; the flavor from the broth and aromatics is usually sufficient.
-
Make Your Own Biscuits-20%
Substitute the refrigerated flaky biscuits with homemade biscuits to avoid the high sodium content found in processed doughs.
-
Enhance with Herbs
Increase the dried thyme or add fresh parsley and lemon zest to boost flavor without adding any sodium.
Recipe FAQs
Can I use chicken breasts instead of thighs?
Yes, but thighs are recommended. Breasts can become dry during the high pressure cycle; if you prefer a different chicken preparation, try our Boursin chicken recipe.
How to prevent the "Burn" notice in the Instant Pot?
Deglaze the pot thoroughly after adding chicken broth. Use a spoon to scrape all browned bits from the bottom before securing the lid to ensure a smooth cook.
Is it true I must pre-cook the vegetables for an hour before pressure cooking?
No, this is a common misconception. Sautéing the onions, carrots, and celery for 3 minutes is plenty of time before they finish softening under pressure.
How to thicken the filling if it is too runny?
Simmer the mixture on Sauté mode for a few minutes. This reduces the liquid and allows the flour to concentrate the sauce before you add the biscuits.
Can I freeze the filling before baking?
Yes, store the cooked filling in an airtight container. Thaw it completely before topping with biscuits and baking at 400°F for the best results.
Why brown the chicken before pressure cooking?
It develops deep flavor through the Maillard reaction. Sautéing the chicken for 3-4 minutes creates a richness that cannot be replicated by pressure cooking alone.
How to achieve a mahogany gold crust?
Brush the biscuit dough with melted butter. Bake at 400°F for 12-15 minutes until the top reaches a deep gold color.
Instant Pot Chicken Pot Pie