Brown Sugar Syrup: the Liquid Gold Standard (Kokuto Style)
- The Liquid Gold Standard: Why Traditional Brown Sugar Syrup Is Superior
- Essential Components for the Best Homemade Brown Sugar Syrup
- The Two-Step Process: How to Make Rich Brown Sugar Syrup (Stovetop Method)
- The Science of Viscosity: Mastering the Perfect Syrup Consistency
- Expert Tips for Syrup Success & Troubleshooting Common Errors
- Maximizing Shelf Life: Storing Your Batch of Brown Sugar Syrup
- Beyond the Coffee Cup: Versatile Uses for Homemade Brown Sugar Syrup
- Recipe FAQs
- 📝 Recipe Card
The Liquid Gold Standard: Why Traditional Brown Sugar Syrup Is Superior
When that scent of deep molasses and burnt caramel hits the air, you know you’re doing something right. It smells like the perfect chewy cookie, warm from the oven, but in liquid form; it’s rich, dark, and ridiculously comforting. Forget those cloyingly sweet, thin syrups you usually buy.
This homemade brown sugar syrup has an incredible complexity that rivals expensive craft brands.
Why would you bother making syrup at home? It is genuinely the easiest thing you will ever master, taking under ten minutes of active cook time. This process saves you cash, removes all those weird preservatives, and ensures you always have the crucial ingredient for the perfect Brown Sugar Shaken Espresso: Homemade Recipe for the Perfect Micro Foam in your fridge. Honestly, once you taste the difference, there is absolutely no going back to the store-bought stuff.
I made the mistake of thinking all syrups were the same for years. Now, I understand the magic is in the ratio and the technique. We’re going to achieve a viscosity that coats a spoon beautifully, elevating whatever you drizzle it over.
Let’s get that kettle on and crack on with the easiest recipe you'll ever add to your repertoire.
Defining Kokuto Style: The Secret to Depth and Molasses Flavor
This recipe isn't just "simple syrup made with brown sugar"; we are aiming for the profound, deep taste of Kokuto. Kokuto is a specific type of unrefined cane sugar traditionally made in Japan, known for its intense mineral content and heavy molasses profile.
By using a higher concentration of brown sugar and carefully reducing it, we mimic that glorious, fudgy depth.
The richness comes directly from the molasses content, which is significantly higher in brown sugar than standard white sugar. This molasses not only gives us that gorgeous colour but also provides a distinct toffee flavour that plain syrups just can’t touch.
This depth is what makes it spectacular in coffee, especially when paired with strong espresso.
Two Ingredients, Infinite Flavor Potential
It's actually absurd how little you need to create such a powerful flavour profile. We only need brown sugar and water, plus a tiny pinch of salt to act as a flavour amplifier. That’s really it! The simplicity is the beauty here.
Is Brown Sugar Syrup the Same as Simple Syrup?
Absolutely not, and this is where most people get confused. Standard simple syrup uses a 1:1 or 2:1 ratio of white granulated sugar to water, resulting in a neutral sweetness. Brown sugar syrup uses, well, brown sugar, which means it contains molasses.
More importantly, traditional simple syrup is usually not reduced by boiling; you just heat it until the sugar dissolves. We deliberately simmer our brown sugar syrup for five to eight minutes, significantly reducing the water content.
This reduction step concentrates the molasses flavour and results in a much thicker, almost sticky texture, making it far superior for drizzling.
Essential Components for the Best Homemade Brown Sugar Syrup
We don't have many ingredients, so the quality of what we use really matters. You wouldn't use ditch water, right? The same logic applies to the sugar you choose.
Choosing the Right Brown Sugar (Dark vs. Light)
Light brown sugar gives you that classic, accessible caramel flavour, which is fantastic for coffee or general baking (like my famous Truly Reliable Rolled Sugar Cookies Recipe No Spread ). However, if you are looking for that maximum Kokuto depth, you should consider using dark brown sugar. Dark brown sugar contains nearly twice the molasses of light brown sugar.
Pro Tip: I usually use a 50/50 mix of light and dark brown sugar. This gives you deep complexity without tasting overtly licorice-y or too heavy.
Water Quality: Does it Matter?
Yes, actually, it totally matters. If your tap water has a funky mineral taste, your syrup will taste like it, too. This is not a strong soup where flavour covers impurities.
I always recommend using filtered water or even bottled water. Clean water ensures the molasses flavour can shine through without any metallic or chlorine undertones.
Adjusting Ratios for Different Uses (Viscosity Control)
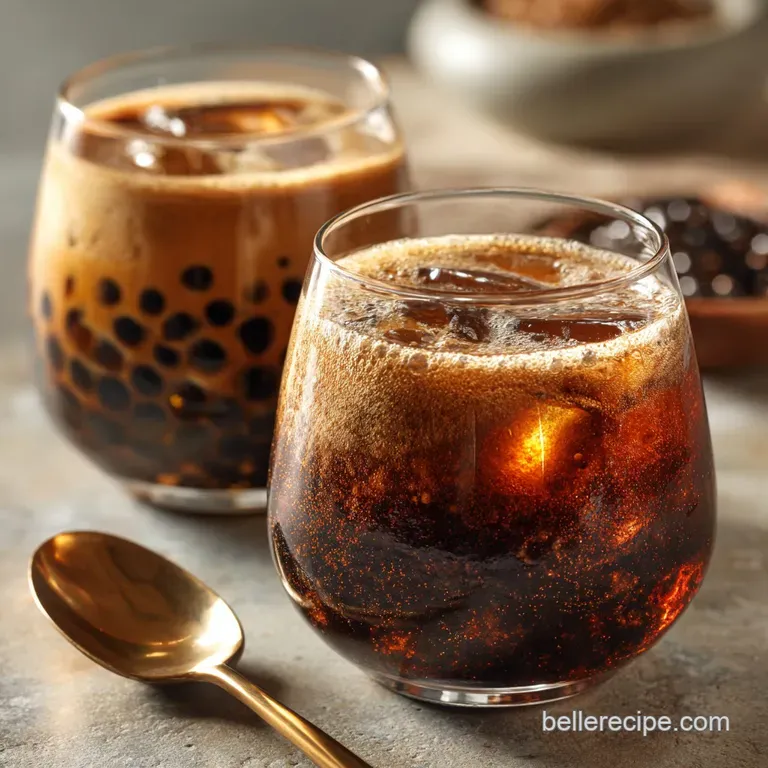
The ratio in this recipe (1.5 cups sugar to 0.75 cups water) is designed for a thick, coating consistency perfect for desserts and cold drinks like boba or iced lattes. If you need a thinner syrup, perhaps for delicate cocktail applications where you need instant dissolution, reduce the sugar to 1.25 cups while keeping the water the same.
| Ingredient | Substitute/Variation | Note on Usage |
|---|---|---|
| Light Brown Sugar | Dark Brown Sugar, Muscovado | For deeper, more pronounced molasses flavour. |
| Filtered Water | Whole Milk or Cream | Creates a Brown Sugar Creamer (Refrigerate quickly, shelf life drops to 1 week). |
| No Simple Syrup? | Maple Syrup (less sweet) | Fine in a pinch, but the flavour is completely different. |
The Two-Step Process: How to Make Rich Brown Sugar Syrup (Stovetop Method)
This is a foolproof method, provided you follow the one cardinal rule: Do not stir when boiling. Seriously, you'll regret it.
Combining Sugar and Liquid: The Initial Phase
Grab your heavy bottomed saucepan. Put the brown sugar, water, and that essential pinch of salt right in there. You want to start this over medium low heat. Stir constantly until every single sugar crystal is dissolved; the liquid should look homogenous, not grainy.
This slow start prevents later crystallization.
Gentle Simmering and Dissolving the Crystals
Once the mixture is fully dissolved, turn the heat up to medium high until it hits a rolling boil. Stop stirring now. Let it boil, undisturbed, for five to eight minutes.
If you stir now, you’ll introduce undissolved sugar grains from the edges back into the main liquid, instantly causing crystallization.
Chef's Note: If you see any sugar grains clinging to the sides of the pan above the liquid line, use a pastry brush dipped in plain water to gently wipe them down into the syrup. This critical step guarantees a smooth, clear syrup.
The Chill Test: Knowing When It’s Done
After about six minutes, the syrup will still look thin and runny. You might think it needs more time, but trust the process! When you pull it off the heat, the residual heat will continue to cook it slightly. The syrup will thicken dramatically as it cools, so don't over reduce it unless you want hard candy.
Once the rapid bubbling has stopped, transfer the syrup immediately to a clean, heatproof jar.
The Science of Viscosity: Mastering the Perfect Syrup Consistency
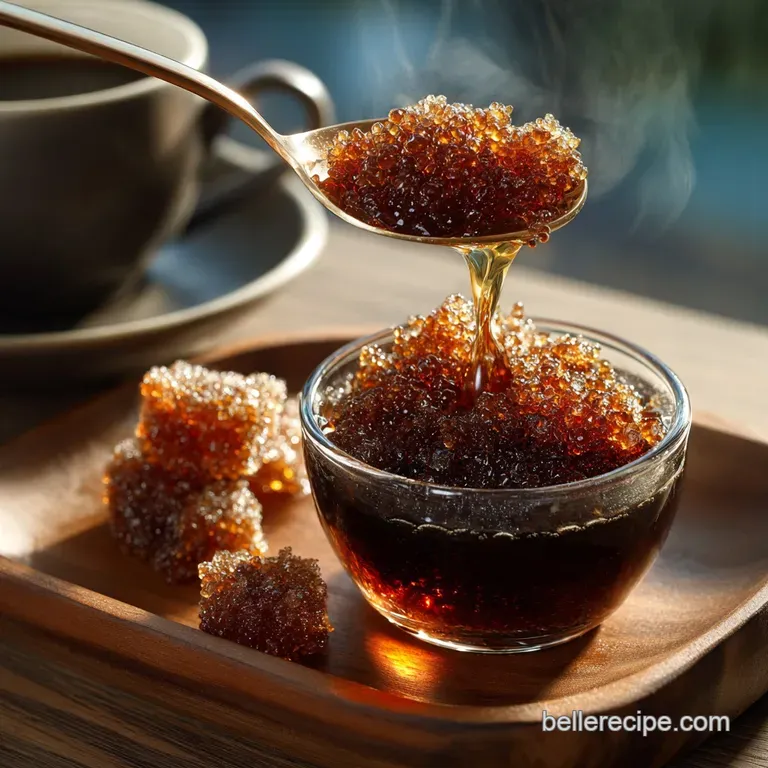
Viscosity is just a fancy word for thickness, and we achieve it by boiling off water. When we reduce the water content, the sugar molecules get closer together, making the syrup dense and sticky. If you cook it too long, you’ve evaporated too much water, and you end up with hard rock candy when it cools.
If you cook it too little, it's just brown sugar flavoured water.
Aim for that 5 to-8 minute sweet spot. If you happen to own a candy thermometer, you are looking for a temperature range of 215°F to 220°F (102°C to 104°C). That slight temperature increase beyond the boiling point is key to achieving true 'nappe' (the ability to coat the back of a spoon).
Expert Tips for Syrup Success & Troubleshooting Common Errors
Why Your Syrup Crystalized (And How to Fix It)
Crystallization is the most common failure mode, creating a grainy, semi solid mess. Why does it happen? Usually, because you stirred it while it was boiling, or you didn't dissolve all the initial sugar granules.
The Fix: Don’t despair! Put the crystallized syrup back in the saucepan with a splash of fresh water (about 1 Tbsp). Gently reheat it over low heat, stirring only until the crystals re-dissolve completely.
Once it is fully liquid again, raise the heat and let it boil, without stirring , for another 5 minutes, paying close attention to the sides of the pan.
Avoiding Scorching (The Smell of Failure)
If you smell burnt sugar, you have scorched the syrup, and that taste is impossible to hide. You must always use a heavy bottomed pan ; thin pans create hot spots and burn the sugar on contact. Keep the heat controlled, especially during the reduction phase.
If you suspect scorching, transfer the syrup immediately to a cool jar, being careful not to scrape the bottom of the pan where the burnt bits might reside.
Maximizing Shelf Life: Storing Your Batch of Brown Sugar Syrup
The Role of Molasses in Crystallization Prevention
Molasses actually works in our favour here. Because molasses contains inverted sugars, it helps prevent the syrup from solidifying in the fridge, much like corn syrup does in some candy recipes. This allows our syrup to remain liquid and pourable, even when chilled.
Achieving the Ideal 'Nappe' (Coating Thickness)
Nappe is a classic culinary term describing a sauce thick enough to coat the back of a spoon. When you dip a spoon into the finished, cooled syrup, the liquid should cling to it, not run off immediately like water. If your syrup runs right off, it means you needed to reduce it longer.
Next time, give it another two minutes of simmering.
Temperature Targets for Maximum Flavor Extraction
While we target 215 220°F for consistency, high heat exposure also develops the caramel flavour. Boiling the syrup for that extended period coaxes out those deep, complex toffee notes that make the syrup taste richer than standard simple syrup.
When to Skim the Surface
Occasionally, especially if you used very fresh, moist brown sugar, a small amount of dark foam might rise to the surface while boiling. If it looks chunky or particularly dark, gently skim it off with a spoon before transferring the syrup to the jar. This is purely for aesthetics and a cleaner final texture.
Beyond the Coffee Cup: Versatile Uses for Homemade Brown Sugar Syrup
I keep a batch of this "liquid gold" on hand constantly; it’s too versatile not to.
Use it immediately in homemade coffee creations. If you’re already obsessed with the iced version, trust me, this syrup makes your hot lattes taste instantly gourmet. It's the secret weapon needed for a truly authentic Brown Sugar Shaken Espresso: Homemade Recipe for the Perfect Micro Foam .
It also makes an incredible dessert sauce. Drizzle it warm over vanilla ice cream or use it as the base liquid when mixing a batch of sticky toffee pudding. You can even use it in place of that super thin, store-bought syrup on pancakes or waffles for a richer alternative to maple.
Maximizing Shelf Life: Storing Your Batch of Brown Sugar Syrup
This syrup keeps beautifully, which is half the fun of making a big batch. Once cooled, seal it tightly and store it in the refrigerator. It remains perfectly fresh for up to three weeks, sometimes even a month. The high sugar content acts as a natural preservative, keeping it safe.
Freezing: You can freeze it, but I generally wouldn't recommend it for a truly refined, pourable syrup. When thawed, syrups can sometimes weep water, resulting in a slightly weaker concentration or a minor texture shift.
If you must freeze it, use freezer safe containers and ensure there’s a little headspace at the top. To thaw, just let it sit overnight in the fridge.
Reheating Tips: If your syrup gets too thick and sticky in the cold fridge, just heat a small amount in the microwave for 10 seconds. Alternatively, dip the glass jar into a bowl of very hot water for a few minutes; it will loosen right up.

Recipe FAQs
Why did my syrup crystallize or turn grainy after cooling?
Crystallization usually happens if residual sugar grains cling to the sides of the pot during boiling and seed the entire mixture. To prevent this, avoid stirring once the mixture boils vigorously, and use a wet pastry brush to carefully wipe down the inside edges of the saucepan.
If crystallization occurs, gently reheat the syrup and whisk in a teaspoon of hot water until the grains dissolve.
How long can I store this brown sugar syrup, and does it require refrigeration?
Due to the high concentration of sugar, which acts as a natural preservative, the syrup keeps very well at room temperature in a sealed, sanitized container for up to one month. For maximum shelf life, or if you live in a very warm climate, storing the syrup in the refrigerator can extend its freshness to approximately three months.
Always ensure the container is completely airtight to prevent oxidation.
My syrup is too thick and set up like soft candy. How do I fix the consistency?
This issue indicates the mixture was cooked too long or reached a temperature above 230°F (110°C), evaporating too much water. To correct this, transfer the syrup back to a saucepan and gently whisk in 1 to 2 tablespoons of hot water until you achieve the desired flowable consistency.
Be cautious not to add excess liquid all at once.
I only have light brown sugar available. Will that work for this recipe?
While light brown sugar will still produce a sweet, functional syrup, it lacks the deep, intense molasses flavor required for the authentic “Kokuto style” richness. If you must use light brown sugar, you can compensate slightly by simmering it for an additional minute to develop a deeper caramel note, but the color and complexity will be lighter.
The best results are always achieved using dark brown sugar.
Can I add vanilla or other spices to enhance the syrup’s flavor profile?
Absolutely adding aromatics is a wonderful way to customize this base recipe for specific culinary applications. You can steep ingredients like a cinnamon stick, a few star anise pods, or the scrapings of a vanilla bean directly in the warm syrup.
Allow them to infuse for 30 minutes before straining the syrup into its final storage container.
What are the best culinary applications for this rich syrup?
This robust, complex syrup is ideal for drinks like cold brew coffee, homemade boba/bubble tea, or elevated milk teas because its flavor holds up well against dilution. Beyond beverages, it performs beautifully as a glaze for savory items like pork belly, or as a rich sweetener in bourbon based cocktails such as an Old Fashioned.
Is this brown sugar syrup recipe naturally vegan and gluten-free?
Yes, the standard two-ingredient recipe dark brown sugar and water is inherently both vegan and gluten-free. It does not utilize any animal products, dairy, or gluten containing grains. Always ensure that the sugar brand you choose does not have any cross contamination if severe allergies are a concern.
Rich Brown Sugar Syrup Recipe

Ingredients:
Instructions:
Nutrition Facts:
| Calories | 291 kcal |
|---|---|
| Protein | 0.0 g |
| Fat | 0.0 g |
| Carbs | 74.3 g |
