Candied Ginger: Sticky Sweet Sunshine Recipe
- Welcome to the World of Crystallized Ginger: Overview and History
- The Alchemy of Candying: Why Boiling Ginger Works
- Essential Ingredients for Perfect Candied Ginger
- Transforming Fresh Ginger Root: The Step-by-Step Method
- Mastering the Syrup and Coating: Pro Tips and Troubleshooting
- How to Store and Preserve Your Homemade Confection
- Beyond Snacking: Brilliant Ways to Use Candied Ginger Jewels
- Recipe FAQs
- 📝 Recipe Card
Welcome to the World of Crystallized Ginger: Overview and History
Stop what you are doing right now and imagine this aroma: spicy, sweet, warm, and intensely comforting. That, my friends, is the smell of perfectly finished Candied Ginger . It starts with a humble, fiery root and ends up as a chewy, sugary jewel.
Seriously, there is nothing better for soothing an angry stomach or fighting off that three o’clock slump. This isn’t a quick recipe, but the active time is manageable, and the results are so cheap and delicious you’ll never buy the pre-made stuff again.
I used to think making anything involving a sugar syrup was pure science fiction, reserved for fancy confectioners only. But I was wrong! This specific technique for traditional Candied Ginger removes all the guesswork.
It relies on slow simmering rather than rapid boiling, which means the ginger pieces get incredibly tender, transforming their texture completely.
We’re going to walk through the complete alchemy of turning fresh ginger root into sticky, sweet sunshine. Whether you call it crystallized ginger or the highly sought after Candied Ginger , the process is pure magic, yielding a treat perfect for baking or just snacking straight out of the jar.
Let’s crack on and get sticky.
The Alchemy of Candying: Why Boiling Ginger Works
The secret to amazing homemade Candied Ginger isn't just dumping sugar on ginger; it’s about a careful, controlled exchange. When you repeatedly boil the ginger root (blanching), you’re accomplishing two things simultaneously.
First, you are tenderizing the rigid cell walls of the root. Second, you are leaching out some of the harshest, most volatile oils that give fresh ginger its sometimes overwhelming bite. Without this step, your final Candied Ginger would be tough and aggressively spicy.
What is the Difference Between Candied and Crystallized Ginger?
Honestly? Not much, especially in the home kitchen. It’s mostly a matter of finishing technique and nomenclature. Candied ginger refers to the ginger pieces that have been cooked in the sugar syrup and are beautifully tender.
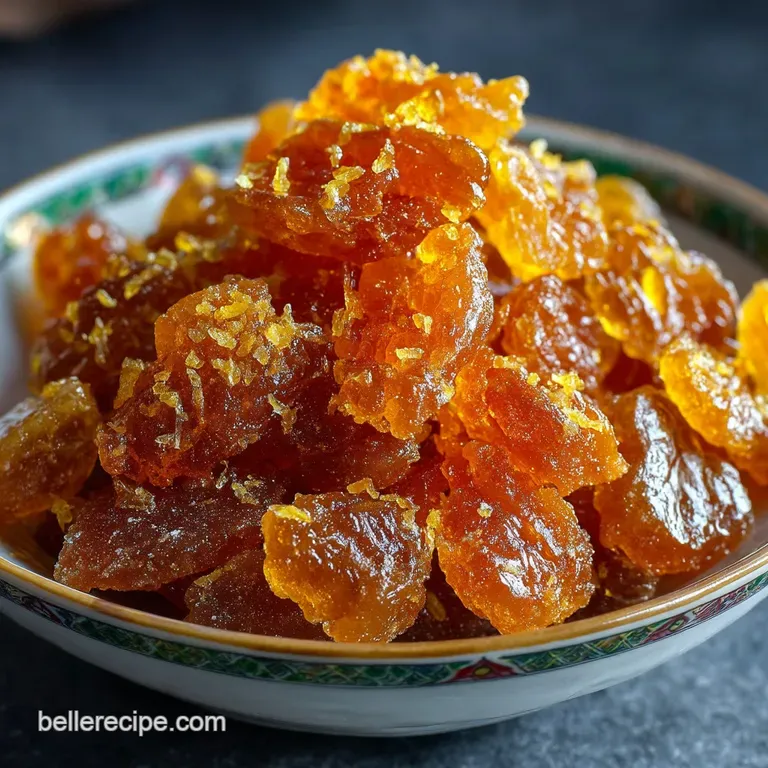
Crystallized ginger is simply the candied pieces that have been rolled in a final coating of granulated sugar until they achieve a crusty, opaque white finish. If you make this Candied Ginger Recipe , you will end up with both, technically speaking.
The Historical Roots of Ginger Confectionery
Ginger has been prized globally for millennia, not just for its zing, but for its preserving qualities. Candying cooking fruit or roots in thick sugar syrup was one of the earliest methods of preservation before refrigeration existed.
This tradition of preparing spicy, sweet Candied Ginger dates back hundreds of years, making it one of the oldest and most trusted confections.
Health Benefits of Eating Prepared Ginger
Beyond being absolutely delicious, consuming ginger even the candied form offers some great digestive perks. Ginger is renowned for its anti nausea properties and soothing effects on the stomach.
Having a small piece of Candied Ginger after a rich meal is a traditional, sweet way to aid digestion, which is always a bonus.
Understanding Osmosis: The Sugar Exchange Process
The science here is simple diffusion, or osmosis if we want to be technical. When the blanched ginger which is relatively low in sugar and high in water is placed in a heavily concentrated sugar syrup, the sugar slowly moves into the ginger cells while the water moves out.
This slow exchange is why this Candied Ginger process takes so long, but it’s crucial. It preserves the ginger and gives it that beautiful, translucent, tender texture.
Why Pre-Boiling is Crucial for Reducing Pungency
If you skip the pre-boiling (blanching) step, your final Candied Ginger will taste like spicy fire, not pleasant warmth. Blanching, especially the three time repeat method we use here, flushes away the most intense chemical compounds.
This prepares the root perfectly so it can fully absorb the sugar syrup while retaining that signature gentle heat we all crave in homemade Candied Ginger .
Achieving the Perfect Chewy Tender Texture
Texture is everything in this recipe. We are aiming for something that is yielding and tender when you bite into it, but still satisfyingly chewy, never mushy. This is achieved by precise slicing (uniformity is key!) and, crucially, monitoring the low simmer.
If you simmer too fast, the outside of the ginger will cook and seal before the inside is fully tenderized by the sugar, resulting in tough bits.
Essential Ingredients for Perfect Candied Ginger
Making homemade Candied Ginger requires very few ingredients, but their quality really matters.
Selecting the Best Fresh Ginger Root (Age and Quality)
Always choose young, firm ginger root. Look for smooth, shiny skin that isn't wrinkled or dried out, which indicates an older root that will be stringier. Wrinkly ginger will taste woodier, meaning your resulting Candied Ginger will have annoying fibrous strings in every bite.
- Substitution Note: If you cannot find fresh, young ginger, use what you have, but be prepared to remove any tough, stringy fibers during the slicing stage.
The Role of Granulated Sugar in Syrup Creation
Standard white granulated sugar is mandatory for the best results here. We need its precise molecular structure to achieve proper crystallization and preservation. Don’t try to swap this out entirely.
- Substitution Note: While you shouldn't swap all the granulated sugar, if you need a slightly darker flavor, you can substitute up to 1/4 cup of the final coating sugar with light brown sugar, though this may lead to slightly stickier pieces of Candied Ginger .
Water: Why Quality Matters for Clarity and Flavor
Because you are reducing the water content significantly during the simmering process, any off-flavors in your tap water will concentrate. For the cleanest, purest taste in your final Candied Ginger , use filtered water, especially in the final syrup stage.
Chef’s Note: The three part blanching process is non-negotiable for traditional Candied Ginger . If you want a milder treat, you can even go for four boils. This step separates the amateurs from the pros!
Transforming Fresh Ginger Root: The step-by-step Method
This is the process where we turn that pungent root into sweet jewels. Focus on patience and temperature control, and you will nail this Candied Ginger Recipe .
Preparation and Slicing Techniques for Uniform Pieces
I’m telling you, skip the peeler and grab a small spoon to peel the ginger; it follows the contours much better and minimizes waste. Once peeled, slicing must be uniform. Aim for 1/8 inch thickness, like fat coins.
If your slices of future Candied Ginger are too thick, they won't tenderize fully. Too thin, and they might disintegrate.
The Two-Stage Cooking Process: Tenderizing and Syrupmaking
The first stage is blanching (tenderizing) and the second stage is simmering in the syrup (infusing). We repeat the cold water boil three times to remove harshness. Then, we transfer the drained pieces to the hot sugar solution.
This slow, low simmer is where the real magic of this amazing Candied Ginger happens, allowing the sugar to penetrate the cells gently.
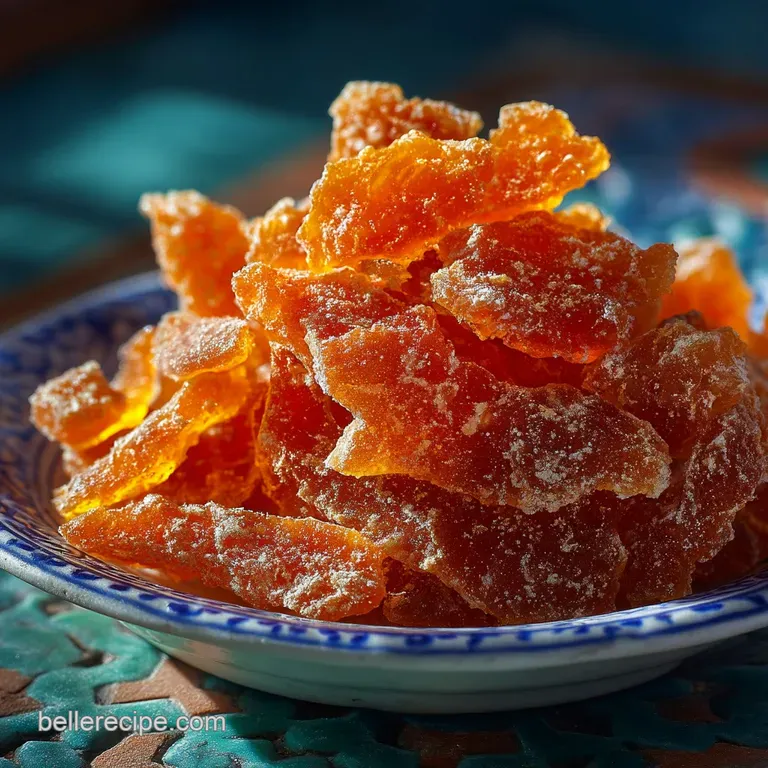
Achieving the Perfect Crystallized Sugar Coating
After the ginger has simmered and dried, the final coating provides that iconic 'crystallized' crunch. This step ensures the pieces won't stick together during storage and adds a delightful textural contrast to the chewy center of the Candied Ginger .
If you skip this, they will be wonderfully sticky but harder to handle.
Final Drying and Cooling Protocols
Don't rush the drying! Spreading the hot, sticky ginger on a wire rack allows air to circulate underneath, helping them set up properly. If you pile them up or place them directly on a plate, they will fuse into a giant, sugary clump.
Give your freshly made Candied Ginger at least four hours to air dry before attempting to coat them.
Mastering the Syrup and Coating: Pro Tips and Troubleshooting
Even with the best intentions, things can sometimes go sideways when working with sugar syrup. Here are the common roadblocks when making homemade Candied Ginger .
Preventing Burned Syrup: Temperature Control Essentials
Syrup burns easily because sugar is inherently unstable under high heat. Always use a heavy bottomed stainless steel or enamel pot. This diffuses the heat evenly.
Once the sugar is dissolved and the ginger is added, reduce the heat to the absolute lowest setting possible to maintain a gentle bubble no aggressive, violent boiling. Using a candy thermometer here is key to guaranteeing your Candied Ginger reaches the perfect syrupy state (230°F / 110°C).
Troubleshooting Undercooked or Opaque Ginger Pieces
If, after the full simmering time, your Candied Ginger pieces still look pale and opaque rather than translucent and shiny, they simply need more time. This usually means your simmer was too low, or your ginger slices were too thick.
Just keep simmering gently, monitoring closely, until they turn glass like. If your syrup has gotten too thick before the ginger is cooked, add a tablespoon of water back to the pan and continue.
How to Achieve a Thicker, More Defined Sugar Crust
If you dry your Candied Ginger and the sugar coating just seems to melt off, the ginger was either not cooked long enough, or it wasn't dried long enough. The ginger must be extremely tacky, but not wet, before rolling in the final sugar.
If you live somewhere humid, consider letting them dry for 8- 12 hours, ensuring they are truly ready to be dusted. The crunchy coating is essential for that perfect crystallized Candied Ginger finish.
How to Store and Preserve Your Homemade Confection
Making a big batch of Candied Ginger is smart because it stores beautifully. Here’s how I handle my stash.
Optimal Shelf Life and Airtight Storage Solutions
Once the Candied Ginger is fully crystallized and completely cooled, store it in an airtight container at room temperature. Kept in a cool, dry pantry, this will last at least three months, if not longer.
Sugar acts as a natural preservative, keeping your delicious Candied Ginger fresh. If you notice the coating starts to melt or the pieces stick together, they might have absorbed moisture from the air; simply toss them with a little fresh coating sugar.
Can You Freeze Candied Ginger? (A Practical Guide)
But does it freeze well? You bet! While it holds up wonderfully at room temperature, freezing is ideal for long term storage or if you live in a very humid environment where the coating struggles.
Place the completely cooled and coated Candied Ginger in a freezer safe bag, pressing out all the air. They will stay perfectly fresh for up to a year. Thaw them overnight on the counter before using; they might need a quick re-dusting of sugar if they feel sticky.
Repurposing the Leftover Ginger Syrup (Zero Waste Idea)
Do not, I repeat, do not throw away that leftover ginger syrup! That golden, spicy liquid is pure concentrated flavor from the process of making Candied Ginger . Store it in a jar in the refrigerator; it lasts for months. Use it to sweeten your tea, pour over pancakes, or even try adding a shot to turn your cocktail game up a notch, especially if you're mixing up a spicy Classic El Diablo Cocktail Tequila Cassis and Spicy Ginger Zing . It’s sticky, sweet, and wonderfully pungent.
Beyond Snacking: Brilliant Ways to Use Candied Ginger Jewels
Once you realize how easy it is to make your own supply of delicious Candied Ginger , you’ll find excuses to put it everywhere.
- Baking Superstar: Chop it finely and fold it into muffins, scones, or dark chocolate cookies. It provides the perfect spicy burst. It is absolutely mandatory if you are making my famous Chewy Molasses Cookies: The Secret to Thick, Cracking Ginger Spice .
- Fruit Desserts: The spicy warmth is heaven alongside baked fruit. I love scattering chopped Candied Ginger over the filling of a pie or an Asian Pear Recipes Rustic Ginger Galette with Flaky Crust just before baking.
- Morning Boost: Mix chopped Candied Ginger into your morning yogurt or granola for a surprising kick.
- Immunity Enhancer: A few pieces are great, but you can also use small bits of the crystallized root when blending up your morning booster shot. It plays beautifully with turmeric, much like in this recipe for Immunity Shots: The Potent Ginger Turmeric Shot Recipe .
Making your own Candied Ginger is one of the most satisfying projects you can undertake in the kitchen. It’s a wonderful blend of old-world preservation techniques and intensely flavorful results. Go ahead, fill your jar with this sticky, sweet sunshine. You’ve earned it!

Recipe FAQs
Why did my candied ginger turn out tough instead of tender and chewy?
This usually happens if the ginger slices are too thick or if the cooking process was rushed and the heat was too high. To ensure maximum tenderness, the long, slow simmering in the sugar syrup is crucial, allowing the sugar to penetrate the fibers fully.
If they are already cooked and hard, you can try re-simmering them briefly in fresh water until slightly softer, then re-coating them with sugar.
Why is the finished sugar coating sticky or melting instead of dry and crystalline?
The stickiness indicates the ginger was not properly dried after being removed from the syrup, or the storage environment is too humid. Ensure the ginger air-dries for at least 24 hours at room temperature, flipping occasionally, before attempting to toss it in sugar.
If the air is very humid, a brief time in a low oven (150°F / 65°C) can aid in drying the exterior.
How should I store candied ginger, and how long does it last?
Store completely cooled and crystallized ginger in an airtight container at cool room temperature, away from direct sunlight. Properly stored, it will last well over three weeks, though its flavor is best enjoyed within the first month.
Avoid refrigeration, as this can introduce moisture and cause the sugar coating to liquefy or bloom.
Can I save and use the leftover ginger syrup?
Absolutely! The resulting syrup is intensely flavored and perfect for sweetening tea, drizzling over ice cream, or using in cocktails and marinades. Strain the syrup through a fine mesh sieve to remove any residual ginger pieces, then store it in a sealed jar in the refrigerator for up to one month.
Why is the initial blanching/boiling step necessary, and can I skip it?
The initial blanching step is vital because it helps leach out some of the intense, raw heat from the ginger, transforming the spice from overwhelming to pleasantly balanced. Skipping this step will result in extremely potent ginger and could also prevent proper tenderization during the long sugar simmering phase.
The multiple changes of water further ensure a cleaner flavor.
Does the type or age of ginger matter for this recipe?
Yes, fresh, young ginger root yields the best results because it is less fibrous and offers a smoother, more palatable chew. Older ginger tends to be woodier and hotter, which may require additional blanching cycles to both tenderize the root and mellow its fiery flavor.
Always choose ginger that is firm and free of soft spots or visible mold.
How can I achieve that dense, white, professional crystal coating?
For a denser, more uniform crystal coating, ensure the ginger is only slightly tacky, not wet, when tossing it in sugar. Use superfine sugar (caster sugar) instead of regular granulated sugar, as the smaller crystals adhere better and provide a smoother finish.
Alternatively, you can toss the fully dried pieces in a slightly thickened mixture of powdered sugar and water for a professional fondant like coating.
Traditional Candied Ginger Recipe
Ingredients:
Instructions:
Nutrition Facts:
| Calories | 560 kcal |
|---|---|
| Protein | 2.0 g |
| Fat | 0.8 g |
| Carbs | 145.5 g |
