The Onthego Grand Tour Banana Pudding Pots
- Elevating Comfort Food: Why This Portable Pudding Reigns Supreme
- Unpacking the Charm of the "Walking Banana Pudding" Concept
- Assembling Your Essential Components for Perfect Puddings
- Sourcing Superior Ingredients for Maximum Flavor Impact
- Step-by-Step Construction: Building Your Portable Delight
- Achieving Perfection: Chilling and Finishing Touches
- Mastering the Make-Ahead: Storage Secrets for Optimal Freshness
- Creative Customizations: Transforming Your Walking Banana Pudding
- Troubleshooting Common Assembly Hurdles
- Recipe FAQs
- 📝 Recipe Card
Elevating Comfort Food: Why This Portable Pudding Reigns Supreme
There is a timeless, undeniable magic to a classic Southern banana pudding. It’s the taste of childhood summers, family gatherings, and pure, unadulterated comfort. Yet, that traditional trifle presentation, glorious as it is, often demands a commitment you need a spoon, a bowl, and a stable surface.
Enter the revolutionary Walking Banana Pudding , a concept that takes every beloved flavor profile and reconfigures it for the modern world of picnics, packed lunches, and party platters where mobility is key.
This isn't just a dessert; it’s an engineering feat of deliciousness, ensuring that every layer remains distinct, flavorful, and perfectly portioned. We’re transforming the humble, comforting favorite into something sturdy, elegant, and effortlessly portable, giving rise to what I affectionately call the "On-The-Go Grand Tour" Banana Pudding Pots.
Unpacking the Charm of the "Walking Banana Pudding" Concept
The beauty of this specific walking banana pudding recipe lies entirely in its presentation and structure. We move away from the communal dish and embrace the individual vessel small jars, sturdy ramekins, or even thick, wide mouthed plastic cups allowing for precise layering and absolute portion control.
This format significantly elevates the experience, making it feel far more intentional than simply scooping from a large container.
Forget the Spoon: Your New Favorite Fête Favorite
When entertaining, especially outdoors, anything requiring delicate balancing quickly becomes stressful. The walking banana dessert solves this by pre-packaging the perfect bite. Guests can grab their individual pot and mingle, confident that their dessert won't collapse or spill.
It’s the ideal solution for a summer fête, a backyard barbecue, or even an upscale classroom treat, making it far more accessible than traditional layered desserts.
The Architectural Secret to Stable, Sturdy Layers
The main hurdle in any layered pudding is preventing component migration specifically, the dreaded soggy bottom where the cookies dissolve instantly into mush. Our approach focuses on structural integrity.
By incorporating a buttery, baked shortbread base right into the bottom of each individual container, we create a moisture barrier. This foundation supports the creamy elements above it, ensuring that even when chilled, the texture remains pleasantly variegated, offering a satisfying crunch against the smoothness of the custard.
This deliberate construction is key to a successful walking banana pudding cups experience.
A Nod to Nostalgia, Built for Modern Mobility
While the packaging is modern, the heart of this walking banana pudding dessert remains deeply rooted in tradition. We eschew quick fix, instant mixes for a rich, slow cooked vanilla custard made with egg yolks, which provides that signature silken mouthfeel.
Paired with perfectly ripe bananas sweet enough to shine but firm enough to slice neatly and finished with a cloud of torched meringue, we honor the classic recipe while updating its delivery mechanism. This attention to authentic flavor ensures that while it’s convenient, it never tastes cheap.
Assembling Your Essential Components for Perfect Puddings
Crafting a truly superior pudding, even a portable one, requires careful attention to each distinct component. For our recipe, yielding six generous servings, we are preparing four essential elements: a crunchy baked base, a luxurious stovetop custard, the fresh fruit, and a cloud like meringue topping.
This easy banana pudding with real bananas shines because we take the time to cook each part properly.
The initial preparation time clocks in around 45 minutes, with about 40 minutes dedicated to active cooking time, yielding a total active time of about an hour and a quarter, plus necessary chilling.
Sourcing Superior Ingredients for Maximum Flavor Impact
The difference between a good pudding and a magnificent one often comes down to the quality of the core components. Since we are isolating the flavors in individual servings, each ingredient needs to pull its weight.
The Foundation: Selecting the Ideal Cracker Crust Base
Instead of relying solely on vanilla wafers for texture (which can become too soft too quickly), we’re baking a dedicated, buttery shortbread base directly into the bottom of our serving jars.
For this base, you will need 1 ½ cups of all-purpose flour, ½ cup of granulated sugar, ½ teaspoon of salt, and 1 cup (two sticks) of chilled, cubed unsalted butter.
The high butter content creates a sturdy, slightly crumbly barrier that holds up beautifully against the moisture of the filling, far superior to simply crushing pre-made cookies for the bottom layer.
Crafting the Silken Custard Core: Dairy and Flavor Enhancers
This is where the heart of the dessert lives. For our rich filling, you will start with 3 cups of whole milk. The richness comes from 6 lightly beaten large egg yolks, which are tempered with ¾ cup of granulated sugar and ¼ cup of cornstarch (the thickener).
Once cooked, a pinch of salt enhances the sweetness, and 2 tablespoons of unsalted butter folded in off the heat, along with 2 teaspoons of high-quality vanilla extract, ensures a velvety finish.
Using pudding with ripe bananas is crucial, but the custard itself must be intensely flavorful to balance the fruit’s sweetness.
Essential Tools: Beyond the Mixing Bowl for Assembly
While standard mixing bowls and a whisk are necessary for the custard, assembling walking banana pudding cups efficiently requires specific implements. You will need six 8-ounce, oven safe jars or ramekins for the construction, a heavy bottomed saucepan to prevent scorching the custard, and critically, a stand mixer or hand mixer for achieving the necessary stiffness in the meringue topping.
Don't forget your kitchen torch for that essential caramelized finish!
Related Recipes Worth Trying
- Rich Banana Pudding with Cream Cheese A Velvety Custard Dream — Tired of runny pudding This Cream Cheese Banana Pudding Recipe bakes a luxuriously thick tangy custard Its the elevated comfort food classic you need Get...
- Best Banana Pudding with Cream Cheese Swirl Recipe — This creamy banana pudding with cream cheese recipe delivers a rich velvety custard that tastes like a Sunday roast finish Foolproof layers for the best...
- Easy Banana Pudding Poke Cake Recipe Ultimate Comfort Dessert — This moist Banana Pudding Poke Cake recipe uses condensed milk for ultimate saturation Its a foolproof Southern classic Find out the simple steps here
Step-by-step Construction: Building Your Portable Delight

The process involves preparing the components separately before the final assembly. We begin by preheating the oven to 350° F ( 175° C) to bake the shortbread base.
You combine the flour, sugar, salt, and cold butter until coarse crumbs form, then press this mixture evenly into the bottom of your six prepared containers, about half an inch thick.
These bases bake for about 15 to 18 minutes until lightly golden, then must be set aside to cool completely on a wire rack.
While those bake, we turn to the stovetop custard. You heat the milk until steaming. In a separate bowl, vigorously whisk the egg yolks, sugar, cornstarch, and salt until pale. You must then temper this egg mixture by slowly streaming in about a cup of the hot milk while whisking constantly a critical step to prevent scrambling the yolks.
Pour this tempered blend back into the saucepan with the remaining milk and cook over medium heat, whisking continuously until the mixture bubbles and thickens significantly. It’s vital to let it boil for a full minute to fully activate the cornstarch.
Remove it from the heat immediately, stir in the butter and vanilla, and press plastic wrap directly onto the surface before chilling thoroughly at least two hours is recommended for proper setting.
Achieving Perfection: Chilling and Finishing Touches
Once all your major elements the baked base and the chilled custard are ready, the assembly begins. This layering strategy is what prevents the structural failure often associated with make-ahead puddings.
Phase One: Preparing the Creamy Custard Layer Uniformly
Before layering, slice your 4 large, firm, ripe bananas. A small trick to maintain brightness is tossing them with just a half teaspoon of lemon juice if you are concerned about browning, though perfectly ripe bananas should be fine if layered quickly.
Ensure your custard is thoroughly chilled; cold custard is much easier to layer neatly and will hold its shape better when stacked.
Layering Strategy: Preventing Soggy Bottoms in Every Tub
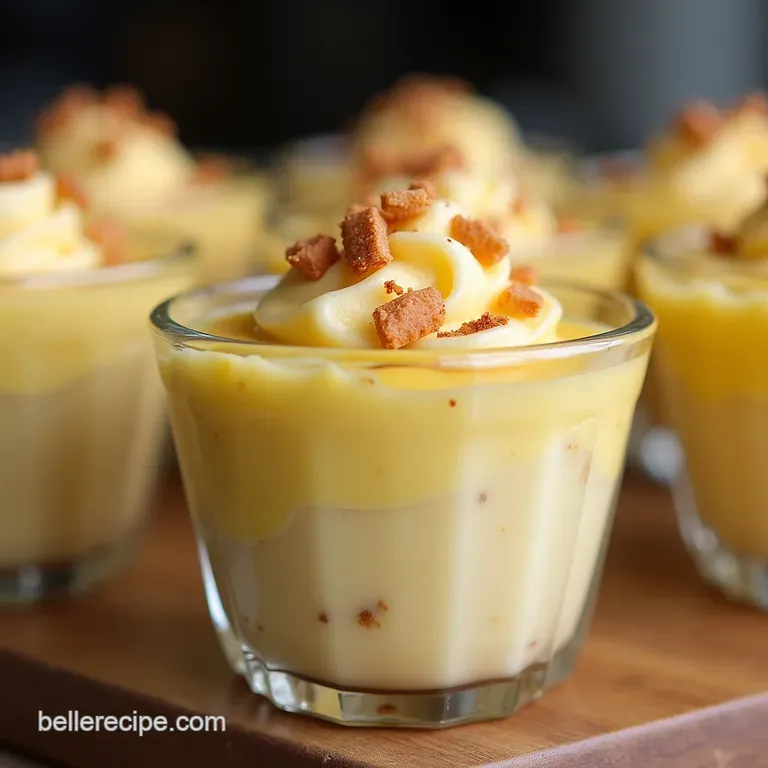
Start the layering process in each chilled jar. Begin with the baked shortbread base, followed by an even distribution of sliced bananas. Next, scoop a generous amount of the chilled custard over the bananas, ensuring it fills the crevices.
You can repeat these layers once more, concluding with a final layer of custard to fill the jar almost to the top. A light sprinkling of finely crushed vanilla wafers or reserved shortbread crumbs goes over this final custard layer for added texture contrast.
The Grand Finale: Whipped Topping Application and Garnishing Guide
The crowning glory of this walking banana pudding recipe is the meringue. Using room temperature egg whites (3), whip them with ¼ teaspoon of cream of tartar until soft peaks form. Gradually beat in ¾ cup of sugar until the mixture is stiff, glossy, and holds sharp peaks.
Pipe or spoon this meringue generously over the top of each filled pot. Finally, using a kitchen torch, lightly kiss the peaks with flame until they achieve that signature beautifully caramelized, golden brown finish. This step adds complexity and depth of flavor that balances the sweetness of the pudding below.
Mastering the make-ahead: Storage Secrets for Optimal Freshness
The convenience of this dessert truly shines when you can prepare it in advance. The structural integrity built into these pots means they handle advance prep far better than a standard trifle.
The Ideal Chill Time: Setting the Structure for Portability
While you can technically serve this soon after assembly, allowing it to chill for a minimum of two hours after layering is crucial. This time allows the flavors to meld and ensures the custard is firm enough to withstand transport without slumping when you move the tubs.
Flavor Twists: Introducing Caramel or Spiced Notes
To enhance the complexity of your walking banana pudding , consider incorporating caramel. Before layering the final custard, drizzle a teaspoon of dark, rich caramel sauce over the banana layer in each jar.
If you prefer warmth, a dash of nutmeg or cinnamon mixed into the custard while it’s still warm adds lovely spiced notes, subtly transforming it into something reminiscent of a walking taco banana pudding interpretation if you were to use cinnamon sugar tortillas as a base (though we stick to shortbread here!).
Keeping It Fresh: Fridge Life and Freezer Potential
These individual pots are best enjoyed within 24 hours. Stored tightly covered in the refrigerator, they will remain fresh. While the custard and base hold up well, the bananas may soften significantly after two days.
Freezing is generally not recommended; the texture of the custard and meringue will suffer significantly upon thawing, compromising the desired mouthfeel.
Creative Customizations: Transforming Your Walking Banana Pudding
While the classic combination is perfect, the individual format invites creative experimentation. For instance, folding ½ cup of toasted pecans into your shortbread dough before baking adds a nutty depth that pairs wonderfully with the fruit.
Alternatively, if you are serving adults, a drizzle of dark rum or banana liqueur over the bananas before the final custard layer introduces a boozy warmth. If meringue feels too fussy, a stabilized whipped cream offers a slightly lighter, though less dramatic, finish.
Troubleshooting Common Assembly Hurdles
Even with a solid plan, minor hiccups can occur during the creation of this delightful walking banana dessert . Knowing how to pivot ensures success.
Flavor Twists: Introducing Caramel or Spiced Notes
If your custard feels slightly thin despite boiling it thoroughly, do not panic. Let it chill completely; sometimes, residual heat prevents immediate setting. If it remains slightly looser than desired, simply treat the final layer as a thick sauce rather than a firm pudding, which works well when paired with a crunchy topping.
Keeping It Fresh: Fridge Life and Freezer Potential
The most common issue is browning bananas. If you are assembling these hours ahead of time, make sure the custard completely covers the banana slices during layering. Any exposed banana surface will oxidize rapidly, even in the fridge.
If you plan on keeping them for longer than 12 hours, consider using the meringue topping only just before serving, as the moisture from the custard can slightly weep onto the meringue over long chilling periods.
Recipe FAQs
How far in advance can I make this Walking Banana Pudding, especially concerning the bananas going brown?
You can assemble the base and custard a day ahead, which is ideal as it allows the custard to fully chill and set nicely. However, you must slice and layer the bananas no more than 4 hours before serving, or they will inevitably start turning a bit dreary.
A tiny spritz of lemon juice on the banana slices helps buy you a little extra time!
My stovetop custard is lumpy! Can I save it, and how do I prevent this next time I make the filling?
Don’t fret, even professional chefs get lumps! If it's only slightly lumpy, strain the hot custard through a fine mesh sieve right before you press the wrap onto the surface to cool that usually sorts it right out.
Next time, the secret is slowly tempering the eggs: always pour the hot milk into the eggs (not the other way around) while whisking like the fate of the village fête depends on it!
Is the meringue topping absolutely necessary for the Walking Banana Pudding, or can I skip it?
While you certainly can skip the meringue, it really is the crowning glory that elevates this from a simple pudding to a showstopper! If you prefer something simpler, you can substitute it with stabilized whipped cream or just use extra crushed vanilla wafers on top.
However, the toasted meringue gives it that authentic, slightly retro flavour.
The recipe says it yields 6 pots, but I need to serve 12 people for a larger gathering. How should I scale the Walking Banana Pudding recipe?
Scaling this recipe is straightforward just double absolutely everything! If you double the ingredients, you’ll also need to double your chilling time slightly, as the deeper layers will take a tad longer to become properly cold. Just ensure you have enough ramekins or sturdy jars on hand!
Can I use instant pudding mix instead of making the custard from scratch to save time?
You could, technically, but honestly, you’d be doing a disservice to the classic flavour! Instant pudding won't have the rich, velvety depth of the proper stovetop custard required to balance the buttery shortbread base. If time is tight, make the custard a day early, but avoid instant mixes for the best results.
Walking Banana Pudding Pots

