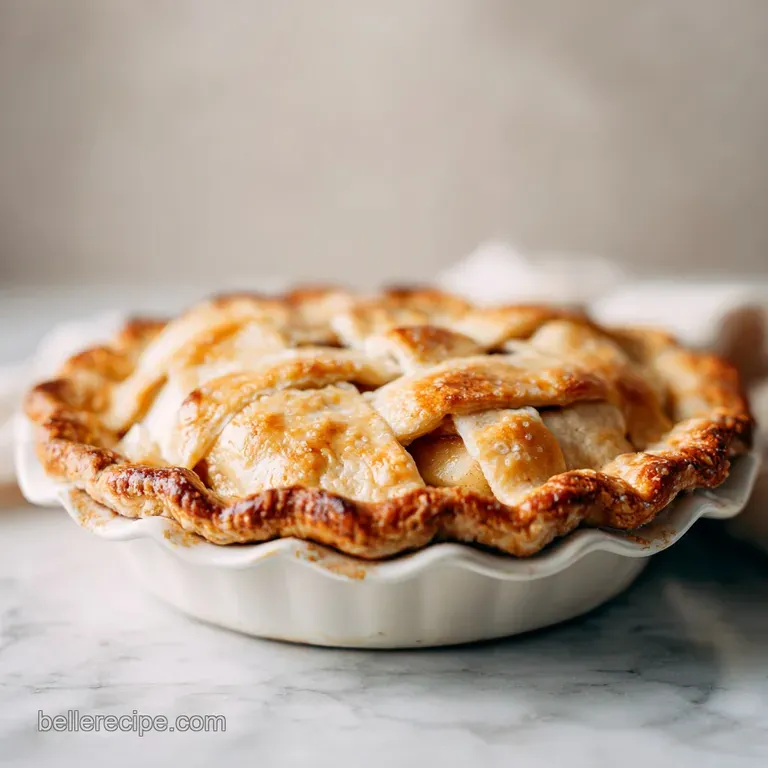
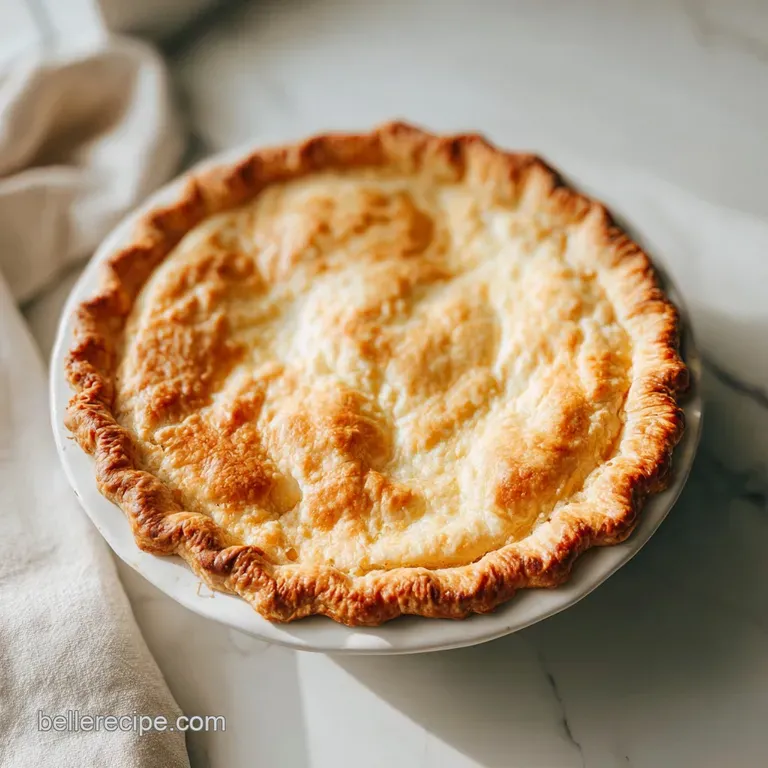
Flaky Pie Crust Recipe: Frozen Butter Method
- Time: Active 10 minutes, Passive 1 hours, Total 1 hours 10 mins
- Flavor/Texture Hook: Buttery, flaky, and shatteringly crisp
- Perfect for: Holiday gatherings or cozy weekend baking
- Finding Joy in This Pie Pie Crust Recipe
- Why This Crust Stays Flaky
- Component Analysis for Perfect Dough
- Simple Elements for Best Results
- Basic Tools for Better Baking
- Handling the Dough With Care
- Fixing Common Crust Problems
- Easy Ways to Change Flavors
- Simple Truths About Baking
- Storing and Saving Your Dough
- Serving Your Flaky Pie Crust
- Recipe FAQs
- 📝 Recipe Card
Finding Joy in This Pie Pie Crust Recipe
You know that sound? That distinct, hollow "clink" when your fork hits a golden brown edge and it just shatters into a thousand buttery shards? That’s the sound of a morning well spent in the kitchen. I remember the first time I actually got it right.
I was standing in my sun drenched kitchen, flour dusting my favorite apron, feeling frustrated because my previous attempts always turned out like cardboard. Then, I stopped overthinking it.
I felt the cold flour between my fingers, smelled the sweet creaminess of the butter, and realized the secret wasn't in a fancy machine. It was in my own two hands and a bit of patience.
We often think baking is this rigid science that leaves no room for error, but honestly, it’s more about a feeling. This pie pie crust recipe is about transforming humble pantry staples into something that feels like a warm hug. We're talking about flour, salt, a pinch of sugar, and a generous amount of butter.
It's simple, honest work. I’ve made every mistake you can imagine too much water, warm butter, overworking the dough until it’s tough enough to soles shoes. But those mistakes taught me exactly how to guide you toward a result that’ll have your friends asking for your secret.
I want you to feel confident when you approach that pile of flour. We aren't just making a container for fruit or custard; we're creating the star of the show. Whether you're tucking in local cherries or a rich pecan filling, this dough provides that flaky, tender foundation that makes a dessert truly memorable.
Let's get our hands a little messy and find some peace in the process. It's much easier than you think once you know what to look for.
Why This Crust Stays Flaky
- Fat Stratification: Large chunks of cold butter create steam pockets during baking that lift the dough layers.
- Gluten Inhibition: Apple cider vinegar lowers the pH level, which helps limit gluten bonds from getting too tight.
- Cold Maintenance: Using frozen butter ensures the fat doesn't melt into the flour before it hits the oven.
- Hydration Control: Adding water by the tablespoon prevents the flour from becoming a sticky, gummy mess.
| Method | Time | Texture | Best For |
|---|---|---|---|
| Blind Bake | 20 minutes | Fully crisp and dry | Custard or cream pies |
| Raw Fill | 60 minutes | Tender and integrated | Fruit or meat pies |
| Par Bake | 12 minutes | Semi firm bottom | Quiches and tarts |
Using a stovetop to pre cook fruit fillings helps prevent a "soggy bottom" because it releases the juices before they ever touch the raw dough. In contrast, the oven method relies on high initial heat to set the crust quickly before the filling has a chance to soak in.
I personally prefer the oven for everything, as long as the dough is chilled properly beforehand. It’s all about managing that moisture so the base stays as crisp as the edges.
Component Analysis for Perfect Dough
| Ingredient | Science Role | Pro Secret |
|---|---|---|
| 320g Flour | Structural framework | Use all purpose for the best balance of tenderness and strength |
| 227g Frozen Butter | Steam production | Grate it while frozen to get even distribution without melting |
| 1 tsp Vinegar | Tenderness agent | It prevents the dough from turning grey if stored in the fridge |
It is really important to keep your ingredients as cold as possible throughout the entire process. If you find your kitchen is a bit warm, pop your flour bowl in the freezer for ten minutes before you start. This small step makes a huge difference in how the fat behaves when you start mixing.
Simple Elements for Best Results
- 320g All purpose flour: The base of our structure. Why this? Provides enough protein for a sturdy crust without being overly chewy. (Substitute: Pastry flour for an even more delicate crumb).
- 1 tsp Fine sea salt: To season the dough. Why this? Fine grains dissolve quickly and evenly into the dry mix. (Substitute: Table salt, though use a slightly smaller pinch).
- 1 tbsp Granulated sugar: For browning and a hint of sweetness. Why this? Helps the Maillard reaction create that deep golden color. (Substitute: Coconut sugar for a nuttier, darker finish).
- 227g Unsalted high fat butter: The source of all those layers. Why this? High fat European styles have less water and more flavor. (Substitute: Lard for an old-fashioned, extra flaky texture).
- 120ml Ice water: To bind the dough together. Why this? Extreme cold keeps the butter solid until it bakes. (Substitute: Vodka, which evaporates faster and limits gluten).
- 1 tsp Apple cider vinegar: Our secret tenderness weapon. Why this? Breaks down gluten and adds a subtle brightness. (Substitute: White vinegar or lemon juice).
Basic Tools for Better Baking
You don't need a kitchen full of gadgets to make a world class crust. In fact, some of my favorite pies have been made with nothing more than a sturdy bowl and a fork. A large mixing bowl gives you plenty of room to work without tossing flour all over your counters.
If you have a pastry cutter, it's great for working the butter in, but two knives or even just your fingertips work wonders if you're quick about it.
The one thing I truly recommend is a good rolling pin. A heavy wooden one gives you the leverage you need to flatten the cold dough without pressing too hard. And please, don't forget the plastic wrap or a reusable beeswax wrap for the chilling stage. Resting the dough is probably the most ignored step, but it’s the one that determines if your crust will shrink or stay perfectly in place. If you're planning a big dinner, this dough is the perfect start for a Classic Southern Pecan Pie recipe that everyone will love.
Handling the Dough With Care
- Freeze the butter. Place the 227g of cubed butter in the freezer for at least 15 minutes. Note: This ensures the fat remains solid during the mixing phase.
- Whisk dry ingredients. Combine 320g flour, 1 tsp salt, and 1 tbsp sugar in a large bowl. Note: Ensuring even distribution of salt prevents "salty spots" in the crust.
- Cut the fat. Incorporate the frozen butter into the flour until the mixture resembles coarse crumbs with some pea sized chunks.
- Prepare the liquid. Mix 120ml ice water with 1 tsp apple cider vinegar. Note: Using a mixture of water and acid improves the overall texture.
- Add liquid slowly. Drizzle in the water 1 tablespoon at a time, tossing with a fork until the dough just starts to clump together.
- Form the discs. Divide the dough in half and gently press into two flat discs. Note: Don't knead; just push the shaggy bits together until they hold.
- Chill the dough. Wrap tightly and refrigerate for at least 1 hour. Note: This allows the flour to fully hydrate and the gluten to relax.
- Roll it out. Roll the dough on a floured surface until it is 3mm thick and wider than your pie dish.
- Trim and crimp. Place in the dish, trim the excess, and pinch the edges until you have a decorative border.
- Final chill. Put the prepared crust back in the fridge for 15 minutes before baking. Note: A cold crust hitting a hot oven is the secret to maximum flake.
Fixing Common Crust Problems
Solving the Crumbly Dough Issue
If your dough is falling apart as you try to roll it, it’s usually a sign of under hydration. It can be scary to add more water, but sometimes the air in your kitchen is just really dry. You want the dough to hold together when you squeeze a handful, not turn into dust.
If it’s already chilled and crumbling, let it sit at room temperature for five minutes, then gently mist it with a tiny bit of water and press it back together.
Stopping the Shrinking Crust Problem
There is nothing more frustrating than a beautiful crimped edge that slides down into the bottom of the pan as soon as it gets hot. This happens because the gluten was too "excited" or the fat was too warm. When you roll the dough, you're stretching those protein strands.
If they don't have time to relax in the fridge, they’ll snap back like a rubber band in the oven. Always give your dough that final 15 minute rest once it's in the pan.
| Problem | Root Cause | Solution |
|---|---|---|
| Tough texture | Overworking the dough | Use a light touch and stop mixing sooner |
| Soggy bottom | Filling leaked through | Brush the raw crust with egg white before filling |
| Greyish color | Oxidation of the flour | Add a teaspoon of vinegar or lemon juice |
Common Mistakes Checklist
- ✓ Never use room temperature butter (it will blend into the flour like a paste)
- ✓ Don't add all the water at once (flour hydration varies by brand and humidity)
- ✓ Avoid skipping the chilling steps (warm dough is impossible to handle)
- ✓ Forget the rolling pin? Use a chilled wine bottle in a pinch
- ✓ Don't over flour your surface (excess flour makes the crust dry and dusty)
Easy Ways to Change Flavors
Scaling this recipe is quite simple if you need more or less. If you're just making a single crust tart, you can easily halve the ingredients. Just beat one egg and use half of it if you're using an egg wash, or just stick to the 60ml of water.
When doubling the recipe for a big holiday bake, I suggest making two separate batches rather than one giant one. It’s much easier to keep the butter cold when you aren't fighting a massive mound of flour.
If you are looking for a fruit forward option, this crust is incredible with a Homemade Cherry Pie recipe. For a savory twist, skip the sugar and add a teaspoon of dried thyme or cracked black pepper to the flour. It completely changes the vibe and makes it perfect for a pot pie or a quiche.
- If you want a sweeter crust, add an extra tablespoon of sugar and a dash of cinnamon.
- If you want a sturdier base, replace 2 tablespoons of water with one cold egg yolk.
- If you want a nuttier flavor, swap 50g of the flour for finely ground toasted walnuts.
Simple Truths About Baking
Many people think you need to use a food processor to get a good crust, but that’s a myth. While it’s faster, it’s much easier to over process the butter into tiny grains that won't create flakes. Doing it by hand gives you total control.
Another common misconception is that the dough needs to be perfectly smooth. In reality, a shaggy, marbled looking dough is exactly what you want. Those visible streaks of butter are what turn into layers later.
Finally, don't worry about using vodka instead of water unless you really want to. While vodka helps because it doesn't develop gluten, ice cold water with a little vinegar does the job just as well for a fraction of the cost. The technique is always more important than the specific "magic" ingredient.
Storing and Saving Your Dough
You can keep the raw dough discs in the fridge for up to three days. Just make sure they are wrapped tightly so they don't pick up any "fridge smells." For longer storage, this dough freezes beautifully for up to three months. When you're ready to use it, thaw it overnight in the refrigerator.
Never try to thaw it on the counter, or the butter will soften too much.
Don't you dare throw away those little scraps after trimming your pie! My grandmother used to take the leftover bits, sprinkle them with cinnamon sugar, and bake them on a cookie sheet for 10 minutes. We called them "pie fries," and they were honestly sometimes better than the pie itself.
It’s a zero waste way to get a little extra treat while the main event is in the oven.
Serving Your Flaky Pie Crust
The beauty of a solid pie pie crust recipe is that it goes with almost anything. Once you've mastered the dough, the world of fillings opens up to you. You could go the traditional route with a rich custard or try something with a bit more kick. If you're feeling adventurous, this crust is the perfect vessel for a Southwestern Tamale Pie recipe if you want to swap the corn crust for something flakier.
When serving, let the pie cool completely. I know it's hard to wait when the whole house smells like butter and sugar, but the crust needs time to set. If you cut it while it’s piping hot, the steam will soften those beautiful layers you worked so hard to create.
Give it an hour, then grab your sharpest knife and listen for that satisfying crunch. You've earned it!

Recipe FAQs
What is the secret to making great pie crust?
Use frozen fat and handle the dough minimally. Large, intact pieces of cold butter create steam pockets during baking, which physically separates the dough into flaky layers. Overworking the dough develops gluten, leading to toughness instead of tenderness.
Which is better, crisco or butter for pie crust?
Butter is superior for flavor, but Crisco offers maximum flakiness. Butter provides unmatched flavor due to its milk solids, but its lower melting point means it requires faster handling. If maximizing flakiness is your only goal, shortening is more forgiving.
What is the basic formula for making pie crust?
The ratio is generally 3 parts flour to 2 parts fat by weight, plus cold water/acid. A standard starting point is two cups of flour to one cup (2 sticks/227g) of butter, adjusting hydration until the dough just clumps.
This principle of fat ratio is key to mastering the texture, similar to how dough handling affects our [The New York recipe].
How to make pie pastry from scratch?
Combine dry ingredients, cut in frozen butter until pea-sized chunks remain. Slowly drizzle in ice water mixed with a teaspoon of vinegar until the dough just comes together when pressed. Form into discs, wrap tightly, and chill for at least one hour before rolling.
Is it true I must use ice water for the dough?
Yes, using extremely cold water is non-negotiable for flake. The ice temperature ensures the butter does not melt into the flour during mixing, which prevents a greasy, tough final product.
If you master this temperature control here, you'll see similar benefits in recipes requiring stable emulsions like [How to Make recipe].
What can I add to make the crust more tender?
Add a small amount of acid, like apple cider vinegar or lemon juice. The acid inhibits gluten development, keeping the dough pliable and tender without affecting the flavor much. This trick helps prevent the gluten strands from tightening up too much during the chilling phase.
Why does my perfectly chilled crust shrink when baking?
The dough was likely overworked or not rested long enough before baking. Rolling the dough stretches the gluten structure; if you skip the final 15-minute chill after placing it in the pan, those tight gluten strands contract rapidly in the heat, pulling the edges down. Give it that final rest!
Flaky Pie Crust Recipe

Ingredients:
Instructions:
Nutrition Facts:
| Calories | 178 kcal |
|---|---|
| Protein | 2.1 g |
| Fat | 11.7 g |
| Carbs | 16.1 g |
| Fiber | 0.5 g |
| Sugar | 0.8 g |
| Sodium | 146 mg |
