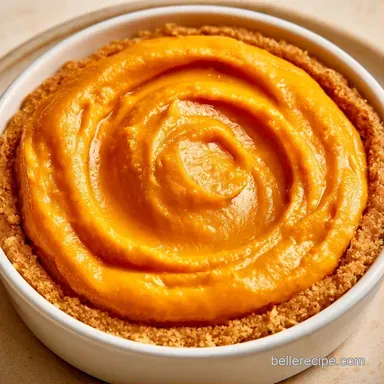
Gluten Free Pumpkin Mousse Pie: No-Bake Treat

- Time:20 minutes active + 4 hours chilling
- Flavor/Texture Hook: Spiced pumpkin cloud with a gingery, shattering crust
- Perfect for: Thanksgiving dinner or a gluten-free holiday treat
The smell of cinnamon and ground cloves always hits me before I even enter the kitchen during November. For a lot of us, pumpkin desserts are the center of the table at family gatherings. It's a tradition that feels like a warm hug, but the traditional baked pies can sometimes feel like a lead weight in your stomach.
I wanted something that kept those nostalgic, sunny autumn flavors but felt a bit more mindful. This GlutenFree Pumpkin Mousse Pie takes the heavy custard and turns it into something airy. It's the kind of dessert you can share with everyone without worrying about who can or can't have gluten.
You can expect a crust that snaps and a filling that melts away. Since there's no baking involved for the filling, the spices stay bright and the pumpkin flavor doesn't get muted by the oven.
Why This Mousse Actually Sets
Air Bubbles: Whipping the cream creates a structure of tiny air pockets that hold the pumpkin purée up. This mechanical aeration replaces the need for eggs or flour to create thickness.
Cold Temperature: The fats in the heavy cream and butter harden as they chill. This turns a soft cream into a sliceable dessert.
Quick Recipe Specs
For those who like to compare, the fast no bake method is a different beast than the classic baked version.
| Feature | No Bake Mousse | Classic Baked |
|---|---|---|
| Texture | Airy and light | Dense and custardy |
| Prep Time | 20 minutes | 30 minutes |
| Set Time | 4 hours chilling | 1 hour bake + cooling |
- For a firmer set
- chill 6 hours instead of 4.
- For a sweeter crust
- add an extra teaspoon of maple syrup.
- For a deeper spice
- add a pinch of nutmeg.
The Ingredients We Need
When picking your pumpkin, make sure it's 100% pure purée. The "pumpkin pie filling" cans have added sugars and thickeners that will mess with the mousse texture.
| Ingredient | What It Does | Best Swap |
|---|---|---|
| GF Ginger Snaps | Adds snap and spice | GF Graham crackers |
| Almond Flour | Binds the crust | Oat flour |
| Heavy Cream | Provides the lift | Full fat coconut cream |
| Maple Sugar | Natural sweetness | Powdered cane sugar |
Full List:
- 1.5 cups (150g) gluten-free ginger snap crumbs
- 0.25 cup (30g) almond flourWhy this? Adds a nutty richness and helps the crust hold together
- 4 tbsp (56g) melted unsalted butter
- 1 tbsp (12g) maple syrup
- 15 oz (425g) 100% pure pumpkin purée
- 1 cup (240ml) chilled heavy whipping cream
- 0.5 cup (60g) powdered maple sugarWhy this? Dissolves instantly without leaving grit
- 1 tsp (5ml) pure vanilla extract
- 1 tsp (2g) ground cinnamon
- 0.5 tsp (1g) ground ginger
- 0.25 tsp (0.5g) ground cloves
- 1 pinch sea salt
- 2 tbsp (30ml) whipped cream (for garnish)
- 1 tsp (2g) cinnamon powder (for garnish)
- 6 crushed candied pecans (for garnish)
And if you love that buttery, crumbly base, you might also enjoy my Strawberry Rhubarb Crumble Pie for a different season.
Gear for the Job
While basic tools work, these items make the process more efficient. A stand mixer (like a KitchenAid) is recommended, though a hand mixer is a great alternative.
- 9 inch pie plate
- Medium mixing bowl (for the crust)
- Large chilled mixing bowl (for the cream)
- Rubber spatula
- Whisk
- Fine mesh strainer (optional, for the pumpkin)
Step by step Assembly

Phase 1: Constructing the Shattering Crust
- Mix the ginger snap crumbs and almond flour in a medium bowl.
- Stir in the melted butter and maple syrup until the mixture looks and feels like wet sand.
- Press the crumbs firmly into the bottom and up the sides of your pie plate. Use the back of a spoon to get it tight.
- Put the crust in the freezer for 10 minutes. Note: This locks the butter in place so the crust doesn't slide.
Phase 2: Folding the Mousse
- Whisk the pumpkin purée, maple sugar, vanilla, cinnamon, ginger, cloves, and salt in a large bowl until the mixture is completely smooth. It should smell like a cozy autumn morning.
- In a separate chilled bowl, beat the heavy cream on high speed until stiff peaks form. You'll know it's ready when you lift the beaters and the cream stands straight up without drooping.
- Scoop about a third of the whipped cream into the pumpkin base. Stir it in gently to lighten the mixture.
- Gently fold the remaining whipped cream into the pumpkin. Use a "cut and fold" motion with your spatula so you don't pop the air bubbles. Stop as soon as no white streaks remain.
Phase 3: The Final Set & Garnish
- Pour the filling into the chilled crust. Smooth the top with your spatula.
- Chill in the fridge for 4 hours. Note: Don't rush this, or the slices will slump.
- Just before serving, dollop the extra whipped cream on top, dust with cinnamon powder, and sprinkle the crushed candied pecans.
Fixing Common Mousse Issues
Mousse is too runny
This usually happens if the cream wasn't beaten to stiff peaks or if the pumpkin purée was too watery. Some brands of pumpkin are wetter than others. To prevent this, you can strain your purée through a cheesecloth for 30 minutes first.
If it's already in the pie, give it another 2 hours in the fridge.
Crust is crumbling
If the crust falls apart when you slice, it usually means it wasn't pressed down hard enough or the butter didn't set. Trust me on this: use your knuckles or a flat bottomed glass to pack those crumbs in tight.
If it's already made, you can lightly brush the edges with a bit of melted butter and pop it under the broiler for 60 seconds.
Grainy texture in filling
This happens when the maple sugar doesn't fully dissolve into the pumpkin. Using a whisk or an electric mixer for the pumpkin base helps. If you're using a substitute like granulated sugar, make sure to whisk it for at least 2 minutes until you can't feel the crystals.
Twists and Ingredient Swaps
Depending on what's in your pantry, you can tweak this GlutenFree Pumpkin Mousse Pie without ruining the structure. If you're looking for other crust ideas, my all-butter pie crust is a great reference for how fats interact with flour, though this mousse version stays no bake.
| Original Ingredient | Substitute | Why It Works |
|---|---|---|
| Heavy Cream | Coconut Cream (chilled) | Same fat content. Note: Adds a slight coconut flavor |
| Maple Sugar | Powdered Sugar | Similar texture. Note: Lacks the maple depth |
| Ginger Snaps | GF Graham Crackers | Similar crunch. Note: Much milder flavor |
| Candied Pecans | Toasted Walnuts | Great crunch. Note: Less sweetness on top |
For a nut free version: swap the almond flour for more ginger snap crumbs or a bit of GF oat flour. It will be slightly less stable but still tastes great.
How to Store and Keep Fresh
Your GlutenFree Pumpkin Mousse Pie can be stored in the refrigerator for 4 days. To prevent it from absorbing other food smells, cover it loosely with aluminum foil or a reusable beeswax wrap.
If you need it to last longer, freezing is an option. Wrap the pie in plastic wrap and then cover it with foil. It remains good for about 2 months in the freezer. To enjoy it, let it thaw in the fridge overnight; thawing it on the counter may cause the mousse to sweat and lose its fluffiness.
Any leftover pumpkin purée from the can can be stored in ice cube trays. Toss a frozen cube into your morning smoothie or oatmeal for a quick hit of flavor.
Serving Suggestions
For perfectly clean, professional-looking slices, warm your knife in hot water and dry it off before every cut. This stops the mousse from clinging to the blade and smudging.
This GlutenFree Pumpkin Mousse Pie pairs wonderfully with a cup of hot apple cider or a bold espresso. The coffee's sharp profile balances out the rich cream. For a truly indulgent treat, serve your slice with a small dollop of maple syrup on the side.
Because this is a no-bake dessert, it's a relaxing way to enjoy the holiday season without spending your whole afternoon at the stove. Just remember to let it chill for the full 4 hours, and you'll have a treat that feels as light as a cloud.
Recipe FAQs
Is Libby's 100% pumpkin gluten-free?
Yes, pure pumpkin purée is naturally gluten-free.
Tip: always check the label for "100% pumpkin" to avoid hidden additives.
Can I use pumpkin pie filling instead of pure pumpkin purée?
Actually, no. Filling contains pre-added sugars and spices that will ruin the mousse balance.
Tip: stick to pure purée to maintain control over the maple sugar levels.
Does Costco offer a gluten-free pumpkin pie filling?
Most Costco pumpkin pie fillings are gluten-free, but you must verify the ingredient list on the specific package.
Tip: look for a certified gluten-free seal for complete peace of mind.
How to modify the flavor if I want no cinnamon?
Omit the ground cinnamon and slightly increase the ground ginger or cloves.
Tip: a pinch of extra sea salt can help bring out the natural pumpkin flavor without the cinnamon.
Would sweet potato work as a gluten-free alternative?
Yes, mashed sweet potato provides a similar texture and is naturally gluten-free.
Tip: ensure the potato is completely smooth to avoid lumps in your mousse.
Why does the crust need freezing?
Freezing for 10 minutes stabilizes the butter and maple syrup to prevent crumbling.
Tip: if you enjoyed mastering this press-in method, see how the same principle works in flaky pie dough.
gluten free Pumpkin Mousse Pie: 8 Slices