Managed Melt Slowbraised Beef Cheeks with Rich Red Wine Ragu
- Managed Melt: Your Next Sunday Dinner Comfort Food
- The Secret Weapons Behind the Sauce
- Meat & Measurements: The Stars of the Show
- Spices and Flavour Architects
- Essential Gear for Controlled Braising
- The Ultimate Sunday Dinner Comfort Food
- Getting Sorted: Prep Day Ahead Braise Technique
- Building the Foundation: Maillard Reaction Searing Guide
- The Long Game: Controlled Braising Temperature
- The Finish Line: Rich Red Wine Ragu Sauce
- Mastering the Melt: Tips from My Kitchen
- Plating Perfection and Pairing Pointers
- Storage Secrets: Why Tomorrow is Better
- Simple Swaps and Dietary Wins
- The Final Flavour Control
- Frequently Asked Questions
- 📝 Recipe Card
Managed Melt: Your Next Sunday Dinner Comfort Food
Oh my gosh, I need to tell you about this recipe. Have you ever had a meal that truly blew your socks off? This Slow cooked beef cheeks recipe is that dish for me.
We call it the "Managed Melt." It is pure, unadulterated Sunday dinner comfort food . It delivers that rich, deep, unforgettable flavour.
Beef cheeks are an inexpensive cut, honestly. But they demand respect and precision. This recipe requires a perfectly managed cooking process.
That is how we achieve the magic. We focus intensely on a Controlled braising temperature . This transforms the tough protein into a genuine melt in your mouth beef stew .
It is the ultimate achievement in Mastering low and slow meat .
I first had this sort of thing in a tiny Italian trattoria. It was a glorious rich red wine ragu sauce over polenta.
It tasted like pure luxury to me. This meal takes patience, about four hours total. However, most of that time is passive cooking.
Your trusty Dutch oven slow cooking tips are about to be put to the test. Only about 30 minutes is active prep work.
The result is surprisingly rich, yet leaner than you might think. Beef cheeks are naturally high in collagen. The process starts with a hard sear.
That Maillard reaction searing guide step is totally non-negotiable, you know? It locks in incredible flavour depth right at the start.
One chef once told me searing creates 80% of the final flavour. The slow cook just pulls it all out.
I highly recommend the Prep day ahead braise technique . This secret weapon lets all the flavours deepen overnight. Plus, chilling it makes Reducing sauce consistency effortless.
You simply skim the solidified fat the next morning. That is true culinary management right there. This glorious sauce is worth every single second of waiting.
Ready to gather the few simple ingredients we need?
The Secret Weapons Behind the Sauce
Ah, the building blocks of pure joy! This isn't a throw-it-together dish. We are aiming for a serious, rich red wine ragu sauce that takes time and patience.
But honestly, the ingredient list is short and sweet. The secret here isn’t fancy items. It’s about how the core components are managed throughout the long cook.
This is truly the definition of Sunday dinner comfort food .
Meat & Measurements: The Stars of the Show
First up, the beef. You need 1 kg (2.2 lbs) of Beef Cheeks . Make sure they are trimmed well! Ask your butcher to do the fussy work.
This cut is perfect for a slow cooked beef cheeks recipe . We dust them lightly with 2 tbsp of All-Purpose Flour before we even think about the heat.
This helps us nail the crust needed for the Maillard reaction searing guide and ensures the sauce thickens nicely.
For the braising liquid, you need 500 ml (2 cups) of Dry Red Wine . Don't splash out on the expensive stuff.
A sturdy, affordable Merlot or Cab Sauv works wonders here. I learned the hard way that saving the good wine for drinking is the way to go! You’ll also need 500 ml (2 cups) of Good Quality Beef Stock .
Together, these liquids create the amazing environment necessary for mastering low and slow meat .
Spices and Flavour Architects
Flavour starts at the base. We create what the French call a mirepoix and the Italians call a soffritto . You need 1 medium Brown Onion, 1 medium Carrot, and 1 stick of Celery.
Dice them tiny! This helps them essentially dissolve into the finished ragu. We also need 2 tbsp (30g) of Tomato Paste .
Cook that paste first until it darkens; that tiny step is vital for deepening the flavour before anything wet goes in.
We keep the herbs minimal: 2 sprigs of Fresh Thyme and a couple of Bay Leaves. Simplicity rules when you are aiming for that intense, slow cooked depth.
Essential Gear for Controlled Braising
You absolutely do not need a fancy kitchen for this magic. But you do need one essential piece of kit.
That is a heavy bottomed casserole dish or a proper Dutch Oven . This is the single most important tool for successful Dutch oven slow cooking tips .
Why? Because a good pot maintains the controlled braising temperature beautifully. If the heat fluctuates wildly, the meat can seize up.
We want a perfectly managed gentle simmer, or "shiver," not a violent boil. That guarantees the melt in your mouth beef stew result we crave.
I also always pull out my fine mesh sieve. That's the secret to perfecting the final reducing sauce consistency after the meat comes out it separates the glossy sauce from the tired vegetables.
Trust me, this tiny bit of prep day ahead braise technique makes a difference!
The Ultimate Sunday Dinner Comfort Food
Oh my gosh, let's talk about the ultimate Sunday dinner comfort food . This isn't just a stew. It’s a complete project in deep, deep flavour.
When you are Mastering low and slow meat , patience is truly everything. I once tried to rush this Slow cooked beef cheeks recipe .
It was a disaster, tougher than old leather boots! But when the process is properly managed , you get that incredible, melt in your mouth beef stew .
It’s a pure culinary hug.
Getting Sorted: Prep Day Ahead Braise Technique
We are diving into the Prep day ahead braise technique here. Why? Because this dish is honestly better the next day.
Get your mind right for Dutch oven slow cooking tips . First, essential mise en place. Chop your onions, carrots, and celery finely.
That’s your flavour base. Trim the beef cheeks the night before if you can. It just saves so much time later.
Quick safety reminder: knives are sharp! Stay focused while chopping. This small bit of organization makes the cooking feel so much smoother.
Building the Foundation: Maillard Reaction Searing Guide
Right, let’s talk crust. We need Maillard reaction searing guide perfection. Pat those beef cheeks totally dry. Dust them lightly in flour.
Get your oil hot over medium high heat. Sear the meat in small batches. This is crucial for flavour. We want a deep, mahogany crust.
Cook them for 2- 3 minutes per side . If you crowd the pot, the temperature drops fast. You’ll just steam the beef, and you lose that depth.
The Long Game: Controlled Braising Temperature
Once the veggies are soft and the wine has reduced (scraping up all those sticky brown bits!), return the seared beef.
This is where the magic happens. We need a very Controlled braising temperature . Cover your Dutch oven tightly. Stick it in the oven at 150° C ( 300° F) .
The liquid should just barely shiver . Never let it boil vigorously; that toughens the meat. Braise for a minimum of 3 hours .
This ensures the cooking is perfectly managed . It transforms the toughest cut into tender velvet.
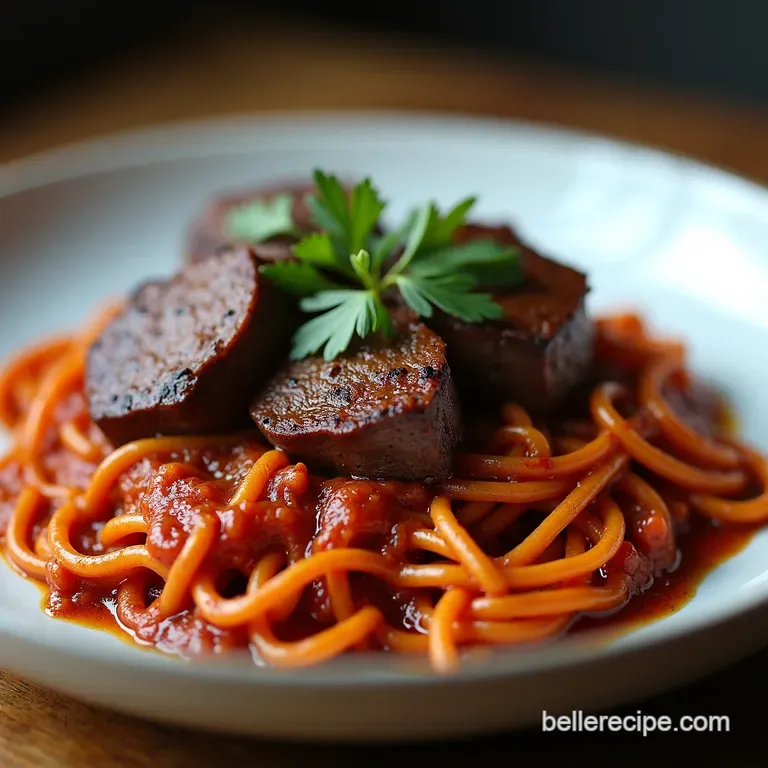
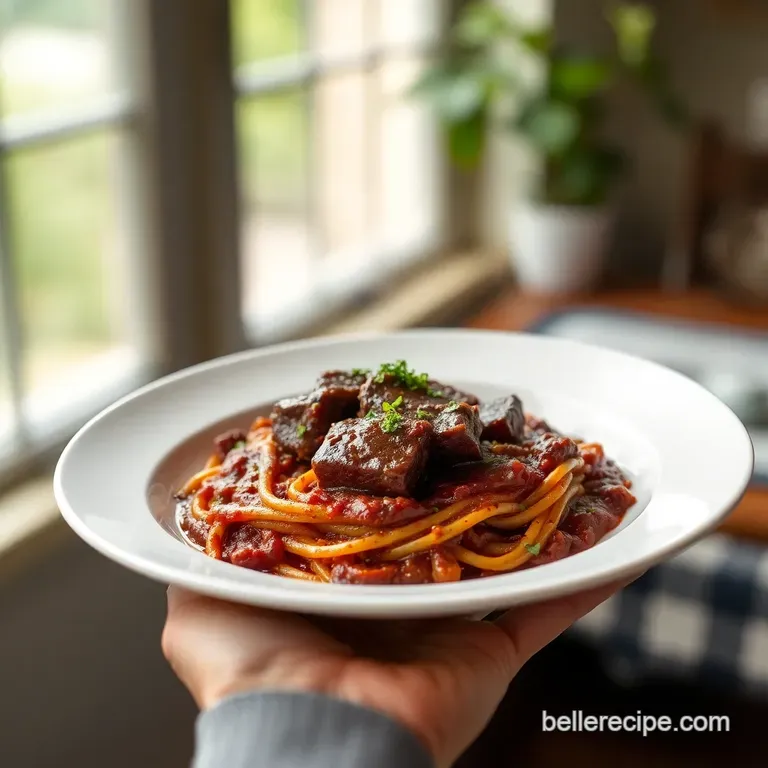
The Finish Line: Rich Red Wine Ragu Sauce
When the beef shreds easily, pull it out. Keep it warm. Now for the glorious Rich red wine ragu sauce .
We strain the liquid to discard the spent vegetables. The biggest mistake people make? Not reducing sauce consistency enough. Boil the liquid hard over medium high heat.
Skim off any excess fat you see. You need to reduce it by at least a third. It takes about 15 to 20 minutes .
This step is vital for that thick, glossy finish. This reduction gives you the amazing Rich red wine ragu sauce .
Honestly, nothing beats serving this up. It’s always a winner.
Mastering the Melt: Tips from My Kitchen
Honestly, once you’ve achieved that tender, Melt in your mouth beef stew texture, you’ve done the hardest part. The final steps are all about polish.
Remember, we are Mastering low and slow meat here, not rushing a weeknight dinner. That deep, Rich red wine ragu sauce is everything.
Don't skimp on the finishing touches!
Plating Perfection and Pairing Pointers
For the ultimate Sunday dinner comfort food , you need a vehicle for that gorgeous sauce. Forget fancy pasta. I swear by creamy, buttery mashed potatoes or soft polenta.
They are basically perfect, edible sponges. You could also serve this over a crispy potato rosti for some crunch. Don't forget some greens, maybe some buttered green beans, to cut through the richness.
When it comes to wine, just pour a glass of whatever you used in the braise. It just makes sense, you know?
Storage Secrets: Why Tomorrow is Better
This is my biggest secret: This is absolutely a Prep day ahead braise technique . I always cook this one day early.
Why? First, the flavour gets even deeper overnight. Second, safety first! Once cooled and refrigerated, all the excess fat solidifies right on the surface.
You can just spoon it off easily. This keeps the Rich red wine ragu sauce clean and healthier. It also proves that the flavour development is easily managed when you give it time.
Critical Note: Keep the beef and sauce separate until ready to reheat.
To reheat, just gently warm the sauce and meat together on the hob over medium low heat. If you want to freeze it, portion the cooled ragu (meat included) into airtight containers.
It freezes beautifully for up to three months. Just make sure you label the tub I once mistook a frozen portion of this for lentil soup.
Disaster!
Simple Swaps and Dietary Wins
If you are cooking for someone who avoids gluten, the modification is super simple. We only used a tiny bit of flour at the beginning for the sear.
Skip that step entirely. Instead, when you are doing the final Reducing sauce consistency phase, mix a tablespoon of cornflour with cold water to make a slurry.
Stir that into the boiling sauce instead. It will thicken everything up perfectly.
Beef cheeks are amazing because they are high in connective tissue which melts down into that beautiful gelatin but they are surprisingly lean compared to many other stew cuts.
You get a massive protein hit here. This kind of slow cooking, especially when the fat is carefully skimmed, transforms a tough cut into something tender beyond belief, like it has lost all its non-human vertebrae.
The Final Flavour Control
Remember, the success of this dish hinges on Controlled braising temperature and the final sauce reduction. Taste the sauce after you’ve skimmed and reduced it.
It might need a small pinch more salt or pepper. You've brought incredible flavour from the Maillard reaction searing guide phase right through to the end.
Take a moment to pat yourself on the back! You truly mastered the long game.
Frequently Asked Questions
This recipe is called the 'Managed Melt'; is it really that difficult to keep things managed in the kitchen?
It's not difficult, but it requires patience it’s about managing the heat, not micromanaging the process! The crucial point is maintaining an ultra gentle ‘shiver’ of a simmer (around 150°C / 300°F), not a rolling boil, which is the key to transforming tough beef cheeks into utterly melting tenderness.
Rushing the braise is the culinary equivalent of putting the kettle on before checking if you have milk for your tea a classic mistake!
I'm cooking for a proper Sunday lunch crowd; can I get a head start and cook this Managed Melt the day before?
Absolutely, yes and making it ahead is highly recommended! Like a good wine or a classic British crime drama, this dish improves overnight as the flavours truly meld together.
Preparing it a day early also allows the fat to solidify on the top while chilling, making it effortless to skim off before reheating, resulting in a cleaner, richer, and more professional tasting sauce. It keeps brilliantly in the fridge for up to 3 days or frozen for up to 3 months.
Beef cheeks can be a bit tricky to find outside of a proper butcher. What other cuts would work just as well?
While beef cheeks offer that unique, high collagen richness essential for a truly sticky ragu, you can certainly substitute them with bone-in short ribs or good quality chuck/blade stewing beef. If you choose short ribs, they are generally fantastic but require careful trimming of excess fat and sinew.
Be prepared to potentially add 30 45 minutes to the cooking time for larger pieces, ensuring the meat passes the 'spoon test' before removing it from the oven.
I followed the time, but my beef is still a bit chewy what’s the trick to getting that melt-in-your mouth texture?
Don’t fret, you haven't failed; the beef simply needs more time! Toughness in braising means the connective tissue (collagen) hasn't completely broken down into gelatine yet. Return the Dutch oven to the lowest possible oven setting and let it continue its gentle simmer, checking every 30 minutes.
Remember, in low-and-slow cooking, the meat dictates the time, not the clock, so keep going until it falls apart easily when tested with a fork.
What's the quintessential side dish to soak up all that gorgeous red wine ragu?
For a truly magnificent pairing, you absolutely must serve this Managed Melt over a cloud of buttery, creamy mashed potatoes or soft Parmesan polenta they are the perfect, humble sponge for the rich, complex sauce.
We highly recommend adding a simple, vibrant side of steamed greens, like tenderstem broccoli or green beans, lightly seasoned with salt and lemon, to provide a crucial fresh lift that balances the overall richness beautifully.
Managed Melt Slowbraised Beef Cheeks With Rich R

