Spicy Red Pepper Pickles: Zesty and Crisp

- Time: 10 min active + 24 hours chilling
- Flavor/Texture Hook: Shatter crisp texture with a slow burn finish
- Perfect for: Summer BBQ platters or adding a zing to heavy sandwiches
- Spicy Red Pepper Pickles
- Why These Peppers Stay Crisp
- The Ingredient Breakdown
- Essential Kitchen Gear
- Simple Steps to Success
- Fixing Common Pickle Problems
- Troubleshooting Common Issues
- Customizing the Heat
- Adjusting the Batch Size
- Pickle Truths and Myths
- Keeping Them Fresh
- Best Ways to Serve
- Recipe FAQs
- 📝 Recipe Card
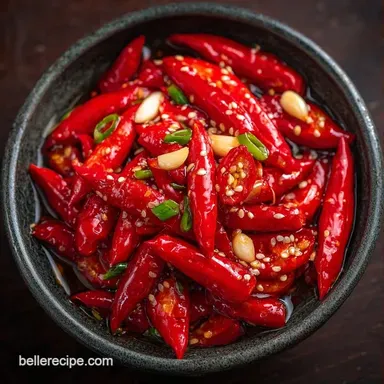
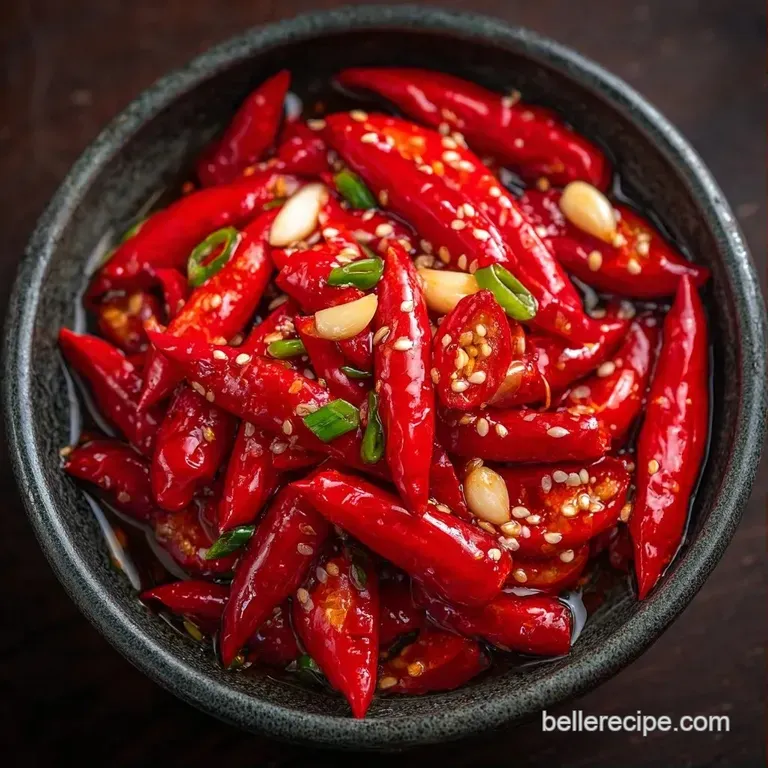
Spicy Red Pepper Pickles
The sharp, vinegary scent hits you the second you pop the seal on the jar, followed immediately by that aromatic punch of smashed garlic. I first started making these for those chaotic Sunday family dinners where the table is overflowing with greasy brisket and potato salad.
You need something bright to wake up your palate, and these peppers do exactly that. They aren't just a side; they're the thing that makes you want to keep eating.
The magic is in the contrast. You get the natural sweetness of the red bell peppers, the searing heat of the Thai chilies, and the sharp bite of the vinegar. It's a tightrope walk between sweet and spicy that feels authentic and bold.
When you bite into one, it doesn't just give way, it shatters, releasing a burst of brine that cleanses your tongue.
If you've only had the store-bought versions, you're missing out on the vibrancy. Homemade Spicy Red Pepper Pickles have a color that actually looks like a pepper, not a neon yellow dye. Plus, you control the heat. Whether you want a gentle tingle or a full blown fire, this recipe lets you call the shots.
Let's get into how to make them happen.
Why These Peppers Stay Crisp
- Osmotic Balance: The specific ratio of salt and sugar draws out excess water from the pepper cells without collapsing them, which keeps the structure firm.
- Thermal Shock: Pouring hot brine over cold peppers creates a quick seal on the exterior, locking in the internal crunch.
- Acid Concentration: The distilled white vinegar lowers the pH quickly, which stops the enzymes that normally soften vegetables over time.
- Air Displacement: Tapping the jars to remove bubbles prevents oxygen from touching the pepper surfaces, which slows down oxidation and texture loss.
| Feature | Fresh Homemade | store-bought Shortcut | Impact |
|---|---|---|---|
| Texture | Shatter crisp | Soft or rubbery | Much better mouthfeel |
| Flavor | Vibrant, layered heat | One dimensional vinegar | Complex aromatic profile |
| Color | Deep, natural red | Pale or neon | More appetizing look |
| Ingredients | Pure, no preservatives | Sodium benzoate/Dyes | Cleaner eating |
The Ingredient Breakdown
Understanding what each part does helps you tweak the recipe later. If you've ever made homemade garlic pickle brine, you'll notice this is similar but with a heavier sugar lean to balance the red pepper's profile.
| Ingredient | Science Role | Pro Secret |
|---|---|---|
| Distilled White Vinegar | Acidifier/Preservative | Use 5% acidity for consistent results |
| Pickling Salt | Texture stabilizer | Non iodized salt prevents cloudy brine |
| Thai Red Chilies | Capsaicin source | Split them lengthwise to release more oil |
| Granulated Sugar | Flavor balancer | Offsets the harshness of the white vinegar |
Essential Kitchen Gear
You don't need a professional lab, but a few specific tools make this easier. Two 16 oz Mason jars are the standard here. If you use plastic containers, the acid in the vinegar can sometimes leach flavors or react with the plastic over a 24 hour soak. Glass is the only way to go for a clean taste.
A small stainless steel saucepan is best for the brine. Avoid aluminum pots, as the vinegar is acidic and can react with the metal, leaving a metallic tang in your Spicy Red Pepper Pickles. A sharp chef's knife is also non negotiable. You want clean cuts on the bell peppers.
Ragged edges from a dull knife create more surface area for the brine to attack, which can lead to softer peppers.
Simple Steps to Success
Right then, let's get these jars packed. Trust me on the packing part, it's where most people mess up by leaving too much room.
- Distribute the smashed garlic, peppercorns, and mustard seeds evenly between the bottom of two 16 oz Mason jars. Note: This ensures the aromatics infuse the brine from the bottom up.
- Pack the sliced red bell peppers and split Thai chilies tightly into the jars, leaving about 1/2 inch of headspace at the top. Note: Tight packing prevents the peppers from floating.
- Combine the distilled white vinegar, filtered water, granulated sugar, and pickling salt in a small stainless steel saucepan.
- Bring the brine mixture to a simmer over medium heat, stirring occasionally until the sugar and salt have completely dissolved and the liquid is clear.
- Remove the brine from heat immediately to avoid over boiling. Note: Over boiling reduces the vinegar concentration.
- Carefully pour the hot brine over the peppers, ensuring every piece is fully submerged.
- Tap the jars gently on the counter to release trapped air bubbles and seal the lids tightly.
- Let the jars sit at room temperature until cool to the touch, then transfer to the refrigerator to chill for 24 hours.
Fixing Common Pickle Problems
If your peppers come out tasting like plain vinegar or feeling like wet cardboard, something went wrong in the process. Usually, it's a temperature or salt issue. According to Serious Eats, the concentration of salt is what primarily governs the "crunch" factor in quick pickles.
Troubleshooting Common Issues
| Issue | Solution |
|---|---|
| Why Your Peppers Are Mushy | This usually happens if the brine was boiling when it hit the peppers, effectively "cooking" them instead of pickling them. |
| Why Your Brine Is Cloudy | Cloudiness is almost always caused by using table salt instead of pickling salt. Table salt contains anti caking agents that don't dissolve and create a milky appearance. |
| Why There's No Heat | If your Spicy Red Pepper Pickles aren't kicking back, it's likely because the Thai chilies weren't split. The heat is concentrated in the seeds and inner membranes. |
Mistakes Checklist:
- ✓ Use filtered water to avoid chlorine taste.
- ✓ Split Thai chilies lengthwise for maximum heat.
- ✓ Use a stainless steel pot to prevent metallic off flavors.
- ✓ Wait a full 24 hours before tasting for the best flavor.
- ✓ Ensure peppers are completely submerged to prevent spoilage.
Customizing the Heat
Since this is a home kitchen, you don't have to stick to the script. If you want a smoky vibe, you can swap the red bell peppers for mini sweet peppers or even add a sliced chipotle in adobo.
For a "sweet heat" balance, increase the sugar by 2 tablespoons, which gives it a profile similar to some old-fashioned Spicy Red Pepper Pickles found in Southern delis.
If you're looking for a low sugar option, you can replace the granulated sugar with a monk fruit sweetener. Just be aware that the texture of the brine will be slightly thinner, and it won't have that same glossy sheen. For a different type of crunch, you could try adding sliced carrots or cauliflower to the mix.
This turns the recipe into a medley, though it may require an extra 12 hours of chilling to get the denser vegetables fully pickled.
If you love the garlic punch here, you might also like my garlic dill spears, which use a similar aromatic base but focus more on the herbaceous side of pickling.
Adjusting the Batch Size
Scaling pickles is generally straightforward, but you can't just multiply everything linearly if you're going huge.
Scaling Down (1/2 batch): Use one 16 oz jar. Keep the brine measurements exact, but you can reduce the garlic to 2 cloves. Since the volume is smaller, the brine will cool faster, so you can pour it in almost immediately.
Scaling Up (2x-4x batch): When doubling or tripling, don't double the salt and red pepper flakes exactly. Start with 1.5x the salt and spices, then taste the brine before pouring. Too much salt in large batches can become overwhelming.
Work in batches for packing the jars to ensure the peppers are packed tightly enough to stay submerged.
Baking Note: Since this is a cold set recipe, oven temperatures aren't a factor, but if you decide to water bath can these for long term shelf storage, remember to follow USDA guidelines for acidity to avoid botulism.
Pickle Truths and Myths
Myth: You must boil the jars to make refrigerator pickles. Truth: Boiling jars is for canning (shelf stable storage). For refrigerator pickles, clean jars are enough because the acidity and cold temperature do the heavy lifting.
Myth: More vinegar always means a longer shelf life. Truth: While acid preserves, too much vinegar destroys the cellular structure of the pepper, leaving you with a soggy mess. Balance is better than volume.
Myth: You can't use regular salt. Truth: You can, but your brine will be cloudy. It's a visual issue, not a safety one.
Keeping Them Fresh
These Spicy Red Pepper Pickles will stay vibrant and crisp in the fridge for about 3 to 4 weeks. Keep them in the coldest part of the refrigerator usually the back of the middle shelf and always use a clean fork to fish them out.
Introducing bacteria from a used fork will shorten their lifespan significantly.
Zero Waste Tip: Don't toss the brine! Once you've eaten all the peppers, you have a potent, spicy, vinegary liquid. Use it as a marinade for grilled chicken or whisk it into a vinaigrette for a kale salad.
If you have leftover pepper stems, toss them into a compost bin or freeze them to add to a homemade vegetable stock for an acidic kick.
Best Ways to Serve
The beauty of this recipe is how it acts as a foil to fatty foods. I love piling these on top of a smash burger with some creamy Big Mac sauce to create a contrast between the rich sauce and the sharp peppers.
For a snack board, pair them with sharp cheddar, salty salami, and some castelvetrano olives. The heat from the Thai chilies cuts through the creaminess of the cheese. They're also brilliant when chopped up and folded into a tuna salad or used as a topping for street tacos.
If you're feeling adventurous, try adding a few slices to a grilled cheese sandwich the acidity breaks up the heaviness of the melted butter and cheese.
Recipe FAQs
What are the best spicy peppers for pickles?
Red bell peppers paired with split Thai red chilies. This combination provides the ideal balance of sweet crunch and fiery heat.
How do you make hot pepper pickles?
Pack sliced red bell peppers and split Thai red chilies into jars with garlic and spices. Simmer a mixture of white vinegar, water, sugar, and pickling salt, then pour the hot brine over the peppers and refrigerate for 24 hours.
Do homemade vinegar pickles need to be refrigerated?
Yes, they must be kept in the fridge. After the jars cool to room temperature, refrigeration ensures the peppers stay crisp and safe to eat.
How to make spicy pickles without canning?
Fill jars with prepared peppers and pour over a hot simmered brine. Seal the lids tightly and let them chill in the refrigerator for 24 hours instead of using a water bath canner.
Why did my peppers turn out mushy?
The brine was likely boiling when it hit the peppers. Remove the brine from heat immediately after it simmers to avoid "cooking" the vegetables and losing their snap.
Is it true that any salt can be used for the brine?
No, this is a common misconception. Using table salt instead of pickling salt creates a cloudy brine because of the anti caking agents found in standard table salt.
What can I serve these spicy pickles with?
Use them as a bold topping for rich, savory sandwiches. These spicy rings provide a perfect acidic contrast to a Reuben sandwich.
Spicy Red Pepper Pickles