Golden Gratin of Canned Green Beans with Savoury Crumble Topping
- Salvaging the Humble Can: Why This Canned Green Beans Recipe Reigns Supreme
- Elevating the Pantry Staple to Comfort Food Glory
- Assembling the Components for a Superior Canned Green Beans Recipe
- Step-by-Step Construction of Your Golden Gratin
- Mastering the Baking Process for Perfect Results
- Transforming Leftovers and Maximizing Flavor Potential
- Recipe FAQs
- 📝 Recipe Card
Salvaging the Humble Can: Why This Canned Green Beans Recipe Reigns Supreme
It’s time to put an end to the culinary exile of the humble canned green bean. For too long, these pantry staples have been associated with sad, watery side dishes served alongside weeknight dinners a far cry from their fresh counterparts.
However, with the right technique and a little creative spirit, we can transform those inexpensive, always available beans into the star of the show. This Canned Green Beans Recipe isn't about masking the ingredient; it’s about celebrating its convenience while elevating its flavour profile beyond the mundane.
We are turning necessity into genuine comfort food glory, proving that deliciousness doesn't require a farmer’s market haul.
Elevating the Pantry Staple to Comfort Food Glory
Our approach focuses on texture and deep, savoury flavour, transforming the soft texture of the canned bean into a satisfying bite enveloped in richness. This specific iteration, the Golden Gratin of Canned Green Beans with Savoury Crumble Topping, is designed to be an Easy Canned Green Beans Side Dish that punches well above its weight class.
It bridges the gap between quick weeknight fare and a dish worthy of a holiday table.
The Secret to Banishing That Metallic Aftertaste
The primary hurdle when using preserved vegetables is often that lingering, dull metallic note. The key to overcoming this in any Canned Green Beans Recipe Easy method lies in thorough rinsing.
After draining the liquid from two standard 15-ounce cans of green beans, they must be rinsed vigorously under cold running water. This simple step washes away residual preservatives and salt, immediately freshening the profile and setting the stage for deeper seasoning later on.
Introducing Your New Go-To Savoury Bake
We are crafting a rich, savoury bake that relies on a velvety cheese sauce and a superior crunch for textural contrast. This method moves far beyond simple butter and pepper; we introduce sharp, aged cheddar and a touch of Dijon mustard to provide necessary tanginess that cuts through the richness.
This contrast is what elevates the dish, making it feel luxurious rather than heavy.
A Nod to Classic Supper Comforts
While this recipe is inherently American in its "casserole" structure, it evokes a deep sense of Comfort Food Canned Green Beans . It’s reminiscent of hearty, traditional supper dishes where simple ingredients were maximized for flavour.
If you’re looking for variations rooted in Southern tradition, you might look towards a classic Southern Canned Green Beans Recipe involving smoked ham hocks, but this cheesy gratin offers a faster, universally appealing alternative, sometimes even incorporating Canned Green Beans with Bacon bits into the topping for extra depth.
Assembling the Components for a Superior Canned Green Beans Recipe

To achieve the complexity required for the Best Canned Green Bean Recipe , we need three main structural elements: the well prepared beans, the luscious sauce, and the textural topping.
Preparation for this Canned Green Beans Stovetop Recipe component is straightforward, requiring about 15 minutes of focused prep work before assembly.
Essential Kitchen Gear for Effortless Assembly
While the assembly itself is simple, having the right tools makes the process seamless. You’ll need a medium saucepan for creating the base sauce a critical step and a large skillet for toasting the topping components separately.
For the actual baking, an 8x8 inch (20x20 cm) square baking dish is perfect for yielding six generous side servings.
The Creamy Base: Dairy and Flavor Agents Required
The heart of this dish is the quick béchamel that turns into a Mornay sauce upon the addition of cheese. Begin by melting 3 tablespoons of unsalted butter in your saucepan. Whisk in an equal amount of all-purpose flour to create a smooth roux, cooking it for just one minute to eliminate any raw flour taste.
Then, gradually whisk in 1 ½ cups of whole milk (warmed slightly is ideal to prevent lumps). Once thickened enough to coat the back of a spoon, remove it from the heat. This is the perfect moment to incorporate 1 cup of sharply grated cheddar cheese, a teaspoon of Dijon mustard for acidity, a small pinch of nutmeg to enhance the dairy notes, and a scant ¼ teaspoon of white pepper.
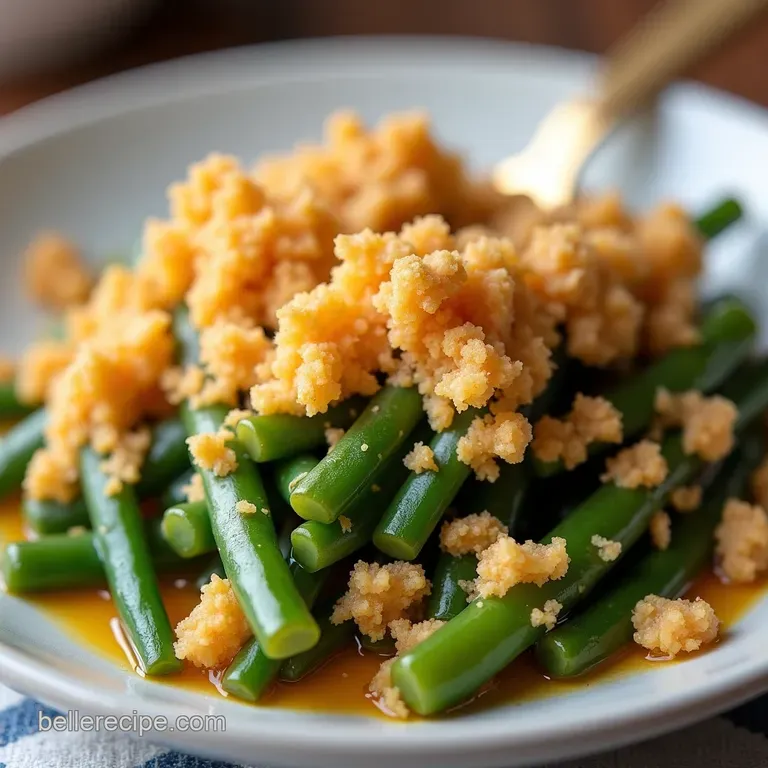
Achieving Maximum Crunch: Shallots and Crumble Mix Details
Texture is paramount, which is why we avoid soggy breadcrumbs. For the topping, thinly slice two medium shallots and sauté them in 1 tablespoon of olive oil or butter until they are deeply golden brown and undeniably crisp. Remove these with a slotted spoon to drain on paper towels.
In the same skillet, toast ½ cup of Panko breadcrumbs until golden. Combine these toasted Panko crumbs with about half of your crispy shallots. This mixture, when scattered over the top, ensures a glorious, audible crunch when serving.
Quantities and Conversions: US Customary Versus Metric Layouts
When preparing this dish, precision ensures the sauce-to-bean ratio is perfect. The recipe calls for roughly 850 grams of drained beans in total from your two cans. If you are working with metric measurements, ensure your cheese is weighed accurately about 100 grams of grated sharp cheddar is needed for the sauce, plus a little extra for the very top layer before the crumble goes on.
Related Recipes Worth Trying
- The Best Grilled Corn on the Cob Recipe Smoky Sweet — Master the perfect grilled corn on the cob by grilling it in the husk This easy method locks in moisture for tender smoky kernels Get the secret soak time now
- The Ultimate ButterBasted Rib Cap Steak Recipe — Cook the Rib Cap Steak Spinalis Dorsi like a steakhouse pro Learn how to cook Rib Cap Steak using a simple highheat sear and aromatic baste for max flavour
- Authentic Smoky Chicken Sausage Jambalaya Recipe — Nail that classic Louisiana flavour with this simple smoky Jambalaya recipe Perfect rice texture guaranteed in one potits comfort food central
Step-by-step Construction of Your Golden Gratin
With all elements prepped, construction is about careful layering. First, preheat your oven to a moderate 375° F ( 190° C). After the beans have been thoroughly rinsed, gently fold them directly into the warm cheese sauce in the saucepan.
The goal is to coat every bean without breaking them up. Pour this saucy mixture evenly into your prepared baking dish.
Mastering the Baking Process for Perfect Results
The baking phase is where all the flavour components marry under heat, developing the deep golden colour and bubbling texture that defines this Canned Green Beans Recipe Ideas highlight.
Pre-Bake Preparation: Draining and Tossing the Beans
As mentioned, the draining and rinsing of the beans are crucial initial steps. Once coated in the sauce, they are ready for the dish. Remember, since the beans are already cooked, we are merely heating them through and allowing them to absorb the surrounding sauce flavours during the bake time.
Building the Velvety Sauce Layer
Before applying the topping, add a light dusting of your reserved extra cheese directly over the sauced beans in the dish. This acts as a crucial adhesive layer, locking the sauce base down before the textural element is added.
The Final Ascent: Applying the Crispy Topping
Generously blanket the cheese layer with your prepared mixture of toasted Panko and crispy shallots. This topping shields the sauce from drying out too quickly and guarantees that beautiful textural counterpoint needed for a genuinely satisfying bake.
Oven Temperatures and Timing for the Ideal Bake
Bake the gratin for 25 to 30 minutes. You are looking for clear visual cues: the edges of the sauce should be vigorously bubbling, and the topping should have achieved a deep, inviting golden brown hue.
Allowing it to rest for five minutes after removing it from the oven helps the sauce settle slightly, making serving much tidier.
Transforming Leftovers and Maximizing Flavor Potential
While undeniably best straight from the oven, this rich bake holds up surprisingly well. It is a fantastic dish for meal prepping, ensuring that future quick dinners are covered.
Flavor Twists: Exciting Variations Beyond the Standard Recipe
If you wish to explore further Canned Green Beans Recipe Ideas , consider adding smoked paprika or a dash of Worcestershire sauce to the cheese base for a deeper umami hit.
For a bit of heat, a finely minced jalapeño sautéed with the shallots can introduce a subtle warmth without overwhelming the creamy flavour.
Optimal Storage and Reheating Guidelines
Store leftovers tightly covered in the refrigerator for up to three days. Reheating is best done in a moderate oven ( 325° F or 160° C) for about 15 minutes, or covered loosely with foil in the microwave, ensuring you heat slowly to prevent the sauce from separating.
Understanding the Macronutrient Breakdown
While certainly rich, this bake balances protein from the dairy with carbohydrates from the flour and topping. Each serving offers a satisfying profile, though sodium levels need monitoring since canned goods inherently carry high salt content always taste the sauce before adding extra salt.
What Readers Are Saying About This Transformation
This recipe consistently earns praise for completely redefining what people expect from canned vegetables. Many note that even picky eaters, usually resistant to anything involving a can opener, devour this dish, calling it the definitive Comfort Food Canned Green Beans experience they never knew they needed.
It's a guaranteed crowd pleaser that proves even the most humble ingredients can shine with just a little expert guidance.
Recipe FAQs
What’s the secret to making this Canned Green Beans Recipe taste better than the bland ones I remember from school dinners?
The real game changer is twofold: first, you must drain and rinse those beans thoroughly to banish any tinny flavour don't skip that step! Second, we’re introducing a rich, homemade cheese sauce and a seriously crunchy topping made with crispy shallots and Panko.
That combination immediately elevates them from sad side dish to something truly spectacular.
Can I use fresh or frozen green beans instead of canned for this bake?
Absolutely, you can! If using fresh, blanch them in boiling water for about 3 minutes first, then shock them in ice water before folding them into the cheese sauce. Frozen beans should be cooked until just tender before adding.
Just remember that canned beans are already fully cooked, so the baking time mainly serves to heat everything through and crisp the topping.
My cheese sauce is lumpy! How do I get a silky smooth béchamel for the casserole?
Ah, the dreaded lump monster! This usually happens when cold milk hits the hot flour/butter mixture (the roux). Always ensure your milk is warmed slightly before adding it gradually while whisking vigorously.
If you’ve already got lumps, take the pan off the heat, grab a stick blender, and give it a quick blitz it works like magic to smooth things right out!
How far ahead of time can I prepare this Green Bean Bake?
This is brilliant for prep ahead, especially if you're hosting a Sunday lunch. You can assemble the entire casserole, topping and all, cover it tightly, and refrigerate it for up to 24 hours. Just add an extra 10 15 minutes onto the baking time to ensure it heats through properly from a cold start.
Is this dish generally healthy, or is it leaning more towards comfort food territory?
Let’s be honest, with a cheese sauce and buttery crumble, this is squarely in the comfort food camp it’s rich, indulgent, and perfect for a chilly evening! It does offer some fibre and nutrients from the beans, but it’s best viewed as a luxurious treat rather than an everyday healthy staple.
If you need to lighten it, use half and-half instead of whole milk in the sauce.
Green Bean Cheese Bake